
Manual

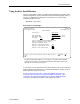
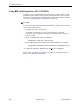
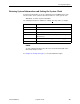
Table Of Contents
- Contents
- About This Guide
- 1. About the FrameSaver SLV
- 2. User Interface and Basic Operation
- 3. Configuration Procedures
- 4. Configuration Options
- Using the Easy Install Feature
- Using RIP with FrameSaver SLV CSU/DSUs
- Entering System Information and Setting the System Clock
- Setting Up the Modem
- Setting Up Auto-Configuration
- Setting Up Dial Backup
- PVC Backup Over the Network Interface
- Setting Up Back-to-Back Operation
- Configuration Option Tables
- Configuring the Overall System
- Configuring Physical Interfaces
- Assigning Time Slots/Cross Connections
- Configuring Frame Relay for an Interface
- Manually Configuring DLCI Records
- Configuring PVC Connections
- Configuring the IP Path List
- Setting Up Management and Communication Options
- Configuring the Criteria for Automatic Backup
- 5. Configuring the FrameSaver SLV Router
- FrameSaver SLV Router Overview
- IP Routing
- Address Resolution Protocol
- Proxy ARP
- Interface Configuration
- Network Address Translation
- Network Address Port Translation
- Dynamic Host Configuration Protocol Server
- DHCP Relay Agent
- Router Security
- Provisioning the Router Interface
- Configuring the Router Using Terminal Emulation
- 6. Security and Logins
- 7. Operation and Maintenance
- 8. Troubleshooting
- 9. Setting Up OpenLane for FrameSaver Devices and Activating SLM Features
- 10. Setting Up NetScout Manager Plus for FrameSaver Devices
- 11. Setting Up Network Health for FrameSaver Devices
- A. Menu Hierarchy
- B. SNMP MIBs and Traps, and RMON Alarm Defaults
- C. Router CLI Commands, Codes, and Designations
- D. Router Command Line Summaries and Shortcuts
- E. Connectors, Cables, and Pin Assignments
- F. Technical Specifications
- G. Equipment List
- Index

3. Configuration Procedures
3-6
September 2002 9128-A2-GB20-80
Saving Configuration Options
When changes to the configuration options are complete, use the Save function
key to save your changes to either the Current, Customer, or Scratchpad
configuration areas.
NOTE:
When changing settings, you must Save for changes to take effect.
Procedure
To save the configuration option changes:
1. Press Ctrl-a to switch to the function key area at the bottom of the screen.
2. Type
s
or
S
to select the S
ave function and press Enter.
The
Save Configuration To:
screen appears.
NOTE:
If you try to exit the Configuration menu without saving changes, a Save
Configuration screen appears requiring a Yes or No response.
— If you select N
o, the Main Menu screen reappears and the changes
are not saved.
— If you select Y
es, the
Save Configuration To:
screen appears.
3. Select the configuration option area to which you want to save your changes
(normally the Current Configuration) and press Enter.
When Save is complete,
Command Complete
appears in the message area
at the bottom of the screen.
NOTE:
There are other methods of changing configurations, like SNMP and
Auto-Configuration. Since multiple sessions can be active at the same
time, the last change made overwrites any previous or current changes
being made. For instance:
— Saving your configuration changes would cause configuration
changes made via another method to be lost.
— If you are making changes and someone else makes changes and
saves them, your changes would be lost.