
User's Manual
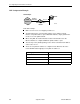
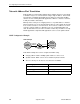

Table Of Contents
- Contents
- About This Guide
- 1. About the FrameSaver SLV
- 2. User Interface and Basic Operation
- 3. Configuration Procedures
- 4. Configuration Options
- Using the Easy Install Feature
- Using RIP with FrameSaver SLV CSU/DSUs
- Entering System Information and Setting the System Clock
- Setting Up the Modem
- Setting Up Auto-Configuration
- Setting Up Dial Backup
- PVC Backup Over the Network Interface
- Setting Up Back-to-Back Operation
- Configuration Option Tables
- Configuring the Overall System
- Configuring Physical Interfaces
- Assigning Time Slots/Cross Connections
- Configuring Frame Relay for an Interface
- Manually Configuring DLCI Records
- Configuring PVC Connections
- Configuring the IP Path List
- Setting Up Management and Communication Options
- Configuring the Criteria for Automatic Backup
- 5. Configuring the FrameSaver SLV Router
- FrameSaver SLV Router Overview
- IP Routing
- Address Resolution Protocol
- Proxy ARP
- Interface Configuration
- Network Address Translation
- Network Address Port Translation
- Dynamic Host Configuration Protocol Server
- DHCP Relay Agent
- Router Security
- Provisioning the Router Interface
- Configuring the Router Using Terminal Emulation
- 6. Security and Logins
- 7. Operation and Maintenance
- 8. Troubleshooting
- 9. Setting Up OpenLane for FrameSaver Devices and Activating SLM Features
- 10. Setting Up NetScout Manager Plus for FrameSaver Devices
- 11. Setting Up Network Health for FrameSaver Devices
- A. Menu Hierarchy
- B. SNMP MIBs and Traps, and RMON Alarm Defaults
- C. Router CLI Commands, Codes, and Designations
- D. Router Command Line Summaries and Shortcuts
- E. Connectors, Cables, and Pin Assignments
- F. Technical Specifications
- G. Equipment List
- Index

5. Configuring the FrameSaver SLV Router
5-2
September 2002 9128-A2-GB20-80
FrameSaver SLV Router Overview
The FrameSaver SLV Router supports locally attached hosts or subnets and
various customer premises distribution networks that contain IP forwarding
devices or routers. The router is shipped as an 802.1d bridge, and it can be
configured to simultaneously support IP routing and bridging of all non-IP
protocols. The router maintains two routing tables to keep customer data and
management data separate.
The router supports Internet Protocol (IP), specified in RFC 791, and Internet
Control Message Protocol (ICMP), as specified in RFCs 792 and 950 (with
exceptions). It acts as a router or gateway as defined in RFC 791.
The router has two interfaces:
Network Interface
Frame relay packets are transported over the T1 line using this interface.
Ethernet
This is a 10/100BaseT interface that automatically negotiates the rate. If all
attached Ethernet devices support 100BaseT, the router defaults to 100BaseT.
Otherwise, the router operates at 10BaseT. The interface has a unique MAC
address.
— In router mode, the router accepts on the Ethernet interface only those
frames with its own MAC address or a broadcast or multicast MAC
address.
— In bridge mode, the router accepts all frames and forwards only ones for
which the destination MAC address does not match an entry in the bridge
table. This is the default setting.
NOTES:
— The configuration examples included in this chapter cover some common
configurations, providing only a few of the possible scenarios.
— IP addresses used in the examples are for illustrative purposes only; they
are not intended to be used when configuring your local network.
— Command syntax will vary based on your network setup.
— Configuration commands require an access level of Administrator-Config,
and changes need to be saved when being configured to take effect.
For additional information, refer to:
Appendix B,
SNMP MIBs and Traps, and RMON Alarm Defaults
, for details on
the supported MIBs and RFCs.
Appendix C,
Router CLI Commands, Codes, and Designations,
for specific
commands and complete syntax.
Appendix D,
Router Command Line Summaries and Shortcuts
, for specific
command default settings and abbreviated command line syntax.