
User's Manual
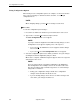

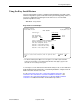
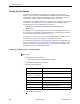
Table Of Contents
- Contents
- About This Guide
- 1. About the FrameSaver SLV
- 2. User Interface and Basic Operation
- 3. Configuration Procedures
- 4. Configuration Options
- Using the Easy Install Feature
- Using RIP with FrameSaver SLV CSU/DSUs
- Entering System Information and Setting the System Clock
- Setting Up the Modem
- Setting Up Auto-Configuration
- Setting Up Dial Backup
- PVC Backup Over the Network Interface
- Setting Up Back-to-Back Operation
- Configuration Option Tables
- Configuring the Overall System
- Configuring Physical Interfaces
- Assigning Time Slots/Cross Connections
- Configuring Frame Relay for an Interface
- Manually Configuring DLCI Records
- Configuring PVC Connections
- Configuring the IP Path List
- Setting Up Management and Communication Options
- Configuring the Criteria for Automatic Backup
- 5. Configuring the FrameSaver SLV Router
- FrameSaver SLV Router Overview
- IP Routing
- Address Resolution Protocol
- Proxy ARP
- Interface Configuration
- Network Address Translation
- Network Address Port Translation
- Dynamic Host Configuration Protocol Server
- DHCP Relay Agent
- Router Security
- Provisioning the Router Interface
- Configuring the Router Using Terminal Emulation
- 6. Security and Logins
- 7. Operation and Maintenance
- 8. Troubleshooting
- 9. Setting Up OpenLane for FrameSaver Devices and Activating SLM Features
- 10. Setting Up NetScout Manager Plus for FrameSaver Devices
- 11. Setting Up Network Health for FrameSaver Devices
- A. Menu Hierarchy
- B. SNMP MIBs and Traps, and RMON Alarm Defaults
- C. Router CLI Commands, Codes, and Designations
- D. Router Command Line Summaries and Shortcuts
- E. Connectors, Cables, and Pin Assignments
- F. Technical Specifications
- G. Equipment List
- Index

4. Configuration Options
9128-A2-GB20-80 September 2002
4-3
Using the Easy Install Feature
The Easy Install feature provides a straight-forward installation menu that requires
minimal configuration to get the FrameSaver unit up and running quickly, and to set
up remote configuration and management via Telnet access from the NOC
(Network Operations Center).
Main Menu
→
Easy Install
Easy Install Screen Example*
* The Ethernet Management Options Screen applies to the 9126-II (both CSU/DSU
and Router) and 9128-II. For the Model 9126, DS0 Base Rate (Kbps) appears after
the Network 1 Line Coding Format option.
To remotely access the FrameSaver unit in Frame Relay mode, use the Dedicated
Network Management Link that was created during installation, using the Node IP
Address that was entered for the unit.
See the
FrameSaver SLV 9126-II 1-Slot Unit Installation Instructions
, the
FrameSaver SLV 9128/9128-II 1-Slot Unit Installation Instructions
, or the
FrameSaver SLV 9128/9128-II Network Access Module (NAM) Installation
Instructions
for additional information and installation procedures.
main/easy_install 9128-II
Device Name: Node A 08/23/2002 11:04
EASY INSTALL
Service Type: Frame Relay
Node IP Address: 000.000.000.000 Clear
Node Subnet Mask: 000.000.000.000
Clear
TS Access: DLCI
980
Create a Dedicated Network Management Link
Ethernet Management Options Screen
Time Slot Assignment Screen
Network 1 Line Framing Format: ESF
Network 1 Line Build Out (LBO): 0.0
Network 1 Line Coding Format: B8ZS
--------------------------------------------------------------------------------
Ctrl-a to access these functions, ESC for previous menu MainMenu Exit
S
ave