Getting Started With Parallels Desktop® 7 Switch to Mac Edition™ Copyright © 1999-2011 Parallels Holdings, Ltd. and its affiliates. All rights reserved.
Parallels Holdings, Ltd. c/o Parallels International GMbH. Parallels International GmbH Vordergasse 49 CH8200 Schaffhausen Switzerland Tel: + 41 526320 411 Fax: + 41 52672 2010 www.parallels.com Copyright © 1999-2011 Parallels Holdings, Ltd. and its affiliates. All rights reserved. This product is protected by United States and international copyright laws. The product’s underlying technology, patents, and trademarks are listed at http://www.parallels.com/trademarks.
Contents Welcome to Parallels Desktop..................................................................................4 What You Can Do ............................................................................................................. 5 Get Started ....................................................................................................................... 5 Install or Upgrade Parallels Desktop ........................................................................6 What You Need ...
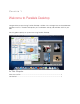
CHAPTER 1 Welcome to Parallels Desktop Congratulations on purchasing Parallels Desktop 7 for Mac. You no longer have to choose between the Mac or the PC―Parallels Desktop lets you use Windows side-by-side with Mac OS X on your Mac. Use this guide to quickly set up and start using Parallels Desktop. In This Chapter What You Can Do .................................................................................................... 5 Get Started ...............................................................
Welcome to Parallels Desktop What You Can Do With Parallels Desktop, you can: • Open Windows programs side-by-side with your Mac OS X applications, without having to restart • Copy and paste text and drag and drop objects between Mac applications and Windows programs • Run Windows games and other 3D programs • Transfer all your data from a PC and use it on your Mac • Purchase, download, and install a new copy of Windows directly from Parallels Desktop • Easily share files, devices, and other res
CHAPTER 2 Install or Upgrade Parallels Desktop Follow the instructions in this section to install or upgrade Parallels Desktop. Note: You can either purchase a boxed version of Parallels Desktop 7 or download it from the the Parallels website. In This Chapter What You Need ........................................................................................................ 7 Install Parallels Desktop ............................................................................................
Install or Upgrade Parallels Desktop What You Need To install and use Parallels Desktop 7 for Mac, you need: • A Mac computer with: • An Intel Core 2 Duo processor or better • At least 2GB of RAM (4GB recommended to run Windows 7) Note: Your Mac must have enough RAM memory to use Mac OS X and its applications plus the memory required for each additional operating system (and its programs) that you want to use simultaneously. • At least 1.
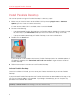
Install or Upgrade Parallels Desktop Install Parallels Desktop You can be up and running with Parallels Desktop in a few easy steps: 1 Make sure you have the latest version of Mac OS X by choosing Apple menu > Software Update (you must have an Internet connection). If a later version of Mac OS X is available, select it and click Install.
Install or Upgrade Parallels Desktop If You Don't Have A Product Activation Key If you don't have a key already, you can get one by choosing Parallels Desktop > Activate Product. Then, to get a free trial Product Activation Key so you can try out Parallels Desktop for a limited time, click Get Trial. Or to purchase a key that lets you use Parallels Desktop permanently, click Buy. Register Parallels Desktop After activation, you're presented with the opportunity to register Parallels Desktop.
Install or Upgrade Parallels Desktop Upgrade Parallels Desktop If you already have Parallels Desktop 5 or 6 follow these steps to upgrade to Parallels Desktop 7. 1 If you haven't already done so, purchase and download a "Parallels Desktop 7 for Mac Upgrade," available from the Parallels Online Store at www.parallels.com/buyonline. A Product Activation Key is sent to the email address you provide. 2 If Parallels Desktop is open, quit Parallels Desktop.
CHAPTER 3 Install or Import Windows Follow the instructions in this section to get Windows up and running on your Mac. There are a few ways to set up Windows: • Import your data from a Windows PC (p. 11) • Download, and install Windows (p. 21) (US and Canada only) • Install Windows from a Windows installation disc (p. 23) • Use Windows that you already have installed from a Boot Camp partition (p.
Install or Import Windows Requirements for Importing Your Data To import your data to your Mac, you need a Windows computer with: • Windows XP with Service Pack 2 or later, Windows Vista, or Windows 7. Note: You can also use a computer running Windows Server 2008 R2 (64-bit only), Windows Server 2008, or Windows 2000 Professional (32-bit only).
Install or Import Windows Using a Parallels USB Cable Important: After importing your data from your PC, you may need to reactivate some of your Windows programs using the activation keys you received when you purchased the programs. The Parallels USB cable required for this method is included with Parallels Desktop Switch to Mac Edition. If you don't have the Parallels USB cable, import your data using one of the other methods.
Install or Import Windows 5 On your Mac, open Parallels Desktop and choose File > New. 6 Select Migrate from a PC and click Continue. 7 Select Parallels USB cable and click Continue. Parallels Transporter starts collecting the information about the source computer. 8 If the Windows Installation Files window appears, insert the Windows installation disc into your Mac and click Continue.
Install or Import Windows 12 Choose where you want to install your data. You can also click Customize and select which Windows volumes to migrate. When ready, click Continue. 13 In the next step there's a warning about Windows activation that might be required when you start using it. To proceed, read this message, select I want to continue and click Continue. 14 Once the migration is complete, click Done. 15 Start Windows.
Install or Import Windows Over a Network Important: After importing your data, you may need to reactivate some of your Windows programs using the activation keys you received when you purchased the programs. To import your data from a PC over a network: 1 Turn on your Mac and your Windows PC and log in. Make sure that the computers are connected over the same network. 2 Make sure that Windows Firewall is turned off. You can turn it on again after the import is finished.
Install or Import Windows 7 Find the passcode displayed in Parallels Wizard on your Mac and enter it in Parallels Transporter Agent on your Windows PC. You can also connect to the source Windows PC using its name or IP address. To do so, click Use IP address instead, select the Windows PC name from the list or type the IP address, and click Continue. 8 If you have chosen to use the computer name or IP address, provide the Windows administrator credentials.
Install or Import Windows 13 Choose where you want to install your data. You can also click Customize and select which Windows volumes to migrate. When ready, click Continue. 14 In the next step there's a warning about Windows activation that might be required when you start using it. To proceed, read this message, select I want to continue and click Continue. 15 Once the migration is complete, click Done. 16 Start Windows.
Install or Import Windows Using an External Storage Device Important: After importing your data, you may need to reactivate some of your Windows programs using the activation keys you received when you purchased the programs. To import your data from a PC using an external storage device: 1 Connect an external storage device to your Windows PC. 2 On the Windows PC, open Parallels Transporter Agent by clicking the Start menu and choosing All Programs > Parallels > Parallels Transporter Agent.
Install or Import Windows 9 Once the migration is complete, click Done to quit Parallels Transporter Agent. 10 Disconnect the storage device from the Windows PC and connect it to your Mac. 11 On your Mac, open Parallels Desktop and choose File > New. 12 Select Migrate from a PC and click Continue. 13 Select External Storage Device and click Continue. 14 Click Choose and locate where you chose to store your data in step 7. Then click Continue.
Install or Import Windows Download and Install Windows If this is your first time using Parallels Desktop and you don't have a copy of Windows, you can purchase, download, and install Windows directly from Parallels Desktop. Your Mac must be connected to the Internet. Note: Purchasing and downloading Windows over the Internet is available only in the United States and Canada. To purchase, download, and install Windows: 1 Open Parallels Desktop (in the Applications folder) and choose File > New.
Install or Import Windows 9 Click Create. Once the download starts, you can pause it anytime by clicking Pause. To resume the download, click Resume. Once the download is complete, the installation of Windows starts automatically. The Parallels Wizard finishes the installation of Windows. You should expect this operation to take an hour or more, and your virtual machine may restart several times during this operation.
Install or Import Windows Install Windows from an Installation Disc If you have a Windows installation DVD and a valid Windows product key, you can install Windows from the disc and use it with Parallels Desktop. To install Windows: 1 Open Parallels Desktop (in the Applications folder) and choose File > New. 2 Insert the Windows installation disc. 3 Click Install Windows from DVD or image file. 4 Select the Windows installation disc from the Install from menu.
Install or Import Windows Use Boot Camp with Parallels Desktop Boot Camp is a feature of Mac OS X that lets you start your Mac up in Windows.
Install or Import Windows Import from an Earlier Parallels Desktop or Other Virtualization Application With Parallels Desktop 7 for Mac you can use Windows that you set up using earlier versions of Parallels Desktop, as well as VMware Fusion, Microsoft Virtual PC, and Virtualbox: 1 Open Parallels Desktop (in the Applications folder) and choose File > Open. 2 Select the Windows data file you want to import, then click Open. • Parallels Desktop data files end with .pvm. • VMware files end with .vmx.
CHAPTER 4 Use Windows Read this section to learn the basics of using Windows alongside Mac OS X. In This Chapter Open a Windows Program ....................................................................................... 27 Install Windows Programs ........................................................................................
Use Windows Open a Windows Program Opening a Windows program is as easy as opening a Mac application. Here are several ways to open Windows programs: • From the Windows Applications folder in the Dock • From the Windows Start menu • From the Mac OS X Finder • From the Dock • Using Spotlight searching • Using Launchpad (if you are using Mac OS X Lion) Note: All Windows program icons can be easily identified by the Parallels Desktop symbol lower-right corner of the icon.
Use Windows To open a Windows program using the Windows Applications folder: • Click the folder, and then choose a program. To add the Windows applications folder to the Dock: 1 Do one of the following: • Option-click (Alt-click) the Parallels icon in the menu bar and choose Configure. • If the Parallels Desktop menu bar is visible at the top of the screen, choose Virtual Machine > Configure. 2 Click Options and then click Applications.
Use Windows Note: You can also Command-click or Right-click the Parallels icon. 2 Click the program you want. Mac OS X Finder You can also open a program by double-clicking its icon in the Finder. To find Windows programs in the Finder: • Double-click the Windows volume on the desktop, and then open the Program Files folder. Note: To show the Windows volume on the desktop, the Mac OS X Finder must be enabled to show connected servers.
Use Windows Spotlight You can search for and open Windows programs using Spotlight: • Click the Spotlight icon in the upper-right corner of your screen, or press Command-Space bar on your keyboard. Then type the name of the program and select it from the list. Launchpad If you're using Mac OS X Lion, you can see a full screen display of all your Windows programs and Mac applications using Launchpad. Just click the Launchpad icon (looks like a rocket) in the Dock.
Use Windows Install Windows Programs You install Windows programs on your Mac just as you would on a Windows PC. The two most common ways of installing programs are: • Using a software installation CD or DVD • Downloading the program or installation file from the Internet or a network Install a Program from a CD or DVD Installation Disc 1 Open any Windows program to start Windows. 2 Insert the installation disc. 3 In most cases, an AutoPlay dialog opens.
CHAPTER 5 Learning More, Support, and Feedback For detailed instructions on how to use all the features of Parallels Desktop for Mac, see the Parallels Desktop User's Guide, available online. To download the Parallels Desktop User's Guide: 1 In Parallels Desktop, choose Help > Online Documentation (you must be connected to the Internet). A web page opens with access to all of the Parallels Desktop manuals. 2 Click the PDF link next to Parallels Desktop User's Guide.
Learning More, Support, and Feedback More Resources For more information and help using Parallels Desktop, see the following resources: • Parallels Desktop Help: For detailed instructions on using all of the features of Parallels Desktop, open Parallels Desktop and choose Help > Parallels Desktop Help or click the Parallels icon in the menu bar and choose Parallels Desktop Help. • Parallels support website: The Parallels support website (http://www.parallels.