
Owner's Manual


9
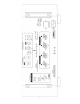
Rear Panel Controls & Audio Connections
Always disconnect the AC cord to your JC 1+ before making or changing any input, output or trigger
wire connections. Inserting or removing an input or output cable while the JC 1+ is turned on can result in a
blast of sound that can damage your loudspeakers. Make sure there is no strain or tension on any cables
that could cause them to pull loose.
Bias Level Switch
The Bias Level switch offers two bias settings for the output transistors. In its Normal (up) switch position, bias
idle current is higher to perfectly match the characteristics of the JC 1+’s output devices. In its Low (down)
position, bias idle current and class A operation are lowered to reduce heat output and power consumption.
With its Bias Level switch set to Normal, the JC 1+ will run very warm and consume more AC power even
when it is idling or playing music at low listening levels. If your JC 1+ is well ventilated, you may find the
Normal bias setting offers a sonic improvement. If your JC 1+ is mounted in a cabinet, or ventilation is
restricted in any way, we recommend you leave the Bias Level switch in the Low position.
Examples of when to use the Low Bias setting:
The JC 1+ in getting too hot (if you can’t keep your hand on the heatsink for at least 5
seconds it is too hot)
The JC 1+ is installed in a cabinet
The JC 1+ is installed in a rack without forced air ventilation
Anything is placed on top of the JC 1+
You wish to reduce the energy consumption
Your room temperature is above 82
◦
F (28
◦
C)
Gain Switch
The Gain switch has two positions Low (23dB) and Normal (29dB). This switch would typically be left in the
Normal position. If you have very high sensitivity speakers or your preamp already has very high gain then
you should use the Low setting.
Examples of when to use the Low (23dB) Gain setting:
You have very high sensitivity speakers (typically above 96dB sensitivity)
The volume control on your preamp ramps up too fast
You can hear some background hiss in your speakers