
Owner's Manual


10
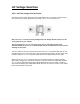
Audio Output Connections
The JC 3 Jr. Output jacks connect to the line level input jacks on your line level preamplifier or
integrated amplifier. Each channel has one balanced XLR jack and one unbalanced RCA output
jack. If your line stage preamplifier or integrated amp is equipped with balanced XLR inputs we
recommend using the JC 3 Jr. Balanced XLR output jacks for the maximum rejection of external
noise sources. The balanced and unbalanced jacks are active simultaneously.
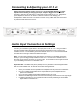
Auto Turn On Option
Turn On Options switch
This switch enables you to choose whether your JC 3 Jr. is turned on and off manually or
automatically, provided your preamp/line stage or integrated amp is equipped with a 12V
trigger output jack.
Note: Setting the Turn On Options switch to 12V disables the JC 3 Jr.’s front panel On-Off
button.
12 V In Jack for Auto Turn On
When the JC 3 Jr. Turn On Options switch is set to 12 V the JC 3 Jr. will turn On and Off
automatically with your preamplifier. The 12
V input is a 3.5mm (1/8”) mono mini jack. To
trigger the JC 3 Jr. on and off automatically, insert the trigger wire plug into this jack and plug
the other end into your preamplifier or integrated amp’s 12
V output jack.
Note: The JC 3 Jr. trigger circuit draws a negligible 10
mA current from the triggering device.
12 V Loop Out Jack
The Trigger Out jack lets you loop or “daisy-chain” the incoming trigger voltage to another
component.
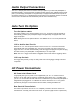
AC Power Connections
AC Power Inlet & Power Cord
A high quality IEC-type AC power cord is supplied with your JC 3 Jr. Please connect it
directly to an AC wall outlet or power line conditioner that is always “live.” If possible, plug
your JC 3 Jr. into the same AC wall outlet or line conditioner that your line level preamplifier or
integrated amp is plugged into. If a different AC outlet is used for the JC 3 Jr. the ground
potential may be higher or lower between the AC outlets, resulting in audible hum.
Rear Panel AC Power Switch
This switch is provided to turn the JC 3 Jr. completely off when it will not be used for an
extended time. Normally, this switch is left in the “on” position (upper section is pressed in).