O W N E R ' S M A N U A L Zamp v.2 Zone Amplifier w w w.parasound.
Table of Contents Important Safety Instructions ........................................................................................ 3 Zamp v.2 Front and Rear Panel Drawings .................................................................... 4 Introduction ..................................................................................................................... 5 Installation and Rack Mounting .....................................................................................
IMPORTANT SAFETY INSTRUCTIONS The lightning flash with the arrowhead symbol within an equilateral triangle is intended to alert the user to the presence of “dangerous voltage” inside the product that may constitute a risk of electric shock. The exclamation point within an equilateral triangle is intended to alert the user to the presence of important operating and maintenance instructions in the literature accompanying the product. TO REDUCE THE RISK OF ELECTRIC SHOCK, DO NOT REMOVE COVER.
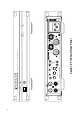
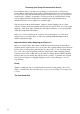
Inputs L R On-Off Loop Out Level L Gnd Sens Audio Lift 12 V Trigger In Out Man Auto On Bridged Parasound Products, Inc. San Francisco, CA USA R R Zamp v.
Introduction Congratulations and thank you for your purchase of this precision Parasound audio component. The Parasound Zamp v.2 is designed for a wide variety of applications, including multi-room, multi-zone installations, desktop audio, bedroom or den systems. The incredible versatility of the Zamp v.2 allows many connection and configuration options, so please be sure to read this manual thoroughly before you begin installation. Unpacking Carefully unpack your Zamp v.
Connecting the Zamp v.2 Refer to the drawing on Page 4 Connection Precautions Disconnect the AC cord before or while making or changing any input, trigger, or speaker connections. Make sure there is no strain or tension on any connections that could cause them to pull loose in the future. Input Connections Use the Right and Left channel RCA jacks for normal stereo operation. Connect the outputs of your preamplifier or multi-room controller to these line level inputs.
Configuring the Zamp v.2 for Mono operation 1. Turn the unit off. 2. Connect the single cable from your mono source to the Right channel Input jack. 3. Set the Stereo-Mono Switch to its Mono position. 4. Connect the positive lead of the speaker wire to the red R+ channel speaker terminal. 5. Connect the negative lead of the speaker wire to the red L+ channel speaker terminal. Note: the R+ and L+ terminals are not spaced to accept a dual banana plug.
Trigger Out Connection The Trigger Out jack lets you loop or “daisy-chain” the trigger voltage to additional amplifiers or other components. Audio Trigger Sensitivity Adjustment The Auto On Audio Sensitivity Control adjusts the audio signal level threshold to turn on the Zamp v.2. It adjusts the audio trigger sensitivity from 30 mV (fully clockwise) to 2 V (fully counterclockwise). The center position corresponds to 50 mV, which is suitable in most cases.
Headphone Jack The headphone jack on the front panel accepts a 1/8" (3.5 mm) plug. The high current headphone circuit will easily drive headphones with an impedance of 8 Ω or higher. The output to the speakers is muted when you plug headphones into the Zamp v.2. Maintaining Your Parasound Amplifier Your Parasound Zamp v.2 power amplifier requires no periodic maintenance except an occasional flattering remark. It has no user-serviceable parts inside.
Returning your Zamp to Parasound for Service If we determine that you should send your Zamp v.2 to Parasound, you will need to obtain a Return Authorization (RA) number. The RA number must be clearly marked on the outer carton only. Ship the unit with adequate insurance and a copy of your purchase receipt inside to validate your warranty. You must provide an original purchase receipt from an Authorized Parasound Dealer for warranty repair.
Voltage Selection Switch for the Zamp v.2 The Zamp v.2 can be easily converted for 110-120 Vac or 220-240 V operation by using the voltage selector switch located on the bottom of the unit. For 110-120 Vac operation. Slide the switch into the position until the section of switch labeled "115" appears through the opening in the chassis. 115 For 220-240 Vac operation. Slide the switch into the position until the section of switch labeled "230" appears through the opening in the chassis.
Parasound Zamp v.2 Specifications Continuous Power Output - Stereo 30 watts RMS x 2, 20 Hz-20 kHz, 8 Ω, both channels driven 45 watts RMS x 2, 20 Hz-20 kHz, 4 Ω, both channels driven Continuous Power Output - Mono 60 watts RMS, 20 Hz-20 kHz, 8 Ω minimum Impedance Current Capacity 10 amps peak per channel Slew Rate > 90 V/µsecond Frequency Response 5 Hz-100 kHz, +0/-3 dB at 1 watt Total Harmonic Distortion < 0.06 % at full power; < 0.03 % typical levels IM Distortion < 0.
Parasound Products, Inc. 950 Battery Street, San Francisco, CA 94111 415-397-7100 / FAX 415-397-0144 www.parasound.com © 2001 Parasound Products, Inc. Rev 2.