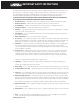
IMPORTANT SAFETY INSTRUCTIONS The lightning flash with the arrowhead symbol within an equilateral triangle is intended to alert the user to the presence of “dangerous voltage” inside the product that may constitute a risk of electric shock. The exclamation point within an equilateral triangle is intended to alert the user to the presence of important operating and maintenance instructions in the literature accompanying the product. TO REDUCE THE RISK OF ELECTRIC SHOCK, DO NOT REMOVE COVER.
TABLE OF CONTENTS Introduction 1 . . . . . . . . . . . . . . . . . . . . . . . . . . . . . . . . . . . . . . . . . . . . . . . . . . . 115 – 230v AC Selector Switch . . . . . . . . . . . . . . . . . . . . . . . . . . . . . . . . . . . . . . . 2 . . . . . . . . . . . . . . . . . . . . . . . . . . . . . . . . . . . . . . . . . . 3 . . . . . . . . . . . . . . . . . . . . . . . . . . . . . . . . . . . . . . . . . . . . . . . . .
2 INTRODUCTION Thank You for Choosing Parasound Congratulations and thank you for your purchase of this precision Parasound audio component. The Parasound Zpre2 Preamplifier is the second generation of one of the world’s most popular and proven preamplifiers. It has been designed for a wide variety of applications, including multi-room, multi-zone installations, desktop audio, PC-Mac audio, bedroom or den systems.
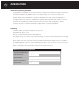
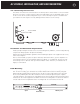
AC VOLTAGE, INSTALLATION, AND RACK MOUNTING 115v - 230v AC Voltage Selector Switch This switch is found on the chassis bottom. The 115V position of this switch is correct for North America; most other countries require setting it to 230V. Make sure the 115/230V switch is set for the correct AC line (mains) voltage before you connect the Zpre2’s power cord and before you install it. The unit may be seriously damaged if this switch is set incorrectly. AC V Voltage Selector Switch. Shown set for 230v.
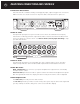
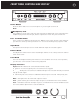
4 REAR PANEL CONNECTIONS AND CONTROLS Connection Precautions Disconnect the AC cord before making or changing any input, output or trigger wire connections. Make sure there is no strain or tension on any wires that could cause them to pull loose. s, o, C Preamp AC Voltage Selector On Bottom 12V Trigger Audio In Jacks The Zpre2 has input jacks for up to four audio sources.
REAR PANEL CONNECTIONS AND CONTROLS continued Zone 1 2 3 4 Switch Audio In 1 Audio Out Video In 2 You can ignore this switch if you are using a single Zpre2 in your system. Video Out 5 RS-232 Control 115V /230V 60Hz /50Hz 20W L The Zone switch and remote control handset can select four discrete IR codes to control up to four Zpre2s in four zones independently with a single remote R handset or IR-based system controller.
6 REAR PANEL CONNECTIONS AND CONTROLS continued 12V Trigger Jacks In Trigger Jack The Zpre2 12V input uses a 2.5 mm sub-mini jack. To trigger the Zpre2, plug Audio In 1 Video In 2 RS-232 Control Video Out Audio Out one end of the provided cord into this jack and the other end into the source component’s trigger output. Some components, including Parasound Surround L Controllers, use 3.5 mm trigger output jacks, so we have also included a trigger Ext Remote Zone wire with 2.5mm and a 3.5mm mini Rplugs.
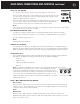
FRONT PANEL CONTROLS AND DISPLAY Power Button Press the Power button once to turn the Zpre2 on, press it again to turn it off. Note: The Power button is inoperative when the rear panel Auto On switch is set to Auto. (Headphone) Jack The headphone jack accepts a 1/8” (3.5 mm) mini plug. The Main audio out is muted when the headphone plug inserts into this jack, but the output to the Fixed – Rec jacks remains live. Bass and Treble Knobs These control tone. Maximum boost and cut is 10dB for each control.
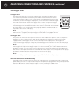
8 REMOTE CONTROL FUNCTIONS The PTZ-1 remote control has a range of approximately 20 - 25 feet (6 - 7.5 meters). Use only AAA alkaline batteries in the handset and insert them according to the + and – polarity markings in the battery compartment. The PTZ-1 Off, On, Mute Volume, In 1-4 buttons, Zpre2 Pre Set and Z 1-4 IR Zone # buttons are for the Zpre2. The tuner buttons control the matching Parasound Ztuner. On and Off Buttons These have the same function as the Power button on the front panel.
REMOTE CONTROL FUNCTIONS continued With this handy feature the Zpre2 will automatically switch to your favorite source component whenever it’s playing. If you use the Zpre2 to control a DVD player, tuner and satellite receiver in your bedroom, you can connect its Audio In 1 jacks to the feed from a distant main system controller. Its program will be selected automatically when it’s playing. Pre Set Button The Pre Set button is used only for reprogramming the remote handset IR zone code.
10 ARE YOU HAVING DIFFICULTY? No sound - Check that AC is live. - Check that input and output cables are secure at both ends. - Make sure it is switched to the correct input. - Is the unit on? Check setting of the Auto-Man switch. Remote does not operate - Zpre2 won’t respond to the remote control. Press remote’s Zone button then remote’s 1 button. - Weak or dead batteries in remote. Replace batteries and please recycle old ones. - IR Interference.
WARRANTY REPAIR Call your Parasound dealer first. If the dealer can’t help you with your problem we encourage you to call Parasound’s Technical Service Department, toll-free at 1-866-770-8324, Monday Friday, 8am - 4pm Pacific time. We can suggest other diagnostic tests you can easily perform.
12 PARASOUND ZPRE2 SPECIFICATIONS Frequency Response – Audio AC Power Requirement 10 Hz - 100 kHz, +0/-3 dB 110 - 120 V / 220 -240 V, 50 - 60 Hz 10 Hz - 50 kHz, +0/-0.8 dB 2 watt standby; 20 watts when turned on Frequency Bandwidth – Composite Video 10 MHz Total Harmonic Distortion 0.006% S/N Ratio 112 dB, input shorted, IHF A-weighted 92 dB, input shorted, unweighted Input Impedance 15 k Ω Input Sensitivity 150 mV for 1 V output Maximum Output: 7.
NOTES Notes: 13
Rev 0.92 © Parasound Products, Inc.