
- Parker Compact Servo Controller User Guide


COMPAX-M unit features
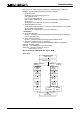
COMPAX-M system network, NMD10 / NMD20 mains module
19
Unit
hardware
Connector
assignment / cable
Technical dataConfigurationPositioning and
control functions
Optimization
functions
InterfacesAccessories /
options
StatusParameterError list
Unit side
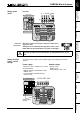
HAUSER
POW ER SUPPLY
X6 X7
X8
ReadyError
RS485INOUT
Control
HAUSER
CO MPAX-M
DIGITAL
StatusNumber
X6
X8 X10
-+Enter
ReadyError
RS232
Input
Output
Test
Control
X9 X11
Valu e
DIGITAL
StatusNumber
X6
X8 X10
-+Enter
ReadyError
RS232
Input
Output
Test
Control
X9 X11
Valu e
COMPA X-M
Motion & Control
COMPA X-M
Motion & Control
DIGITAL
StatusNumb er
X6
X8 X10
-+Enter
ReadyError
RS232
Input
Output
Test
Control
X9 X11
Valu e
cable conduit
L1L2L3PE 24V
+-
24V
+
-
PE
+LS
-LS
UVWPEbrake
PE + -
X1
X2
X3
X5
X1
X2
X3
X4X4
UVWPE
PE
+
-
X1
123 45
black 1
black 2
black 3
green/
yellow
free
black 4
black 5
brake
Note the screened connection of the motor cable on the
upper unit side.
Clamp the motor cable with the open place of the screen
braid under the ground terminal (see figure on the right).
Only wire up brake in motors which have a holding brake! If not, do not
wire.
The mains supply and the control voltage supply are provided by the mains
module.
Power supply:
!
3*80V AC – max. 3*500V AC; 45 - 65Hz
!
Fuse protection:
NMD10: 16A (K circuit breaker in 20A)
NMD20: 35A
K circuit breaker or similar Neozed
fusible cut-out.
Control voltage
!
24V DC
±
10%
Ripple <1V
SS
Fuse protection: max. 16A
COMPAX-M
Motion & Control
COMPAX-M
Motion & Control
HAUSER
POWER SUPPLY
X6 X7
X8
Ready Error
RS485IN OUT
Control
HAUSER
COMPAX-M
DIGITAL
Status Number
X6
X8 X10
-+Enter
Ready Error
RS232
Input
Output
Test
Control
X9 X11
Value
DIGITAL
Status Number
X6
X8 X10
-+Enter
Ready Error
RS232
Input
Output
Test
Control
X9 X11
Value
DIGITAL
Status Number
X6
X8 X10
-+Enter
Ready Error
RS232
Input
Output
Test
Control
X9 X11
Value
cable conduit
L1 L2L3 PE 24V
+-
24V
+
-
PE
+LS
-LS
UVWPEbrake
PE+ -
X1
X2
X3
X5
X1
X2
X3
X4X4
power supply
module
L1 L2L3 PE
+
-
X1
1
23 45
24V
Wiring up the
motor
Screened
connection
Wiring up mains
power / control
voltage