MIXED FUEL RANGE COOKER RM 850CN RM 850GRN GB
CONTENTS Instructions for the user Instructions for the installer Important Safety Information 4 Safety Advice 18 Description of the appliance 5 Technical Features 19 Use of appliance - Using the electric oven - Using the electric grill - Rotisserie - Hints & Tips - Using the Hob 6 6 7 9 9 10 Location - Ventilation - Levelling 20 20 21 Electrical connection 22 Gas connections 23 Conversion of gas 25 Maintenance and Cleaning - Oven bulb replacement 13 14 Something Not Working 15 Servi
IMPORTANT SAFETY INFORMATION You MUST read these warnings carefully before installing or using the appliance. If you need assistance, contact our Customer Care Department on 08705 950950. Installation • • • • • • • • • This cooker must be installed by qualified personnel, according to the manufacturer’s instructions and to the relevant British Standards. This cooker is heavy. Take care when moving it. Any gas installation must be carried out by a registered CORGI installer.
DESCRIPTION OF THE APPLIANCE Control panel 50 250 200 Oven door handle PARKINSON COWAN 10 15 20 40 35 100 150 5 55 50 45 30 25 Storage compartment door handle Oven door with glass Hob SR 2000 W AUX 1000 W 3 2 4 1 5 R 2600 W R 2600 W 1. Front left burner (rapid) 2. Back left burner (semi-rapid) R 2600 W 3. Middle burner (rapid-fish kettle) 4. Back right burner (auxiliary) 5.
USE OF APPLIANCE Using the Electric Oven Before the first use ensure that the room is well ventilated: V.M.C. (Mechanic ventilation) or opened window. Before the First Use of the Cooker Remove all packaging both inside and outside of the cooker, before using it. Before first use, the oven should be heated without food. During this time, an unpleasant odour may be emitted. This is quite normal. 1. Remove the oven accessories. 2. Remove any adhesive labels or protective films, if there are any. 3.
Cooking in the oven Traditional cooking Traditional cooking is made by natural convection of heated air (fig. 2). It is necessary to pre-heat the oven. How to proceed ? For small cakes, pastry, Victoria sandwich. 1. Preheat the oven the thermostat on position chosen for cooking: - about 8 min. for position 50°C to 150°C; - about 15 min for position 175°C to 250°C; 2.
The grill is used for grilling all kind of meat which remain tender, toast or browning dishes already cooked. Slide the dripping pan under the grid on the lowest shelf to collect the juice and fat. For turning off the heating elements. Turn the knob anticlockwise to position Off “ ”. Grilling Heat comes from the top of the oven. It is suitable for grilling meat (beef bacon, pork bacon …) that remains tender, for toast or to brown dishes already cooked.
Rotisserie When using the rotisserie, the accessible parts of the appliance are hot and the appliance should not be left unsupervised. Take care that children do not play near it. While the rotisserie is operating leave the door half open and put the grill deflector “A” in place. After use the rotisserie and its support are hot, use oven gloves to remove food. A The rotisserie can be used for either spit roasting meat or for kebabs and smaller pieces of meat. fig. 8 How to use the rotisserie 1. 2. 3. 4.
Oven Cooking • Turn off the oven 5 minutes before the end of cooking time, and use residual heat to complete the cooking. • The thickness, the material and the colour of the pan will influence the cooking results. • When cooking, certain dishes increase in volume, ensure the pan is large enough. • To prevent fat dripping when roasting use tall rim pans proportional to the item being roasted. • Prick the skin of poultry and sausages with a fork before cooking to avoid spitting.
Ignition of the burners • Push the knob and turn it left to the “large flame” symbol. • At the same time, push the electronic ignition knob (see fig 12). Keep it pushed until the gas ignites (1 spark / second). or Mains Failure • Push the corresponding knob in completely and turn it left to the “large flame” symbol and ignite with a match. • Release the knob and watch that the burner has ignited. Upon ignition, adjust the flame as required.
Accessories appliance delivered with the The following accessories are supplied with your appliance (fig. 14) : • • • 1 trivet. a removable handle a dripping pan / roasting tray with roasting grid in it. The dish has to be put in the middle of the shelf to balance the weight. • a grill deflector It is used for when using the grill or the turn-spit.
MAINTENANCE AND CLEANING The oven should be kept clean at all times. A build-up of fats or other foodstuffs could result in a fire, especially in the grill pan. Before cleaning, ensure all control knobs are in the OFF position, and the appliance has cooled completely. Before any maintenance or cleaning can be carried out, you must DISCONNECT the cooker from the electricity supply.
DO NOT clean the oven door while the glass panels are warm. If this precaution is not observed the glass panel may shatter. If the door glass panel becomes chipped or has deep scratches, the glass will be weakened and must be replaced to prevent the possibility of the panel shattering. Contact your local Service Centre who will be pleased to advise further. IMPORTANT: The inner door glass must be in place when using the oven.
SOMETHING NOT WORKING If the appliance is not working correctly, please carry out the following checks, before contacting your local Service Centre. IMPORTANT: If you call out an engineer to a fault listed below, or to repair a fault caused by incorrect use or installation, a charge will be made even if the appliance is under guarantee. Symptoms Solutions 1.
SERVICE AND SPARE PARTS In the event of your appliance requiring service, or if you wish to purchase spare parts, please contact your local Service Force Centre by telephoning:- 08705 929929 Your telephone call will be automatically routed to the Service Force Centre covering your post code area. For the address of your local Service Force Centre and further information about Service Force, please visit the website at www.serviceforce.co.
GUARANTEE CONDITIONS Standard Guarantee Conditions We Parkinson Cowan undertake that if, within 12 months of the date of the purchase, this Parkinson Cowan appliance or any part thereof is proved to be defective by any reason only of faulty workmanship or materials, we will, at our option, repair or replace the same FREE OF ANY CHARGE for labour, materials or carriage on condition that: • The appliance has been correctly installed and used only on the electricity supply stated on the rating plate.
INSTRUCTIONS FOR THE INSTALLER SAFETY ADVICE • Before installation ensure that the local distribution conditions (gas type and pressure) and the pre-setting of the appliance are consistent. • This appliance must be installed only in a room with good ventilation. • This appliance must not connected to a flu. It has to be installed and connected in accordance with the rules in force. Special attention should be paid to the applicable disposal concerning ventilation.
TECHNICAL FEATURES Free standing Hob Classe 1 Pan support Front right Back right Front left Back left Middle (fish) Burners ignition Oven Oven power Grill Grill burner power Oven light Oven Total rating Accesories Supply Trivet Removable handle Dripping pan / roasting tray Roasting grid Grill deflector Rotisserie Shelf Legs Rated voltage Rated frequency Total cooker rating Dimensions Height Width Depth Enamelled Rapid Auxiliary Rapid Semirapid Rapid 2600 W 1000 W 2600 W 2000 W 2600 W 0,6 W electric
The cooker has been registered as a “Class X” appliance according to Fire Risk Regulations. Any adjacent cabinets or walls must not exceed the cooker’s height. The cooker may be located in a kitchen, a kitchen/diner or bed sitting room, but not in a bathroom, shower room or garage.
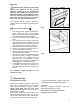
Assembling of back panel Introduce the screws of the back panel fixing (1) into the seats of supports (2) and push it downwards to the bottom of seats (fig. 22). 2 Levelling - Fix the two legs by means of screws and nuts delivered together with the appliance (fig. 23). - Open the storage compartment door. - Place the top clips of the plinth into the holes as shown in fig. 24.
ELECTRICAL CONNECTION Any electrical work required to install this cooker should be carried out by a qualified electrician or comp etent person, in accordance with the current regulations. THIS COOKER MUST BE EARTHED. The manufacturer declines any liability should these safety measures not be observed. This cooker is designed to be connected to a 240V, 50Hz AC electrical supply. Before switching on, make sure the electricity supply voltage is the same as that indicated on the cooker rating plate.
GAS CONNECTION Your cooker is delivered adjusted for the kind of gas stated on the rating plate. If the appliance is supplied with natural gas and the pressure for natural gas is 20mbar. The following methods of connection to the gas supply must be used: Right Hand Connection (from front) Ensure that the rubber hose is not in contact with any part of the hatched area shown in the diagram and that the loop of the hose when connected is not in contact with the floor when the appliance is in position (fig.
Rigid Connection Where it is not possible to make the connection using a rubber hose, a rigid pipe work connection must be used.
CONVERSION OF GAS Your cooker is designed to work with natural gas, and is convertible for use with propane or butane. The LPG conversion kit is available from your Service Force Centre and must be fitted by a Corgi Registered engineer. For changing the gas type it is necessary to: • replace the nozzles; • adjust the minimum level (simmer); • check the gas connection; SPECIFICATION NOZZLES Table no.1 (Cat : II 2H3+) Normal power (kW) Economic power (kW) Bypass (mm) RAPID 2.60 0.72 0.
Replace the nozzles of the hob burners Every appliance has spare nozzles for every type of gas. The whole length of every nozzle is marked in millimetres on the nozzle. Hob burners • Remove the pan support; • Remove the caps and the burner crowns; • Using a No 7 socket spanner unscrew the nozzles and replace them with those required for the type of gas in use (see table no. 1). • Reassemble the parts following the same procedure in reverse. These burners do not need any primary air regulation.
.