SG 414 Operating and Installation Instructions
n SG 414 u c iot Introduction nI t or d This gas appliance has been designed and manufactured to all the necessary British Standards. It also carries the C.E. mark. The appliance complies with European Council Directive 90/396/EEC. It is important that you understand how to use and care for the appliance properly before you use it for the first time. We have written this booklet with your safety in mind. Read the booklet thoroughly before you use the appliance.
Contents Contents SG 414 Page Lighting the appliance 4 The grill 6 The hotplate 9 The oven 12 Oven cooking chart 15 The electronic minute minder 18 Slow cooking 20 Care and cleaning 22 Installing the appliance 28 General information 30 What is wrong and why? 32 Servicing 34 Installation Instructions 36 Technical Data 37 Safety requirements/ventilation 38 Location of appliance 39 Installation 40 Testing 42 3
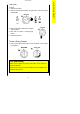
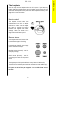
Lighting the appliance SG 414 Lighting the appliance The system works by means of an electric spark system. Details about the plug are given on page 30. Hotplate & Grill To light 1. Lift up the lid. You cannot use the hotplate when the lid is down. 2. Push in the control knob and turn it to the large flame symbol (highest setting), and press the ignition button immediately. When the burner has lit release the button 3. Leave the grill door open when you are using the grill.
The oven To light: 1 Open the oven door. 2 Push in the control knob and turn it to gas mark 9. The oven will light automatically. 3 Now turn the control knob back to the gas mark you want. 4 Wait until the burner is showing large flames. 5 Close the oven door. To turn off any burner 1 Push in the control knob and turn it to the off position. This is shown by a large dot. For your safety When you are lighting any burner check that it has lit before you leave the appliance.
The grill SG 414 The grill The grill is a high-speed grill. The instructions below tell you how to vary the heat setting and how to change the height of the grid to suit the food you are cooking. You should remember to turn the food regularly. You should not use the grill to keep food warm as it will continue to cook the food. Prior to using the grill We suggest that you operate the grill for approximately 5 - 10 mins to burn off any residue from the surface.
Cooking positions There is only one position for the grill shelf (Position 2). Positions are counted from the top downwards. Most food should be cooked on the grid in the grill pan. You can turn the grid over to suit different thicknesses of food. You can place some dishes straight on to the grill shelf. This is useful when you are browning the top of food such as cauliflower cheese. Preheating You don't usually need to preheat the grill.
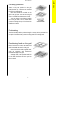
The grill SG 414 The grill pan and handle The grill pan is supplied with a removable handle. To attach the handle, place the wirework under the cut out in the pan so that the metal plate hooks over the top of the grill pan. Slide the handle to the left and over the central bump on the grill pan. Ensure the handle is correctly located. It is not necessary to remove the grill pan handle during grilling. Place the grill pan on the shelf so that the pan is positioned centrally beneath the grill.
The hotplate You can only use the hotplate when the lid is open. If you have any trouble lighting a hotplate burner turn all hotplate control knobs off and make sure the hotplate burner parts have been replaced correctly. See page 23 for more information. Heat control The hotplate control knobs turn anticlockwise from 'OFF' to 'HIGH' and then to 'LOW'. You can adjust the heat by turning the control between the highest and lowest settings. These are shown as a large and a small flame symbol.
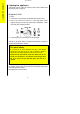
The hotplate SG 414 For your safety 1 Take care to avoid burns and scalds when you are reaching across the hotplate. Use pans with flat bases. They are more stable than pans which are warped. Do not use pans with very heavy handles which cause the pan to tip. Put pans on the centre of the burners. Position pan handles so they cannot be accidentally knocked. Take extra care when you are deep fat frying. Do not cover the pan with a lid. Do not leave a pan unattended.
Helpful hints 1 Keep flames under the base of pans. If the flames lick round the sides of the pans you are wasting gas. 2 Only heat the amount of liquid you need. Do not overfill pans. 3 Cover pans with a lid whenever possible. The food will heat up more quickly and there will be less steam in the kitchen. 4 Try cooking more than one vegetable in the same pan, for example potatoes and carrots. 5 Cut vegetables into smaller pieces. This way they will cook more quickly.
The oven SG 414 The oven Before you use the oven you should wipe it out with a damp cloth to remove any dust. Heat zones There are zones of heat within the oven. The temperature in the middle is the gas mark you have chosen. The top of the oven is slightly hotter and the lower shelf slightly cooler. The base of the oven is quite a lot cooler. You can make use of these heat zones when you are cooking foods that need different temperatures all at the same time.
Baking trays and dishes For your safety Never place cooking dishes, trays and so on over the oven burners. This will damage the appliance as well as the cookware and possibly the floor covering underneath the appliance. Leaveaagap gap ofof13mm 13mm(½") (½")between betweenallall Leave dishes and the sides of the oven dishes and the sides of the oven sosothethe heatcan cancirculate circulateproperly. properly.
The oven SG 414 Condensation Condensation may form on the appliance. This is quite normal and nothing to worry about. The condensation forms when heat and moisture are present, for example during cooking. Whenever possible try to make sure that food which contains a lot of moisture, for example casseroles, are covered. If you do notice any condensation, wipe it up straight away.
5 5 5 Beef Lamb Pork and Veal Roasting meat: 4 4 4 Shelf position Medium: Well Done: Medium: Well Done: Rare: Medium: Well Done: Approximate cooking time Oven cooking chart 30 mins. per ½ kg (1lb) and 30 mins. 35 mins. per ½ kg (1lb) and 35 mins. 25 mins. per ½ kg (1lb) and 25 mins. 30 mins. per ½ kg (1lb) and 30 mins. 20 mins. per ½ kg (1lb) and 30 mins. 25 mins. per ½ kg (1lb) and 25 mins. 30 mins. per ½ kg (1lb) and 30 mins. Thaw frozen joints thoroughly before cooking them.
Approximate cooking time 5 4 20 mins. per ½kg (1lb) and 20 mins. 4 4 25 mins. per ½kg (1lb) and 25 mins. 4 4 or 5 15 mins. per ½kg (1lb) and 15 mins. 5 4 25 mins. per ½kg (1lb) Cook as above but calculate weight including stuffing. Shelf position Thoroughly thaw frozen joints before cooking them. Chicken Turkey below 4.5kg (10lbs) over 4.
Plate tart (shortcrust) Fruit pie (shortcrust) Mince pies (flan pastry) Shelf position 2 2 2&4 Gas mark 6 6 5 25 - 35 mins. 25 - 35 mins. 15 - 25 mins. Approximate cooking time 17 Bread 0.45 kg (1lb loaves) 0.90 kg (2 lb loaves) Rolls and buns Yeast mixtures: 8* 8* 8* 2 4 3 3 3 2 3 4 4 30 - 40 mins. 30 - 40 mins. 10 - 20 mins. 2 hrs. approx. 45 - 60 mins. 50 - 60 mins.
The electronic minute minder SG 414 THE ELECTRONIC MINUTE MINDER - Button 1 = ( ) Decrease control and minute minder setting button Button 2 = (+) Increase control ( ) Bell Symbol The electronic minute minder can also be used to show the time of day. Bell symbol Please note that this is a 24 hour clock, for example 2pm is shown as 1400. In the following pages we explain how to use the minute minder and set the time of day. Read through them until you're familiar with the procedure.
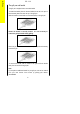
2. TO USE THE MINUTE MINDER The minuet minder gives an audible reminder at the end of any period of cooking up to 23 hours and 59 minutes. Fig 5. To set press button (1) and the display will read 0.00, See Fig 5. Release button (1) and press and hold button (2). The display will count up in one minute intervals until the interval to be timed is reached, eg 30 minutes, See Fig 6. If necessary press and hold button (1) to achieve the correct time interval. The bell symbol will show in the display. Fig 6.
Slow cooking SG 414 Slow cooking The slow cook setting gives a very low heat in the oven. It is particularly useful when you are cooking soups, stews and casseroles because the long slow cooking will make cheaper, tougher cuts of meat more tender. You need to cook food at gas mark 6 for 30 minutes before you turn the oven down to the slow cook setting. This makes sure that the temperature of the food gets hot enough to start the food cooking.
Soups, casseroles and stews l l l l Do not cook casseroles over 2.7kg (6lb). Bring to the boil on the hotplate then cook on slow cook. Cook in the middle of the oven or above. Cover food with a tight fitting lid or tin foil. Vegetables l l l l l Cut into small pieces. Dried beans must be pre-soaked then boiled in an open pan for 15 minutes before adding to any dish. Place vegetables under meat in casseroles. Cover food with a tight fitting lid or tin foil.
Care and cleaning SG 414 Care and cleaning For your safety For hygiene and safety reasons you must keep this gas appliance clean. A build up of fat or other foodstuff could cause a fire. Try to mop up spills and splashes as soon as they happen. But be careful as parts of the appliance will be hot. Do not use any polishes, caustic cleaners, abrasives, washing soda or soap powder except those recommended in this booklet.
The hotplate Clean the hotplate top using a mild abrasive such as 'Cif'. Take care not to damage the spark electrodes. If the spark electrodes are damaged the burners will not light. You can remove the pan supports, burner caps and burner crowns to clean them. Again take care not to damage the spark electrodes. If any food spills during cooking you can place the pan on another burner to finish cooking. Then you can remove the dirty parts and clean them before the spill 'burns on'.
Care and cleaning SG 414 The grill and oven furniture Clean the grill and oven furniture frequently using hot soapy water. After use you can soak the grill pan for a few minutes and then clean it using mild abrasives or a soap filled pad such as 'Brillo'. Clean the shelf, grill pan grid and handle using hot soapy water. Mild abrasives can be used if necessary. The grill Do not clean the grill burner itself. The burner is designed to be self cleaning.
The oven The sides and back of your oven are coated in a special material which helps to keep itself clean. Follow these simple rules to maintain the appearance of the special finish. Do not overfill dishes or they will boil over. Do not put dishes too high in the oven. If you do they may stick to the oven roof. Cover your roasting tins with foil. This will prevent fat splashing. Use a roasting tin which is just large enough for the meat and potatoes. This will help to reduce fat splashing.
Care and cleaning SG 414 Oven cleaning cycle You need to follow the cycle to keep the inside of the oven in good condition. The type of cooking you do will affect how often you need to follow the cycle. If you do a lot of roasting and very little other baking you should follow the cleaning cycle once a week. If you do very little roasting you will only need to follow the cleaning cycle every 2-3 weeks. To carry out a cleaning cycle: 1. Remove the oven shelves. 2.
Cleaning between the outer and inner door glass. You can remove the glass from the oven and grill doors if you need to. Note: For grill door it is important not to open the door when the glass is removed because the door is lighter and it will spring shut. To remove the outer glass 1 Open the door so you can get at the two cross head screws on the top of the door. Note: Open the grill door slightly to access screws. 2 Loosen these two screws using a pozidrive screwdriver.
Installation SG 414 Cleaning The Door Glass To prevent damaging or weakening the door glass panels avoid the use of the following: Household detergents and bleaches Impregnated pads unsuitable for non-stick saucepans Brillo/Ajax pads or steel wool pads Chemical oven pads or aerosols Rust removers Bath/Sink stain removers If the door glass panel becomes chipped or has deep scratches the glass will be weakened and must be replaced to prevent the possibility of the panel shattering.
Positioning The diagram shows how close to the appliance cupboards, shelves, curtains and so on can be fitted. Look at the diagram and carefully read the instructions to make sure your appliance is fitted safely. If you are in doubt your installer will give you advice. Do not fit any materials which may catch fire, for example wood or curtains behind the appliance. Base units which are higher than the hotplate must be 100mm away.
General information SG 414 General information For your safety Do not block any of the appliance vents. Never line any part of the appliance with aluminium foil. Do not let items which can catch fire or electric mains leads such as kettle flexes trail over any part of the appliance. Moving your appliance You may damage some soft or badly fitted floor coverings when you move the appliance.
If the ignition system doesn't work there may be a fault with the electrical supply. First, check the socket by trying out another piece of electrical equipment in it, if that works correctly renew the fuse in the plug. If the fuse keeps failing there is a fault in the appliance which must be put right. Do not use a fuse with a rating higher than 3 amps. Do not carry out other electrical work. Unplug the appliance and tell your installer.
What is wrong and why? SG 414 What is wrong and why? We strongly recommend that you carry out the following checks on your appliance before calling a Service Engineer. Problem The oven, grill or hotplate will not light. Check l l l If only the hotplate burners will not light make sure that the burner parts have been replaced correctly. See instructions on page 23. If you cannot hear any sparking when you press the ignition button there may be a fault with the electrical supply.
Problem Having difficulty cleaning any part of the appliance. Check that the instructions for care and cleaning, beginning on page 22 are being followed.
Servicing SG 414 Service and spare parts In the event of your appliance requiring service, or if you wish to purchase spare parts please contact your local Service Force Centre by telephoning:- 08705 929929 Your telephone call will be automatically routed to the Service Force Centre covering your post code area. For the address of your local Service Force Centre and further information about Service Force, please visit the website at www.serviceforce.co.
For your safety Maintenance must only be carried out by a competent /qualified person. Do not try to repair or alter/modify the appliance yourself as this could be dangerous. We recommend that your appliance has an annual gas safety check carried out by our approved service organisation.
INSTALLATION INSTRUCTIONS Serial number on front frame. Rating Plate on top rear of panel. Please note that the handle and pan supports may differ in type and shape from that shown in the diagram. For your safety Where applicable Natural Gas and L.P. Gas versions of this appliance are available. Check that this model is suitable for the type of supply available.
TECHNICAL DATA DIMENSIONS Height to hotplate Space for fixing at hotplate level Space for fixing above hotplate level Minimum space above hotplate Weight of appliance Minimum distance from rear wall Height 900mm (nominal) Width 550mm (nominal) Depth 600mm (to front of door panel) 2mm minimum clearance Flush-see important note 'Location of Appliance' page 39. 787mm (If a cooker hood is fitted refer to the cooker hood installation instructions). 61.8kg. 5mm (spacer given by pressed spacer on vent panel).
OVEN Heat Input Injector Marking Thermostat By-Pass Marking Natural Gas 2.4kW (8189Btu/h) 108 69 L.P.Gas 2.4kW (172.4 g/h) 078 78 GENERAL Ignition Spark Gap GAS CATEGORY H. T. Spark 3-4mm COUNTRIES OF DESTINATION CAT. I2 H GB, IE CAT. I3+ GB, IE IMPORTANT - SAFETY REQUIREMENTS This appliance must be installed in accordance with the Gas Safety (Installation and Use) Regulations Current Editions and the I.E.E. Wiring Regulations.
LOCATION OF APPLIANCE 787 787 This appliance must not be installed in a bed-sitting room of volume less than 20m³ or in a bathroom, shower room or garage. It is essential that the appliance is positioned as stated below (see Fig. 1a) i.e. shelves, wall cabinets and cooker hoods must be fitted a minimum of 787mm directly above the top of hotplate and 400mm above the hotplate when fitted in line with the outside of the appliance.
INSTALLATION 1. PARTS REQUIRED The loose hotplate parts are packed in the polystyrene fitment on top of the hotplate. 2. LEVELLING THE APPLIANCE If the appliance requires levelling or its height adjusting (from the hotplate to any working surface), the procedure below must be followed: 1. Adjustment to suit floor conditions or height is obtained by rotating clockwise or anticlockwise the feet, at the front and rear of the appliance. 2.
50 Fig.3 700 450 250 This appliance is designed to be installed with an appliance flexible connection only. Supply piping should not be less that R³/8. Connection is made to the Rc ½ (½" B.S.P.) female threaded entry pipe located just below the hotplate level on the rear left hand side of the appliance. NOTE: ONLY LIQUID SEALANTS TO BE USED WHEN INLET GAS PIPE IS FITTED TO SHUT OFF VALVE I.E.: DO NOT USE P.T.F.E. SEALANT TAPE. Carry out a gas tightness test after connecting to the gas supply.
If the wiring is extended or a completely new cable fitted a 3-pin 13 amp plug should be fitted. (See Fig.4a). Connect the wires as follows: BROWN to the Live Terminal. Fig.4a BLUE to the Neutral Terminal. GREEN and YELLOW to the Earth Terminal.
10. CHECKING THE OVEN 1. 2.. 3. 4. 5. 6. Turn the oven thermostat to Mk.9 and check that there is sparking from the ignition system. This should continue until the oven burner is alight. When the oven burner lights up the sparking should cease, there should be a low gas rate at first to the oven burner which is the flame supervision device (F.S.D.) by pass rate. When the F.S.D. phial has heated up it opens the F.S.D. valve and the main gas stream flows to the burner.
NOTES 44
NOTES 45
NOTES SG414 - 311680800 46
Contents Check List Note: If you require relacements of the item listed below please contact your local Service Force Centre quoting the relevant part number. The loose contents of this pack include:No. OFF DESCRIPTION 2 Main Oven Shelves 1 Grill Shelf 1 Guarantee Card 1 Grill pan grid (311419801) 1 Grill Pan (311409401) 1 Detachable grill pan handle (311468100) 4 Burner Crowns 4 Burner Caps 2 Pan Supports Note : If you require an additional handle for your grill pan.
IMPORTANT NOTICE In line with our continuing policy of research and development, we reserve the right to alter models and specifications without prior notice. This instruction booklet is accurate at the date of printing, but will be superseded if specification or appearance are changed. Description Burner Cap - Rapid Burner Cap - Normal Burner Cap - Simmer Burner Crown - Rapid - N.G. Burner Crown - Rapid - L.P.G. Burner Crown - Normal Burner Crown - Simmer Pan Support No.