Typhoon 3D Instruction Manual Charge-and-Fly™ Park Flyer Wingspan: 39.
Typhoon 3D Plug-N-Play Instruction Manual Congratulations on your purchase of the ParkZone Typhoon™3D Plug-N-Play airplane (PKZ4175). We at ParkZone are committed to giving you the most enjoyable flight experience possible. In order to have a safe and successful flight, we ask that you do not fly until you have read these instructions thoroughly. In as little as a few hours, you can be ready for your first flight with the Typhoon 3D PNP.
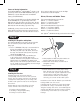
Step 2 Installing Landing Gear 1. Slightly squeeze together the legs of the landing gear while sliding it into the allotted space on the fuselage undercarriage. 2. The fit should be snug, so it will not easily pull out. 3. Gently tug on the landing gear to ensure that it is inserted all the way into the fuselage and will not come out when the plane is in use. Step 3 Attaching the Wing • BATT • THRO • ELEV • AILE (R) • AILE (L) • RUDD • AUX1 1. Locate the wing set.
Step 4 Attaching the Horizontal Stabilizer and Rudder 1. Locate horizontal stab. 2. Carefully slide horizontal stab into fuselage, making sure control surface horn is on top. 3. Use included strips (4 pieces) of clear tape to secure stab to tail fillet. You should use 1 strip for top and bottom of each side. 4. Locate rudder. Carefully snap tail wheel wire into the clip on bottom of fuse, as shown. 5. Use the three pins that are supplied to connect rudder to stab, as shown.
Center of Gravity Information Your ParkZone Typhoon™ 3D Plug-N-Play™ aircraft can be powered by either a 9-cell Ni-MH 1000mAh battery pack (PKZ1027), or by the Thunder Power 3S 2100mAh battery pack (THP21003S). (8.5 g) and may help you to get used to the flight characteristics of this 3D airplane. The center of gravity (CG) for your Typhoon 3D PNP, with the 9-cell Ni-MH pack, is approximately 3.50 inches (90mm) back from the leading edge of the wing. The CG with the 3S 2100mAh Li-Po is approximately 3.
Step 7 20 Amp ESC: A. Menu Item 1: Voltage Auto Cutoff The Typhoon™3D PNP™ can be powered by either a 9-cell 10.8V 1000mAh Ni-MH or a 3S 11.1V 2100mAh Li-Po battery pack. Using the Thunder Power 3S battery will greatly increase the power, performance, and flight time of your Typhoon 3D PNP. 1 beep – auto cutoff The ESC comes with the auto-cut voltage set for the 9-cell Ni-MH battery pack. You must reprogram the voltage automatic cutoff if you are planning to fly with the 3S Li-Po battery.
Step 8 Range Checking Your Radio System • Always make sure that all controls are functioning per the transmitter input that you are giving. This includes ailerons, rudder, elevator, and throttle. • Always make sure that you have fully-charged Tx batteries. After you have finished the assembly, it is time to range check the radio system within the Typhoon™ 3D PNP™ . Prior to each flying session: • Make sure that no one around may be flying, or is getting prepared to fly, on the same channel that you are on.
Warranty and Follow-Up Procedures Horizon Hobby, Inc. guarantees this merchandise to be free from defects in material and workmanship at the date of purchase. This warranty does not cover any component parts, or damage by use or modification. In no case shall Horizon Hobby’s liability exceed the original purchase cost of this item. Further, Horizon Hobby reserves the right to change or modify this warranty without notice.
Replacement Parts Make sure that you keep your Typhoon™3D PNP™ flying! Replacement parts are available at your local hobby shop or from Horizon Hobby (www.horizonhobby.com). Please try your local hobby shop first. By supporting them, they will be there when you need them. Item #: PKZ1006 PKZ1007 PKZ1027 PKZ1519 PKZ4102 PKZ4104 PKZ4107 PKZ4113 PKZ4114 PKZ4116 PKZ4117 PKZ4120 PKZ4121 PKZ4122 PKZ4123 PKZ4124 PKZ4125 PKZ4126 PKZ4128 PKZ4130 PKZ1131 PKZ4167 PKZ4176 Description: Retail: 13.
PKZ4176 6 05482 14553 1 ParkZone products are distributed exclusively by Horizon Hobby, Inc. 4105 Fieldstone Road Champaign, IL 61822 ©2005 Horizon Hobby, Inc. www.parkzone.com 7899.