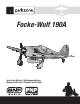
Focke-Wulf 190A Instruction Manual / Bedienungsanleitung Manuel d’utilisation / Manuale di Istruzioni
EN NOTICE All instructions, warranties and other collateral documents are subject to change at the sole discretion of Horizon Hobby, Inc. For up-to-date product literature, visit www.horizonhobby.com and click on the support tab for this product.
EN The Focke-Wulf 190A You are just a few simple steps away from taking flight with this impressive replica of one of WW2’s most feared fighters of the Luftwaffe. The Focke-Wulf 190A was arguably the most capable fighter in the European theatre until the Spitfire Mk IX took to the skies in 1942. Now you can re-create your own epic air battles between axis and allied powers with this ParkZone® Focke-Wulf 190A.
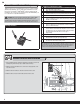
EN Transmitter and Receiver Binding “Binding” is the process of programming the receiver to recognize the GUID (Globally Unique Identifier) code of a single specific transmitter. You need to bind your chosen Spektrum™ DSM2®/DSMX® technology equipped aircraft transmitter to the receiver for proper operation (please visit www.bindnfly.com for a complete list of compatible transmitters). CAUTION: When using a Futaba® transmitter with a Spektrum DSM® module, you must reverse the throttle channel and rebind.
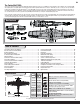
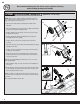
EN Battery Installation A 1. Push the button (A) into the fuselage, releasing the battery latch. 2. Lift the back of the battery hatch and pull backwards to remove the battery hatch. 3. Install the fully charged battery (B) in the battery compartment with the end of the battery aligned with the rear edge of the foam battery shelf. See the Adjusting the Center of Gravity instructions for more information. 4. Make sure the flight battery is secured using the hook and loop strap (C). 5.
EN We recommend installing the E-flite electric retracts (optional) in the wing before installing the wing on the fuselage. OPTIONAL E-flite Retractable Landing Gear (EFLG115, sold separately) NOTICE: Always ensure the retracts and wheels are installed so that there are no obstructions when extending and retracting the struts. Failure to do so could result in damage to the aircraft or gear. 1. Remove the wheels (A) and wheel collars (B) from the fixed left and right struts. Fixed Landing Gear A E 2.
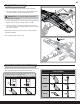
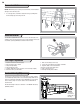
EN Wing Installation 1. Remove the battery hatch from the fuselage using the latch button. B 2. Turn over the fuselage so the bottom faces up and install the wires and connectors through the hole in the fuselage (A) to the receiver. CAUTION: DO NOT crush or otherwise damage the wiring when attaching the wing to the fuselage. C 3. Insert the guide pins (B) on the front of the wing in the fuselage plate holes (C), then connect the wing to the fuselage using 2 screws (D). A 4.
EN Drop Tank Installation IMPORTANT: The included scale drop tank will slow your aircraft much like the auxiliary tank on a full-scale aircraft. A B NOTICE: NEVER attempt to belly land your aircraft with the drop tank or drop tank support frame installed or damage to the aircraft may result. 1. Install the drop tank support frame (A) on the wing using 4 screws (B) as shown. 2. Pull back the lever (C) on the side of the payload mount to retract the pin (D). 3. Load the drop tank (E) D 4.
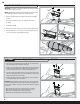
EN Horizontal Tail Installation B 1. Slide the horizontal tail tube (A) into the hole in the rear of the fuselage. 2. Install the left and right horizontal tails (B) onto the fuselage as shown. Ensure the control horn faces down. A 3. Apply 4 pieces of tape (C) to the fuselage mounts (one on the top and bottom of each half of the horizontal tail). 4. Attach the clevis to the elevator control horn (see instructions for clevis connection). When needed, disassemble in reverse order.
EN Cannon Installation NOTICE: NEVER attempt to belly land your aircraft with the cannons installed or damage to the aircraft may result. 1. For scale appearance, install the included cannons by press fitting them into the leading edge of the wing as shown. Decal installation Your aircraft is supplied with two small Iron crosses for the tail insignia, to be applied as shown. For those desiring a more accurate tail insignia, other decals are available separately (PKZ4930, not available in all territories).
EN Control Direction Test Move the controls on the transmitter to make sure the aircraft control surfaces move correctly and in the proper direction. After performing the Control Test, correctly set the failsafe. Make sure the transmitter controls are at neutral and the throttle and throttle trim are in the low position, then rebind the aircraft to your transmitter. If the receiver loses its link to the transmitter, the failsafe will drive the servos to these settings made at binding.
EN Dual Rates Your DSM2/DSMX full range transmitter features dual rates to help you select the amount of travel that you want from the control surfaces. High Rate Low Rate Aileron 12mm up/down 8mm up/down Elevator 10mm up/down 8mm up/down Rudder 25mm left/right 20mm left/right Flying Tips and Repairs Consult local laws and ordinances before choosing a flying location. Range Check your Radio System After final assembly, range check the radio system with the aircraft.
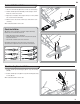
EN Drop Tank Fairing Service A 1. If installed, remove the wing from the fuselage, then remove the drop tank support frame and payload mount from the wing. 2. Remove 2 screws (A) from the top of the wing and the drop tank fairing (B). 3. Carefully remove the mount from the bottom of the wing. Paint may keep the mount attached to the wing. 4. Reassemble in reverse order.
EN AMA National Model Aircraft Safety Code Effective January 1, 2011 A. GENERAL A model aircraft is a non-human-carrying aircraft capable of sustained flight in the atmosphere. It may not exceed limitations of this code and is intended exclusively for sport, recreation and/or competition. All model flights must be conducted in accordance with this safety code and any additional rules specific to the flying site. 1. Model aircraft will not be flown: (a) In a careless or reckless manner.
EN Troubleshooting Guide Problem Aircraft will not respond to throttle but responds to other controls Extra propeller noise or extra vibration Reduced flight time or aircraft underpowered Aircraft will not Bind (during binding) to transmitter Aircraft will not connect (after binding) to transmitter Possible Cause Throttle not at lowest position or throttle trim too high Solution Reset controls with throttle stick and throttle trim at lowest setting Throttle servo travel is lower than 100% Make sure
EN Limited Warranty What this Warranty Covers Horizon Hobby, Inc. (“Horizon”) warrants to the original purchaser that the product purchased (the “Product”) will be free from defects in materials and workmanship at the date of purchase.
EN Warranty and Service Contact Information Country of Purchase Horizon Hobby Address Phone Number/Email Address Horizon Service Center (Air) 4105 Fieldstone Rd Champaign, Illinois 61822 USA 888-959-2305 Online Repair Request: visit www.horizonhobby.com/service Horizon Product Support (All other products) 4105 Fieldstone Rd Champaign, Illinois 61822 USA 877-504-0233 productsupport@horizonhobby.
Parts Contact Information • Kontaktinformationen für Ersatzteile • Coordonnées pour obtenir des pièces détachées • Recapiti per i ricambi Country of Purchase Horizon Hobby Address Phone Number/Email Address Sales 4105 Fieldstone Rd Champaign, Illinois 61822 USA 888-959-2305 Sales@horizonhobby.com United Kingdom Horizon Hobby Limited Units 1-4 Ployters Rd Staple Tye Harlow, Essex CM18 7NS, United Kingdom +44 (0) 1279 641 097 sales@horizonhobby.co.
Optional Parts • Optionale Bauteile • Pièces optionnelles • Pezzi opzionali Part # | Nummer Numéro | Codice Description Beschreibung Description Descrizione PKZ5101 Propeller 10.5 X 9: EXTRA 300 Propeller 10.5 x 9: Extra 300 Hélice 10.5X9 Elica 10.
© 2013 Horizon Hobby, Inc. ParkZone, E-flite, Celectra, EC3, DSM, DSM2, DSMX, Z-Foam, Bind–N–Fly, Plug-N-Play and ModelMatch are trademarks or registered trademarks of Horizon Hobby, Inc. The Spektrum trademark is used with permission of Bachmann Industries, Inc. Futaba is a registered trademark of Futaba Denshi Kogyo Kabushiki Kaisha Corporation of Japan. All other trademarks, service marks and logos are property of their respective owners. www.parkzone.