
User Manual


EN
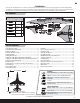
Installing Optional Flaps
1. Install the left and right fl ap servos (A)
(PKZ1081 x 2, sold separately) in the wing
pocket using hot glue or double-sided tape.
2. Install the control horns (B) and plates (C) on
the wing using 2 screws (D) in each horn.
3. Install a connector and clevis (E) in the second
innermost hole of the servo arm and outer hole
of the control horn.
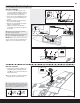
4. Carefully cut a wedge of foam from the fl ap
hinge near the aileron hinge (see illustration).
5. Carefully cut a small amount of foam at the
fl ap and wing root so the fl ap moves freely
(see illustration).
6. Remove the tape to put the servo wires in the
wing channel (F).
7. Put the fl ap servo wires in the wing channel
with the aileron wires.
8. Install the fl ap servo connector in the hole at
the wing root.
9. Place tape over the channel.
10. Cut a small amount of tape at the fl ap servo to
let the servo arm move freely.
11. Adjust the clevis so the fl ap is not pulled fully
against the wing at the hinge when the fl ap is
operated.
12. Install the servo connectors in the fuselage.
13. Install the wing on the fuselage using installa-
tion instructions on the previous page.
NOTICE: Make sure wires are not crushed or
damaged when the wing is attached to
the fuselage.
14. Attach the servo connectors to the correct
receiver channels or Y-harnesses.
15. Do a control test of the fl aps using your aircraft
and transmitter.
A
E
B D
C
F
If you are assembling your aircraft
using only stock parts, proceed to the Installing the Landing Gear section.
1/2 or Takeoff Flap Full Flaps
Flap down 13mm down 25mm down
6