Ultra Micro Mini Vapor® Instruction Manual / Bedienungsanleitung Manuel d’utilisation / Manuale di Istruzioni
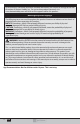
NOTICE All instructions, warranties and other collateral documents are subject to change at the sole discretion of Horizon Hobby, Inc. For up-to-date product literature, visit www.horizonhobby.com and click on the support tab for this product.
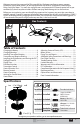
Welcome to an exciting new world of flying possibilities. Bedrooms, conference rooms, garages, basements, break rooms, offices–all can be transformed into aerial RC playgrounds with the Ultra Micro Series Mini Vapor®. Its small size, negligible mass and proportional 3-channel control will let you confidently fly almost anywhere indoors without worrying about damage to it or the furniture. Before you start exploring your new found flying opportunities, however, you must take some time to read this manual.
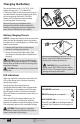
Charging the Battery Your aircraft comes with a 1S 3.7V DC Li-Po battery charger and 1S 3.7V 30mAh 25C Li-Po battery. Refer to the charging warnings. It is recommended to charge the battery pack while you are inspecting the aircraft. The flight battery will be required to confirm proper aircraft operation in future steps. Remove the cover on the bottom of the charger and install four of the included AA batteries, noting proper polarity. Replace the cover after the AA batteries are installed.
Charging Warnings The Battery Charger (EFLC1002) included with your aircraft has been designed to safely charge the Li-Po battery. CAUTION: All instructions and warnings must be followed exactly. Mishandling of Li-Po batteries can result in a fire, personal injury and/or property damage. • By handling, charging or using the included Li-Po battery, you assume all risks associated with lithium batteries. • If at any time the battery begins to balloon or swell, discontinue use immediately.
Installing Transmitter Batteries Your ParkZone® 4-channel DSM2/ DSMX RTF transmitter comes prebound to the aircraft. Remove the cover, install four of the included batteries (noting proper polarity) and reinstall the cover. 1 2 3 6 4 5 Transmitter and Receiver Binding Binding is the process of programming the receiver of the control unit to recognize the GUID (Globally Unique Identifier) code of a single specific transmitter.
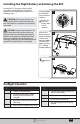
Installing the Flight Battery and Arming the ESC Arming the ESC also occurs after binding as previously described, but subsequent connection of a flight battery requires the following steps. CAUTION: Always keep hands away from propeller. When armed, the motor will turn the propeller in response to any throttle movement. CAUTION: Always disconnect the Li-Po battery from the aircraft receiver when not flying to avoid over-discharging the battery.
Transmitter Control Mode 2 Throttle Elevator/Rudder Rudder Trim Throttle Trim Elevator Trim Mode 1 Elevator Throttle/Rudder Rudder Trim Elevator Trim Throttle Trim Digital Trims The ParkZone® 4-channel DSM2/DSMX transmitter features digital trim buttons on all controls to make fine adjustments. The digital trims are used to fine-tune the model’s flight path when in flight. Before the first flight, center the control surfaces mechanically (see Control Centering).
Control Direction Test Bind your aircraft and transmitter before doing these tests. Move the controls on the transmitter to make sure aircraft control surfaces move correctly. Always keep throttle at the low position during testing.
Reverse Controls NOTICE: The Mini Vapor RTF should not require any servo reversing. Should the Mini Vapor electronic components be used in another aircraft, you may find it necessary to reverse the operation of the flight control surfaces. D C B A The transmitter included with the Mini Vapor is the same transmitter included in other ParkZone Ultra Micro RTF models. 1. Ensure the battery is disconnected from the aircraft and the transmitter is turned OFF. 2.
Control Rates We recommend using a DSM2/DSMX aircraft transmitter capable of dual rates. Adjust according to individual preferences after initial flight. It is normal for linear servos to make noise. Noise is not an indication of a faulty servo. High Rate Low Rate Elevator 100% 70% Rudder 100% 70% To achieve the proper Low Rate settings when using a programmable DSM aircraft transmitter, set the low rate value to 70% for elevator and rudder.
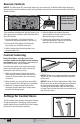
Motor Service CAUTION: DO NOT handle propeller parts while the flight battery is connected. Personal injury could result. Remove Disassembly 1. Disconnect the battery from the ESC/receiver. 2. Hold the spur gear and turn the propeller counterclockwise (looking from the front of the model) to remove. Turn the propeller clockwise to install. Make sure the propeller size numbers (125 x 39) face away from the motor (see illustration). 3.
Flying Tips and Repairs We recommend flying your Mini Vapor in an indoor location with a floor area of 15 ft x 15 ft and a minimum ceiling height of 8 ft; a living room or office is ideal. We suggest first flights take place in a larger area, like a garage or basement. We do not recommend flying the Mini Vapor outdoors unless the conditions are absolutely calm. The Mini Vapor is extremely light and can be easily blown away. Hand Launching Hold the Mini Vapor at shoulder height with one hand.
Additional Safety Precautions and Warnings As the user of this product, you are solely responsible for operating it in a manner that does not endanger yourself and others or result in damage to the product or the property of others. • • • • • • Never place any portion of the model in your mouth as it could cause serious injury or even death. • Never operate your model with low transmitter batteries. • Always keep the aircraft in sight and under Always keep a safe distance in all directions control.
Troubleshooting Guide Problem Possible Cause Aircraft will not respond to throttle but responds to other controls Throttle stick and/or throttle trim is too high Reset controls with throttle stick and throttle trim at lowest setting Throttle channel is reversed Reverse throttle channel on transmitter Extra propeller noise or extra vibration Damaged propeller, prop shaft or motor Replace damaged parts Nut on prop shaft is too loose Tighten the prop shaft nut 1/2 turn Reduced flight time or aircraft
Troubleshooting Guide (continued) Possible Cause Problem Solution Controls reversed Transmitter settings reversed Do the Control Direction Test and adjust controls on transmitter appropriately Motor loses power Damage to motor or power components Do a check of motor and power components for damage (replace as needed) Nut on prop shaft is too tight Loosen prop shaft nut until propeller shaft turns freely Motor power Battery power is down to the point of quickly decreas- receiver/ESC Low Voltage Cuto
WARRANTY SERVICES Questions, Assistance, and Services Your local hobby store and/or place of purchase cannot provide warranty support or service. Once assembly, setup or use of the Product has been started, you must contact your local distributor or Horizon directly. This will enable Horizon to better answer your questions and service you in the event that you may need any assistance. For questions or assistance, please visit our website at www.horizonhobby.
Warranty and Service Information Country of Purchase United States of America United Kingdom Germany France China 18 EN Horizon Hobby Horizon Service Center (Electronics and engines) Horizon Product Support (All other products) Address 4105 Fieldstone Rd Champaign, Illinois 61822 USA 4105 Fieldstone Rd Champaign, Illinois 61822 USA Units 1-4 Ployters Rd Staple Tye Horizon Hobby Harlow, Essex Limited CM18 7NS, United Kingdom Horizon Christian-Junge-Straße 1 Technischer Service 25337 Elmshorn, German
FCC Information This device complies with part 15 of the FCC rules. Operation is subject to the following two conditions: (1)This device may not cause harmful interference, and (2) this device must accept any interference received, including interference that may cause undesired operation. CAUTION: Changes or modifications not expressly approved by the party responsible for compliance could void the user’s authority to operate the equipment.
Replacement Parts • Ersatzteile • Pièces de rechange • Pezzi di ricambio Part # • Nummer Description Numéro • Codice Beschreibung Description Descrizione Propeller: 125 x 39 Indoor Propeller Tragfläche: Mini Vapor Fahrgestellsatz: Mini Vapor Hélice indoor : 125 x 39 Aile de Mini Vapor Elica: Elica per interni 125 x 39 Ala: Mini Vapor Jeu de train d’atterrissage : Mini Vapor Jeu de biellettes mécaniques : Mini Vapor Set carrello di atterraggio: Mini Vapor Set asta di spinta: Mini Vapor PKZU1220 Prop
Optional Parts and Accessories • Optionale Bauteile und Zubehör • Pièces et accessoires optionnels • Componenti e accessori opzionali Part # | Nummer Description Numéro | Codice EFLC1005/AU/ EU/UK Beschreibung Description Descrizione AC to 6V DC 1.
© 2012 Horizon Hobby, Inc. ParkZone, E-flite, Vapor, DSM, DSM2, Bind–N–Fly and ModelMatch are trademarks or registered trademarks of Horizon Hobby, Inc. DSMX is a trademark of Horizon Hobby, Inc., registered in the U.S. The Spektrum trademark is used with permission of Bachmann Industries, Inc. Futaba is a registered trademark of Futaba Denshi Kogyo Kabushiki Kaisha Corporation of Japan. US D578,146. PRC ZL 200720069025.2. US 7,898,130. Other patents pending. 76 IT www.parkzone.