
Manual


8
9
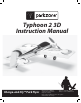
Fly in this area
(upwind of pilot)
Stand here
600 feet
WIND
Range Checking your Radio System
After you have finished the final assembly, it is time to
range check the radio system within the Typhoon 2 3D.
Prior to each flying session:
• Make sure the model is restrained before doing a
range check with the motor running. Make sure no
one around who is flying, or is getting prepared to
fly, is on the same channel you are on. After this is
confirmed, turn on transmitter with antenna down.
Next, turn on receiver (switch on the plane). With
the airplane on the ground and the motor running,
you should walk away approximately 100 feet and
still have full control of all functions. If this is not
the case, do not fly! Call Product Support at
1-877-504-0233.
• Always make sure all controls are functioning per
the transmitter input you are giving. This includes
ailerons, rudder, elevator, and throttle.
• Always make sure you have fully charged the
transmitter batteries.
Always remove the flight battery from the airplane
when you are done flying, or when you are on the
way to the flying field. Leaving the battery plugged
in the airplane for an extended time could cause
permanent damage to your battery (especially if using a
Li-Po battery).
Flying
Always choose a wide-open space for flying your
ParkZone Typhoon 2 3D. It is ideal for you to fly at an
AMA sanctioned flying fields. If you are not flying at an
AMA approved site, always avoid flying near houses,
trees, wires, and buildings. You should also be careful
to avoid flying in areas where there are many people,
such as busy parks, or school yards. Always follow
local ordinances.
Prior to each flight:
• Always make sure your Typhoon 2 3D is properly
trimmed. From time to time, it may be necessary to
re-trim your airplane. Simply turn the radio system
(along with flight battery) and check all control
surfaces. Most trim changes should be able to be
made by using the trim levers on the transmitter.
Greater changes will need to be made by removing
clevis from control horn and turning it on pushrod in
the appropriate direction.
• Always make sure the receiver, ESC, and battery
are properly secured.
• Always verify the propeller is on securely.
• Always ensure the servo reversing switches on the
transmitter are set correctly.
• Verify propeller is fitted in correct direction and is
attached securely.
• Always verify the dual rates switch is set at where
you plan on flying. We recommend LOW rates
for your initial flying. The Typhoon 2 3D is VERY
maneuverable on high rates and requires a lot of
experience to handle properly.
Your Typhoon 2 3D RTF comes out of the box with the
E-flite
®
25-amp brushless ESC. This controller has been
designed for use in radio control aircraft and is designed
to support motor currents up to 25 amps continuous,
and up to 4 micro servos with a 2- to 3-cell Li-Po bat-
tery. It is suitable to use with most radio brands.
The E-flite 25A ESC comes in an impressive plastic case
with exposed, finned heat sinks for both of the motor
drive mosfets and, unlike many controllers, there is
also a finned heat sink fitted to the BEC regulators to
give a more reliable and more powerful power supply to
the servos. If you intend to fly your Typhoon 2 3D RTF
stock, then there is no need to program your ESC. It
comes installed with the default settings. If you intend to
re-program the ESC, we strongly recommend removing
the propeller first in order to keep it from spinning if the
motor is accidentally engaged. Note: ALWAYS assume
the motor and the propeller are live. ALWAYS keep clear
of the propeller at all times. The high rpm of the brush-
less motor can cause severe injury.
E-flite 25-Amp ESC Features:
• Two soft cut settings (for 2- and 3-cell Li-Po battery
packs)
• 70% Smart Cut feature
• Brake option
• Timing options for up to 4-pole inrunner and 4-pole
outrunner motors
• 2 setting options for the throttle input range
Using Your E-flite 25-Amp Brushless
Controller:
The E-flite 25A controller is very simple to use and, for
safety, will not arm the motor until the throttle stick has
been held in the Idle/Off position for more than 1 sec-
ond. The controller will tell you what setting you have for
the soft cut voltage every time you plug in the battery by
first making a low, long beep to show startup. Then, it
makes 2 or 3 medium length, mid-tone beeps to indicate
the cell count (or 7 beeps if 70% Smart Cut is selected),
helping you to check the setting before every flight. To
prepare for flight, you should first turn on your transmit-
ter and ensure the throttle is set to the Idle/Off position.
Next, plug in the flight pack to the speed control and
listen for the tones to indicate soft-cut voltage. After the
controller has indicated the cell count, the controller will
make one set of 3 medium length, rising tones to tell
you it is armed and ready to fly, or 2 sets of fast rising
tones if you are entering the programming mode. For
your own safety, and the safety of others, you should
always treat the motor and propeller as though they
are “live” and dangerous, remembering the motor could
start at any time. Keep any body parts, clothing and
tools clear of the propeller arc. Never leave the battery
connected when you are not flying the aircraft. Always
remove the battery pack from the model before charg-
ing the battery, and when finished flying.
Programming:
The E-flite 25-amp programming sequence is designed
to be very simple and intuitive. It is a simple menu
system that should be very easy to learn and remember.
Stick Up = Full Throttle
Stick Down = Idle
Default Setup for E-flite 25-amp ESC:
• 3S auto-cutoff
• Brake inactive
• 4-pole and greater timing
• Auto setting throttle input range
Programming Mode:
1. With the battery disconnected from the controller,
and the transmitter turned on, first move the
throttle stick to the full power position. Leave it in
this position and then connect the battery to the
controller.
2. Wait for 5 seconds, and the ESC will give two
sets of fast ringing tones to indicate you have
successfully entered the programming mode.
3. Once you hear these tones, move the stick
to center, and the controller will beep 1 time,
indicating you are at menu item number 1.
4. The controller will now wait 5 seconds for you to
make your selection, move the stick to Full Throttle
for “Yes,” or to Idle for “No.”
5. When you have made a valid selection, the control
will beep once with a lower tone and then you can
move the stick back to center for the next menu
item (2 beeps, 3 beeps and so on). If you do not
make a selection within 5 seconds, the controller
will move to the next menu item.
6. Please note that you do not need to program every
menu item. You can simply exit the programming
mode after you have made the required selections
by:
a. Moving the throttle stick to idle, after making
your selection.
b. Leaving it in the idle position for approximately
8 seconds (if you made no selection), until you
hear one set of 3 medium length rising tones that
indicate the controller has armed the motor; or
c. By simply unplugging the battery.
Step 9 Step 10
Step 11