T-28 Trojan Instruction Manual / Bedienungsanleitung Manuel d’utilisation / Manuale di Istruzioni PKZ8250 PKZ8275
EN NOTICE All instructions, warranties and other collateral documents are subject to change at the sole discretion of Horizon Hobby, LLC. For up-to-date product literature, visit www.horizonhobby.com and click on the support tab for this product.
EN Table of Contents Preflight ...............................................................................................4 Model Assembly ..................................................................................4 Control Horn and Servo Arm Settings ...................................................6 Transmitter and Receiver Binding / Switching ON and OFF SAFE® Select.....7 SAFE® Select Switch Designation.........................................................
EN Preflight 1 Remove and inspect contents. 8 Bind the aircraft to your transmitter. 2 Read this instruction manual thoroughly. 9 Make sure linkages move freely. 3 Charge the flight battery. 10 Perform the Control Direction Test with the transmitter. 4 Fully assemble the airplane. 11 Adjust flight controls and transmitter. 5 Install the flight battery in the aircraft (once it has been fully charged). 12 Perform a radio system Range Test. 6 Check the Center of Gravity (CG).
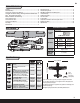
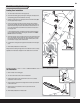
EN Model Assembly Continued Landing Gear Installation A 1. Turn the model so the bottom of the wing faces up. 2. Install the main landing gear by inserting the main gear struts (A) into the corresponding gear plate hole located on each wing. 3. Carefully turn each strut in the gear plate until the horizontal section (B) of the strut gently snaps into place. 4. Loosen the nose gear screw (C) in the nose gear arm before installing the nose gear strut (D).
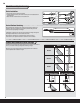
EN Model Assembly Continued Clevis Installation • Pull the tube from the clevis to the linkage. • Carefully spread the clevis, then insert the clevis pin into the desired hole in the control horn. • Move the tube to hold the clevis on the control horn. 1. 4. 2. 5. 3. 6. Control Surface Centering After assembly and transmitter setup, confirm that the control surfaces are centered. If the control surfaces are not centered, mechanically center the control surfaces by adjusting the linkages.
EN Transmitter and Receiver Binding / Switching ON and OFF SAFE® Select This product requires an approved Spektrum™ DSM2®/DSMX® compatible transmitter. Visit www.bindnfly.com for a complete list of approved transmitters. The aircraft has an optional SAFE Select feature, which can be switched ON or OFF easily by binding in a specific manner as described below.
EN SAFE® Select Switch Designation SAFE® Select technology can be easily assigned to any open switch (two or three position) on the transmitter. With this new feature, you now have the flexibility to enable or disable the technology while in flight. Mode 1 and 2 Transmitters IMPORTANT: Before assigning your desired switch, ensure that the travel for that channel is set at 100% in both direction. Assigning a switch Bind the aircraft correctly to activate SAFE Select.
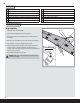
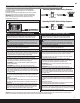
EN Center of Gravity (CG) Place the battery all the way forward in the fuselage and hold the battery in place using a hook and loop strap. It is easiest to balance the aircraft inverted. 63.5mm back from the leading edge at the root. Control Direction Test Bind your aircraft and transmitter before performing these tests. Move the controls on the transmitter to ensure the aircraft control surfaces move correctly. After doing the Control Test, correctly set the failsafe.
EN Flying Tips and Repairs Consult local laws and ordinances before choosing a flying location. Flying Field Always choose a wide-open space for flying your aircraft. It is recommended that you fly at a designated RC flying field. Always avoid flying near houses, trees, wires and buildings. Avoid flying in areas where there are many people, such as parks, schoolyards, or soccer fields. Range Check your Radio System NOTICE: If a crash is imminent, reduce the throttle and trim fully.
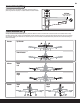
EN Motor Service CAUTION: Always disconnect the flight battery before performing motor service. A C D B F Disassembly 1. 2. 3. 4. Use a tool to remove the spinner nut (A) from the collet (B). Remove the propeller (C), backplate (D) and collet from the motor shaft. Remove three screws (E) from the cowling (F). Carefully remove the cowling from the fuselage. Paint may keep the cowling attached to the fuselage. 5. Remove four screws (G) from the motor mount (H) and fuselage. 6.
EN Troubleshooting Guide Problem Aircraft will not respond to throttle but responds to other controls Extra propeller noise or extra vibration Reduced flight time or aircraft underpowered Aircraft will not Bind (during binding) to transmitter Aircraft will not connect (after binding) to transmitter Possible Cause Throttle not at idle and/or throttle trim too high Reset controls with throttle stick and throttle trim at lowest setting Throttle servo travel is lower than 100% Make sure throttle servo t
EN AMA National Model Aircraft Safety Code Effective January 1, 2014 A. GENERAL A model aircraft is a non-human-carrying aircraft capable of sustained flight in the atmosphere. It may not exceed limitations of this code and is intended exclusively for sport, recreation, education and/or competition. All model flights must be conducted in accordance with this safety code and any additional rules specific to the flying site. 1. Model aircraft will not be flown: (a) In a careless or reckless manner.
EN Limited Warranty What this Warranty Covers – Horizon Hobby, LLC, (Horizon) warrants to the original purchaser that the product purchased (the “Product”) will be free from defects in materials and workmanship at the date of purchase.
EN FCC Information FCC ID: BRWDASRX15 PKZ8250: This equipment has been tested and found to comply with the limits for a Class B digital device, pursuant to part 15 of the FCC Rules. These limits are designed to provide reasonable protection against harmful interference in a residential installation. This equipment generates, uses and can radiate radio frequency energy and, if not installed and used in accordance with the instructions, may cause harmful interference to radio communications.
IT Replacement Parts • Ersatzteile • Pièces de rechange • Pezzi di ricambio Part # | Nummer Numéro | Codice Description Beschreibung Description Descrizione Propeller Adapter Luftschraube 9.5x7.5 ParkZone Mini Servo, 3 adrig, kurzes Kabel ParkZone Servo Y-Kabel 3D2, T-28 Adaptateur d‘hélice Hélice 9.5X7.5 Servo SV120 (câble court) : Profondeur T-28 Adattatore elica Elica “9.5 X 7.5” SV120 Servo (terminale corto): Elevatore T-28 PKZ1063 Prop Adapter Propeller “9.5 X 7.
© 2018 Horizon Hobby, LLC. ParkZone, E-flite, AS3X, SAFE, the SAFE logo, DSM, DSM2, DSMX, Bind-N-Fly, BNF, the BNF logo, EC3, Prophet, Plug-N-Play and ModelMatch are trademarks or registered trademarks of Horizon Hobby, LLC. The Spektrum trademark is used with permission of Bachmann Industries, Inc. All other trademarks, service marks and logos are property of their respective owners. US 9,056,667. US 8,672,726. www.parkzone.com PKZ8250, PKZ8275 Updated 3/18 56817.