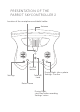
PRESENTATION OF THE PARROT DISCO GENERAL Flap Servomotor Propeller Servomotor Cowling Fisheye camera On/Off button, warning light and pitot tube Flap
ENGLISH CHUCK AUTOPILOT UNIT RC remote port Battery connector Servomotor connectors Micro USB port Central engine connector
PRESENTATION OF THE PARROT SKYCONTROLLER 2 Location of the smartphone and tablet holder Antenna On/Off button Take off/ Land Settings During flight: take a photo Settings: Confirm Return home During flight: start/stop video recording Settings: return
ENGLISH Switch to direct view or immersive view Set the camera exposure USB port Change the display mode on the application Vertical orientation of the camera
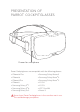
PRESENTATION OF PARROT COCKPITGLASSES Drawer for smartphone Parrot Cockpitglasses are compatible with the following phones: • • • • • • • iPhone 6s Plus iPhone 6s iPhone 6 Plus iPhone 6 Samsung Galaxy S® 7 Samsung Galaxy S® 6 Samsung Galaxy S® 5 • • • • • • • Samsung Galaxy Note® 5 Samsung Galaxy Note® 4 Samsung Galaxy Note® 3 LG G4 LG G3 HTC One M8 Nexus 5 ever leave Parrot Cockpitglasses in the sun when not in use. N This could damage your phone.
DOWNLOAD THE FREEFLIGHT PRO APPLICATION Login to the App Store® or Google PlayTM and download the free FreeFlight Pro application to your smartphone or tablet. CHARGING THE PARROT DISCO’S BATTERY The battery must be disconnected from the Parrot Disco. 1. Select the plug for your country and put it on the charger. 2. Connect the cable to the charger. 3. Connect the battery to the charger’s cable, and then plug the charger into the mains.
FITTING THE BATTERY 1. Remove the Parrot Disco’s cowling. 2. Place the battery in the slot provided for this purpose. 3. Plug the battery into the Parrot Disco. 4. Close the Parrot Disco’s cowling.
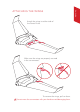
Attach the wings to either side of the Parrot Disco. Make sure the wings are properly secured in the servomotors. To remove the wings, pull on them. Do not move the servomotors with your hand to avoid damaging them.
PRE-FLIGHT CHECKS Before each flight with Parrot Disco, make the following checks: REGULATIONS ake sure that the use of Parrot Disco is allowed where you are M going to fly. Check the restrictions regarding the use of Wi-Fi® frequencies in the place where you are going to fly. Check the regulations on the use of FPV goggles when flying a drone where you are going to fly. FLIGHT CONDITIONS ake sure you have at least 80 meters in diameter of clear space .M for your Parrot Disco to take off and land.
ENGLISH PILOTING CONFIGURATIONS There are three piloting configurations. Familiarise yourself with no. 1 and no. 2 before using no. 3.
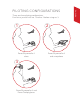
CONNECTING TO THE PARROT DISCO CONNECTING THE PARROT SKYCONTROLLER 2 TO THE PARROT DISCO 1. Place the Parrot Disco on a flat surface. 2. Press the Parrot Disco’s On/Off button. >>The button flashes red and green once the GPS is connected. 3. Press the Parrot Skycontroller 2’s On/Off button to turn it on. 4. Wait until the warning light is a steady green. You are connected to the Parrot Disco. If the warning light continues to flash red, you need to calibrate the Parrot Disco. To do this: 1.
1. Screw the smartphone holder onto the Parrot Skycontroller 2. A B B A ou can rotate the holder to fit your smartphone’s dimensions. Y To do this, press on it and rotate it to the right. B A B A 2. Press the right button on the holder to fully open it. 3. Position your smartphone on the holder.
4. Tighten the holder on your smartphone. 5. Using your smartphone’s USB cable, connect your smartphone to the Parrot Skycontroller 2’s USB port. >> The FreeFlight Pro application starts automatically. You are connected. USE THE PARROT COCKPITGLASSES 1. Connect your Parrot Skycontroller 2 to your drone. 2. Pull out the drawer on your Parrot Cockpitglasses. 3. Open the drawer. 4. Pass your smartphone’s USB cable through the opening in the drawer. 5.
GPS GPS 40 % 0.0 m/s 0.0 m/s 0.000... 0.000... ? ? 40 % 8. Close the drawer and slide it into the Parrot Cockpitglasses. 9. Adjust the strap of the Parrot Cockpitglasses on your head. Note: Use the Parrot Skycontroller 2 to edit the FreeFlight Pro application’s settings when you are wearing Parrot Cockpitglasses. FIRST FLIGHT: USE THE FLAT TRIM FUNCTION 1. Place the Parrot Disco on a flat surface. 2. Press the On/Off switch to turn on the Parrot Disco. 3.
TAKING OFF You must take off into the wind. 1. Stand facing upwind holding the body of the Parrot Disco with one hand. 2. Make sure the Parrot Disco’s engine is completely clear. 3. Press the button on your Parrot Skycontroller 2. >>The Parrot Disco’s engine will slowly run for 3 seconds and then accelerate. >>A «Ready to take off» pop-up window is displayed on your smartphone. You can take off. 4. Gently toss the Parrot Disco upward. >>The Parrot Disco takes off.
ENGLISH PILOTING MODES AUTOPILOT This mode allows you to securely fly the Parrot Disco. During flight, the Parrot Disco maintains its speed and maintains its altitude. LEFT CONTROL B RIGHT CONTROL B A A Accelerate B Go down B A A Slow down B B Go up Right orbital standby mode B Left orbital standby mode B A A A Turn right A Turn left You can configure and customise the commands in the FreeFlight Pro application.
MANUAL MODE You can use an RC remote (not included) to fly the Parrot Disco. Manual mode offers no piloting assistance for the Parrot Disco. Configure the channels of your RC remote for the Parrot Disco. To do this, refer to the manual for your RC remote. The Parrot Disco is difficult to control without the assistance of the autopilot. This mode is for expert pilots.
ENGLISH CONTROL SCREEN Return Home Take a photo Video recording Previous screen Parameters Map mode FHD FPV mode 8M S 49m 5848.
FPV MODE Use See Through mode to see through the camera of your smartphone when you are wearing Parrot Cockpitglasses. Press the right trigger on the Parrot Skycontroller 2 to switch from immersive view to See Through. There are several display mode in Freeflight Pro application: • Radar : Information about your Parrot Disco position.
o avoid damaging the Parrot Disco, land on a suitable surface, T such as grass, for example. LINEAR LANDING 1. Position the Parrot Disco facing upwind. 2. Press the button on the Parrot Skycontroller 2. >>The Parrot Disco descends in a straight line and then straightens and lands softly. Note: During the descent of the Parrot Disco, you can over-correct: go up, go down, turn left and turn right. 10 m 50 m To cancel the landing, press the button on the Parrot Skycontroller 2.
CIRCULAR LANDING During circular landing, the Parrot Disco makes sure, by itself, that it 10 m lands facing upwind so as to limit its landing speed. 1. Make sure you have an area of at least 80 meters in diameter to land the Parrot Disco. 50 m 2. In the FreeFlight Pro application, press Circular landing >>The Parrot Disco lands in a spiral. 80 m Circular landing requires a lot of space. .
The Parrot Disco can be used in photo mode or video mode. TAKING PHOTOS On your Parrot Skycontroller 2, press the A button to take a photo. The internal memory of the Parrot Disco has a capacity of 32 GB. The maximum number of stored photos depends on the format selected. For good quality photos, make sure the Parrot Disco is in photo mode. RECORDING VIDEOS Recording starts automatically when you press the Take off button. The icon flashes while recording video.
CREATING A FLIGHT PLAN 1. Press to enable waypoint editing. 2. On the map, tap where you want to place your first waypoint. >>A numbered bubble appears. The number represents the altitude of the Parrot Disco when passing this point. 3. Continue placing your waypoints. 4. Once you have drawn your path, press and hold the last point of your journey. >>A pop-up window appears. Choose the desired landing mode (linear or circular).
If the connection is lost during flight between your Parrot Skycontroller 2 and your Parrot Disco, the Parrot Disco will fly in 60-meter diameter circles for a specified time period (10 seconds by default). If the connection is not restored, the Parrot Disco returns to its starting position and then flies in 60-meter diameter circles. If the connection is not restored after 5 minutes, the Parrot Disco performs a circular landing.
2. Turn on the Parrot Disco. >>Your computer will automatically detect the Parrot Disco. 3. Open the folder as if it were a USB flash drive. 4. Copy the photo and video recordings onto your computer. ON YOUR SMARTPHONE To retrieve photos and/or videos from the FreeFlight Pro application: 1. Turn on your Parrot Disco and connect it via Wi-Fi to your smartphone. 2. On your smartphone, launch the FreeFlight Pro application and go to Menu > Internal Memory.
1. Connect your micro USB flash drive (not provided) to a computer. Make sure that your flash drive does not contain any files in .plf format. 2. Go to the Parrot Disco’s support page on www.parrot.com and download the update file available in .plf format. 3. Copy this file to the root of your micro USB flash drive. 4. Turn on the Parrot Disco. 5. Connect the micro USB flash drive to one of the Parrot Disco’s ports. >>The Parrot Disco automatically restarts and the warning light flashes yellow.
SPARE PARTS You can buy spare parts for the Parrot Disco from our online store : www.parrot.com. For more information on the assembly of spare parts, see the video tutorials on our support page. TECHNICAL SPECIFICATIONS SENSORS • • • • Ultrasound Altimeter Hi-speed vertical camera Pitot Tube: speed sensor INERTIAL NAVIGATION SYSTEM • Three-axis gyroscope • Three-axis accelerometer.
• Weight: 750 gr. • Size: 1150 mm x 580 mm x 120 mm • Wingspan: 1150 mm GPS • Integrated GPS • GPS + GLONASS PERFORMANCE • Engine: 1280kv • Servomotor: 5V • Option of installing an SBUS, SUMD, CPPM radio receiver VIDEO & PHOTOS • Full HD 1080p Camera • Video feed: 360p / 720p FIRMWARE • Linux & Open Source SDK for development BATTERY CHARGER • • • • Input: 100-240V, 50h-60Hz, 1.2A Output: Max 12.6Vdc, 3.
GENERAL INFORMATION The Parrot Disco must be used in accordance with the civil aviation rules for each country, and in places suited to its chosen progression in order to always ensure the safety of people, animals and property. Before flying your Parrot Disco, check the local civil aviation rules. ACCESSORIES AND SPARE PARTS Accessories and spare parts are available from your Parrot retailer or on www.parrot.com..
WI-FI® (PARROT DISCO) Before you fly your Parrot Disco, check the restrictions regarding the use of Wi-Fi® frequencies in the place where you are going to fly it. Certain frequencies may be restricted or prohibited. In some countries, for example, the use of the 5 GHz Wi-Fi® band may be prohibited outdoors.
and non-conductive container). Never leave the battery unattended during the charging process. Never disassemble or modify the housing’s wiring, or puncture the cells. Always ensure that the charger output voltage corresponds to the voltage of the battery. Do not short circuit the batteries. Never expose the LiPo battery to moisture or direct sunlight, or store it in a place where temperatures could exceed 60 °C (car in the sun, for example). Always keep it out of reach of children.
FCC/IC (PARROT DISCO/PARROT SKYCONTROLLER 2) To comply with FCC/IC RF exposure guidelines for transmission equipment, a distance of at least 20 cm must be maintained between the product antenna and individuals. To remain compliant it is not recommended to use the product at any distance less than this. Changes or modifications not expressly approved by the party responsible for compliance could void the user’s authority to operate the equipment.