
Installation Manual


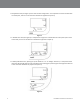
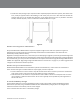
Table Of Contents
- A. Safety Information 3
- B. Other Conventions 5
- A. Overview of Installation 7
- B. Required Materials (Not Supplied) 7
- C. Design the Installation 7
- D. Install the Battery Charger 9
- E. Install the Order Point Speaker and Microphone Assemblies 12
- F. Install the Vehicle Detector(s) 13
- G. Assemble the PAR Drive Thru Headset G5. 13
- H. Install the Basestation 15
- I. Connect the Components 17
- J. Basestation to Component Wiring 20
- K. Auxiliary Detector Relays 21
- L. Installing Accessory Boards in the Basestation 23
- M. Power Up 26
- A. Enter Configuration Mode 28
- B. Navigating the Basestation Display 28
- C. Finding the MAC Address of the G5 Basestation 30
- D. Configuring with a Computer 30
- E. Logging into the Base Station with a PC 31
- F. Switching Between Lane1 and Lane2 31
- G. Menu Options for Lane1 and Lane2 32
- H. Change Basic Volume Settings 33
- I. Change Noise Reduction Level 39
- J. Set System Date and Time 39
- K. Change Global Settings 39
- L. Haptics “Vibration” Alerts and Blue LED Alerts on Headsets 42
- M. Order Taking Modes Setup 43
- N. Change Site Scheduling 43
- O. Change Site Information 44
- P. Digital IO Setup 45
- Q. Change Passcodes 45
- R. Split and Cross Lane Mode 46
- S. Installer Setup 46
- T. Factory Setup (Restore Factory Defaults) 47
- U. Create and Load Templates 47
- V. Reboot System 47
- W. Check the Revision Levels 48
- 1. Overview
- 2. Installation
- A. Overview of Installation
- B. Required Materials (Not Supplied)
- C. Design the Installation
- D. Install the Battery Charger
- E. Install the Order Point Speaker and Microphone Assemblies
- F. Install the Vehicle Detector(s)
- G. Assemble the PAR Drive Thru Headset G5H1
- H. Install the Basestation
- I. Connect the Components
- J. Basestation to Component Wiring
- K. Auxiliary Detector Relays
- L. Installing Accessory Boards in the Basestation
- M. Power Up
- 3. Configuration
- A. Enter Configuration Mode
- B. Navigating the Basestation Display
- C. Finding the MAC Address of the G5 Basestation
- D. Configuring with a Computer
- E. Logging into the Basestation with a PC
- F. Switching Between Lane1 and Lane2
- G. Menu Options for Lane1 and Lane2
- H. Change Basic Volume Settings
- Inbound Microphone Volume
- Outbound Talk Volume
- Vehicle Alert Volume
- Outbound Greeter Message Volume
- Change the Monitor Volume
- Inbound Listen
- Outbound Talk
- Vehicle Present
- Vehicle Approach
- Page Messages
- Greeter Messages
- Monitoring Audio Separately for the Two Lanes
- Change the Night Volume
- Registering Headsets
- Add Headsets
- Remove Headsets
- List All Headsets
- Resetting Inactive Days
- Checking Headset Software Revision
- Identifying Headset Serial Number
- I. Change Noise Reduction Level
- J. Set System Date and Time
- K. Change Global Settings
- L. Haptics “Vibration” Alerts and Blue LED Alerts on Headsets
- M. Order Taking Modes Setup
- O. Change Site Information
- P. Digital IO Setup
- Q. Change Passcodes
- R. Split and Cross Lane Mode
- S. Installer Setup
- T. Factory Setup (Restore Factory Defaults)
- U. Create and Load Templates
- V. Reboot System
- W. Check the Revision Levels
- X. Change the Microphone Preamp Gain
- Y. Installer Access
- 4. Troubleshooting
- 6. Appendix: Basestation Specifications
- 7. Appendix: Induction Loop and Vehicle Detector Board Specifications
- 8. Appendix: G5 Charger Specifications
- 9. Appendix: Best Practices
- 10. Appendix: PAR Acoustic Kit Installation Guide
- 11. Appendix: Loop and Cable Condition Test
- 12. Appendix: Upgrading a Single Lane Basestation to a Dual Lane
- 13. Index

8
Installation Instructions G5 Release A
•
A Single Drive-Thru (see Figure 1) is the most common configuration. It is comprised of one lane of traffic with
one order point, and one or two drive-thru windows for payment and pick up.
Figure 1.
•
A Tandem Drive-Thru (see Figure 2) is comprised of a single lane of traffic with two order points (one in front
of the other) and one or two drive-thru windows for payment and pick up.
Figure 2.
•
A Side-by-Side Drive-Thru, (See Figure 3) also known as a “Y” or “Merge” drive-thru, is comprised of two
lanes of ordering traffic side-by-side, each with its own ordering point, but merges into a single lane with one
or two drive-thru windows for payment and pick up.
Figure 3.