OT-310 Handheld POS Terminal User's Manual
ENGLISH Table of Contents Introduction ....................................................................................... 1 Features ........................................................................................................ 1 Package Contents ........................................................................................ 1 Product Overview ......................................................................................... 2 Front and Back ..................................
ENGLISH Application and Operation ............................................................... 26 Browser ......................................................................................................... 26 Launching a Web Page ........................................................................ 26 Viewing the Current Web Page ............................................................ 26 Managing Web Pages ..........................................................................
ENGLISH Viewing Call Log .................................................................................. 52 Barcode Scanner Module ............................................................................. 53 Configuring Barcode Reader Settings .................................................. 53 Reading a Barcode .............................................................................. 54 MSR Module ...............................................................................................
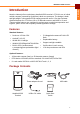
Introduction Meet the industry’s first revolutionary handheld POS terminal. OT-310 is one of a kind mobile computer powered by Qualcomm’s dual core processor. The design is sleek and light weight. It also passed IP54 sealing protection and is 1.5m drop resistant. Optional features for OT-310 are 1D or 2D barcode scanner and MSR or IC card. These modular features are combined in various ways to satisfy transportation and logistics, public sector and hospitality related application settings.
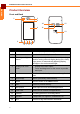
INTRODUCTION: Product Overview ENGLISH Product Overview Front and Back 1 2 3 12 10 4 11 13 9 8 7 6 5 No. 2 Item Description 1 3 LEDs Used for power system and application notifications. 2 Receiver Speaker for handheld phone calls. 3 Proximity and light sensor Proximity sensor for detection of near objects (e.g., used for turning off touch display during voice calls). Light sensor for automatically adjusting display backlight to the environmental light.
INTRODUCTION: Product Overview ENGLISH Left and Right 3 1 1 4 2 No. Item Description 1 Barcode scan trigger keys Press to scan barcodes. 2 Micro USB OTG port Connect to a USB cable for data transfer or battery charging purposes. 3 Earphone jack 3.5mm audio jack with same pin configuration as iPhone. 4 Volume keys Press to adjust the volume. Top and Bottom 1 No. 2 Item 3 Description 1 Barcode scan window Point this scan window to scan barcodes.
INTRODUCTION: LED Indicators ENGLISH LED Indicators The OT-310 handheld POS terminal has three LED indicators. 3 No. 4 2 Item 1 Description 1 Module indicator Lit Green when 1D or 2D barcode scanner is activated. 2 Wireless indicator Lit Green when wireless connection (3G, Wi-Fi, or Bluetooth) is activated. 3 Power indicator • Lit Red when the battery is charging. • Lit Green when the battery is full.
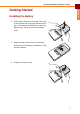
GETTING STARTED: Installing the Battery ENGLISH Getting Started Installing the Battery 1. Place the two thumbs on the back cover. One on the left and one on the right side of the NFC logo. Press firmly and slide down to open the battery cover. Lift up to remove the battery cover. 2. Align the battery connectors on the battery with the pins in the battery compartment. Then insert the battery. 3. Replace the battery cover.
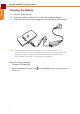
GETTING STARTED: Charging the Battery ENGLISH Charging the Battery 1. Open the protective cap. 2. Connect the device using the DC to USB cable and power adaptor. 3. Plug the other end of the power adaptor to the wall outlet to start charging. 3 2 1 2 NOTE: Charging shall also be possible from PC via USB and via OT-310 cradle.Furthermore, any microUSB charger which is compliant with USB battery charging 1.2 (http://www.usb.org/developers/devclass_docs/ USB_Battery_Charging_1.2.pdf) shall be acceptable.
Installing the Memory Card 1. Remove the battery compartment cover and remove the battery and SIM card. 2. Unlock the memory card slot by sliding it toward the bottom of OT-310. 3. Insert a micro SD card into the memory card slot. 4. Gently place down the memory card slot. Lock the memory card slot by sliding it toward the top of OT-310. 5. Replace the SIM card and the battery. 6. Replace the battery cover. Installing the SIM Card 1. Remove the battery compartment cover and battery. 2.
GETTING STARTED: Powering the Device On/Off ENGLISH Powering the Device On/Off To turn on the device: Press and hold the Power button for 3 seconds to turn on the device. To turn off the device: 1. Press and hold the Power button for at least 3 seconds. 2. Touch Power off. 3. A confirmation message appears on the screen. Touch OK to turn the device off. Sleep Mode To save power, put the device to Sleep mode when not in use.
Unlocking the Screen By default, the screen is locked after turning the device on, when leaving sleep mode or after a period of inactivity. The screen lock time can be set in Settings menu (see“Configuring Display Settings” on page 16). To unlock the screen, drag towards enter the Camera application. NOTE: When the . Or, drag towards icon is touched, it automatically changes to to directly .
USING THE HANDHELD POS TERMINAL: Understanding the Interface ENGLISH Using the Handheld POS Terminal Understanding the Interface Home Screen Overview 1 3 2 4 5 No. 10 Item Description 1 Status Bar Display status icons and notifications. See “Status and Notifications” on page 11 for more information. 2 Home screen Main screen display. • Touch items on the screen to select an application. • Swipe the finger left or right to change panels.
USING THE HANDHELD POS TERMINAL: Understanding the Interface ENGLISH Status and Notifications The Status Bar always appears on top of the screen and indicates different types of information. 1 2 3 4 5 No. Item 6 Description 1 Barcode reader Indicate the barcode reader is enabled. 2 Bluetooth icon Indicate Bluetooth is enabled. To enable this function, see “Connecting to Bluetooth Devices” on page 18. 3 Wi-Fi icon Indicate the Wi-Fi signal strength.
USING THE HANDHELD POS TERMINAL: Understanding the Interface ENGLISH Using the Touch Screen The device is equipped with a 4.3-inch touch screen. The following describes some tips on how to use the touch screen. Touching • Touch an icon displayed on the screen to select it. • A pop-out menu may appear (depending on the function in use) by touching and holding on the screen. Scrolling • Scroll up/down: slide the finger up/down on the screen.
USING THE HANDHELD POS TERMINAL: Understanding the Interface ENGLISH Managing the Home Screen Add shortcut icons, widgets, and folders on the Home screen and change the wallpaper. To change the wallpaper: 1. Touch and hold a blank space on the Home screen. 2. A pop up window appears. Touch one of the following: • Gallery: To use pictures saved on the device. • Live Wallpapers: To use pre-installed interactive wallpapers that came with the device.
USING THE HANDHELD POS TERMINAL: Understanding the Interface ENGLISH To remove items: 1. Touch and hold the desired item to remove. 2. Drag and drop the item to the Remove icon until the item turns red. The application icon is removed from the Home screen. Opening Applications Touch > APPS tab to access the pre-installed applications and device settings. • Touch an icon to open the application. • Swipe the finger left or right to view more applications.
USING THE HANDHELD POS TERMINAL: Changing Basic Settings ENGLISH Changing Basic Settings Setting the Date and Time Adjust the date and time of the device to provide accurate operation. The time zone can also be set accordingly. To automatically adjust date and time, perform the following: 1. On the Home screen, touch > Settings. 2. In SYSTEM, touch Date & time. 3. Touch Automatic date & time checkbox to automatically set the date and time according to the network.
USING THE HANDHELD POS TERMINAL: Changing Basic Settings ENGLISH Configuring Display Settings This device display can be configured in many ways to better suit the working environment. To adjust the brightness, perform the following: 1. On the Home screen, touch > Settings. 2. In DEVICE, touch Display > Brightness. 3. Drag the slider to adjust the brightness setting. 4. Touch OK to confirm.
USING THE HANDHELD POS TERMINAL: Changing Basic Settings ENGLISH Configuring Sound Settings This device has several sound settings such as general sound, ringtones, notifications, and alarms. To adjust the volume, perform the following: 1. On the Home screen, touch > Settings. 2. In SOUND, touch Volumes. 3. Drag the respective volume slide to adjust the volume. 4. Touch OK to confirm the settings. To customize the device ringtones and notifications, perform the following: 1.
USING THE HANDHELD POS TERMINAL: Managing Wireless and Network Settings ENGLISH Managing Wireless and Network Settings Connecting to Wireless Networks To connect to an available wireless network, perform the following: 1. On the Home screen, touch > Settings. 2. In WIRELESS & NETWORK, touch Wi-Fi and set it to ON to enable the Wi-Fi function. The device searches for available networks within range. 3. Touch an available network connection. 4.
USING THE HANDHELD POS TERMINAL: Configuring Language and Keyboard Settings ENGLISH Configuring Language and Keyboard Settings Changing the System Language To change the system language, perform the following: 1. On the Home screen, touch > Settings. 2. In PERSONAL, touch Language & input. 3. Touch Language. 4. Touch the desired language. 5. Touch to return to the Home screen. Changing the Input Settings By default, the device uses the Android keyboard.
USING THE HANDHELD POS TERMINAL: Configuring Language and Keyboard Settings ENGLISH Using the User Dictionary The device has a built-in user dictionary, allowing users to add words to it. To add words to the dictionary, perform the following: 1. On the Home screen, touch Language & input. > Settings > 2. Touch Personal dictionary. 3. To add words to the dictionary, touch . 4. Type the word to add to the dictionary. 5. Touch OK. 6. Repeat steps 3 to 5 to add more words. 7.
Advanced Settings Configuring Location Services Based on the location, the Location Services settings menu allows interactive options with Google. 1. On the Home screen, touch Location access. > Settings > 2. Touch one of the following options: • Google’s location service: Check the box to allow application to use data from sources such as Wi-Fi and mobile network to determine the approximate location. • GPS satellites: Check the box to enable GPS satellites to pinpoint the location.
USING THE HANDHELD POS TERMINAL: Advanced Settings ENGLISH • Unknown sources: Check the box to allow installation of applications from unknown sources. • Trusted credentials: Allow applications to display trusted CA certificates. • Install from storage: Install encrypted certificates from memory card. • Clear credentials: Clear credential storage of all contents and reset its password. 3. Touch to return to the Home screen.
USING THE HANDHELD POS TERMINAL: Advanced Settings ENGLISH 3. Touch Corporate. 4. Enter the Email address and Password. NOTE: If there are more than one accounts, check the Send email from this account by default box to set the current account as the default account. 5. Touch Next to continue. 6. Enter the required information such as Domain or Username, Password, Server (for Exchange account), etc. NOTE: Obtain these information from the network administrator or service provider. 7.
USING THE HANDHELD POS TERMINAL: Advanced Settings ENGLISH To synchronize other accounts, perform the following: 1. On the Home screen, touch Accounts & sync. > Settings > 2. Touch the desired account to sync. 3. Check the boxes of the desired data to sync, such as Contacts, Calendar. 4. Touch 5. Touch > Sync now. to return to the Home screen. To remove an account, perform the following: 1. On the Home screen, touch > Settings > Accounts & sync. 2. Touch the desired account to remove. 3.
USING THE HANDHELD POS TERMINAL: Advanced Settings ENGLISH Managing Storage Space Use the Storage settings menu to view the total and available space on the device. The device has two storage sources: • USB STORAGE: The internal storage • SD CARD: The micro SD card To view the total and available storage space, touch touch Settings > Storage. from the Home screen, then To unmount the memory card for safe removal, perform the following: 1. On the Home screen, touch Storage. > Settings > 2.
APPLICATION AND OPERATION: Browser ENGLISH Application and Operation This chapter covers information on how to use pre-installed applications and customize related settings. Browser Use Browser to view web pages. Launching a Web Page 1. On the Home screen, touch > Browser. 2. Touch the address bar. 3. Enter the URL on the address bar 4. Touch Go on the on-screen keyboard. NOTE: Be sure that the device is properly connected to Internet either via Wi-Fi connection or mobile data network.
APPLICATION AND OPERATION: Browser ENGLISH Managing Web Pages Touch to change the view current setting or configure other functions. • Refresh: Select to reload current web page. • Forward: Select to go to the next page. • Bookmarks: Select to view bookmarks, history, or saved pages. • Save to bookmarks: Select to save favorite web pages as bookmarks. • Share page: Select to share the current page via Bluetooth, Email, or Messaging. • Find on page: Select to find texts on the current web page.
APPLICATION AND OPERATION: Camera ENGLISH Camera Use Camera to capture photos and panorama shots and record videos. Capturing Photos 1. On the Home screen, touch > Camera. Flash mode Zoom icon Touch to enter Camera menu. Touch to view the latest record file. 2. Aim the device at the subject. NOTE: Drag the 3. Touch icon to zoom in/out on the subject. to capture the shot. Reviewing Photos Touch the thumbnail frame to preview the latest captured photo. • Touch Gallery.
APPLICATION AND OPERATION: Camera Touch ENGLISH Configuring Camera Settings to enter the camera menu. Perform the following: • Touch to configure the basic camera settings. Available options: Store location (OFF/ON), Picture size (5M Pixels/3M Pixels/2M Pixels/WXGA/HD720/1M Pixel/SVGA/WVGA/VGA/CIF/QVGA/QCIF), Focus mode (Normal/Macro), Anti Banding (Auto/60 Hz/50 Hz/ Off), Restore defaults (Cancel/OK). • Touch to change the auto exposure settings.
APPLICATION AND OPERATION: Camera ENGLISH Recording Videos 1. On the Home screen, touch 2. Touch and select > Camera. to switch to Video mode. Zoom icon Touch to enter Video menu. Touch to view the latest record file. 3. Aim the device at the subject. 4. Touch to start recording the video. NOTE: Drag the 5. Touch icon to zoom in/out on the subject. to stop recording. Reviewing Videos Touch the thumbnail frame to preview the latest recorded video. • Touch to play the video. • Touch Gallery.
APPLICATION AND OPERATION: Camera Touch ENGLISH Configuring Video Settings to enter the video menu. Perform the following: • Touch to configure the basic video settings. Available options: Store location (OFF/ON), Video Encoder (H264/H263/MPEG4), Audio Encoder (AAC/ AMRNB), Video duration (30 minutes/15 minutes/10 minutes/30 seconds), Color effect (None/Mono/Sepia/ Negative/Solarize), Power Mode (Normal_Power/ Low_Power), Restore defaults (Cancel/OK). • Touch to specify the video quality settings.
APPLICATION AND OPERATION: Camera ENGLISH Capturing Panorama Shots 1. On the Home screen, touch 2. Touch and select > Camera. to switch to Panorama mode. Touch to view the latest record file. 3. Aim the device at the subject. 4. Touch to start capturing the shot. 5. Pan the device horizontally and follow the shooting guideline as shown on the screen. Shooting guideline 6. Touch 32 to stop shooting.
APPLICATION AND OPERATION: Email ENGLISH Email Use the device to send and receive emails using Internet email accounts. Setting up an Email Account 1. On the Home screen, touch > Email. 2. Enter the email address and password. 3. Touch Next. NOTE: Touch Manual setup to manually configure the email. NOTE: To setup an Exchange email account, refer to “Managing Accounts” on page 22. 4. Set the Inbox checking frequency setting and touch other options box to enable the necessary settings. 5.
APPLICATION AND OPERATION: Email ENGLISH 6. Enter the account and display names and touch Next. Once the account setup is complete, the device will automatically retrieve the emails. Viewing Emails By default, emails are automatically saved in the Inbox folder. Unread emails Indicates this email contains attachment. Read emails Indicates this email has been added to the Starred folder. • Touch to manually receive emails. • Touch to view other folders.
APPLICATION AND OPERATION: Email 1. On the Home screen, touch 2. Touch ENGLISH Composing and Sending an Email > Email. . 3. Enter the recipient’s email address in the To field. 4. Enter a subject in the Subject field (if necessary). 5. Compose the email. NOTE: To add attachments to emails, touch > Attach file. Then select the file to attach. 6. Touch to send the email. Reading and Replying an Email 1. On the Home screen, touch > Email. 2. Touch an email to open it. 3.
APPLICATION AND OPERATION: Email ENGLISH Deleting Emails To delete an email at a time, perform the following: 1. On the Home screen, touch > Email. 2. Touch an email to open it. 3. Touch to delete the current email. To delete selected emails in the same folder, perform the following: 1. On the Home screen, touch > Email. 2. Touch and hold the desired email to delete. Select other email(s) if necessary. 3. Touch 36 to delete the selected email(s).
APPLICATION AND OPERATION: Email 1. On the Home screen, touch 2. Touch ENGLISH Adding Other Email Accounts > Email. > Settings. 3. Touch ADD ACCOUNT. 4. Repeat Steps 2~6 in “Setting up an Email Account” on page 33. NOTE: Check the Send email from this account by default box to set this new account as the default email account. Customizing Email Settings 1. On the Home screen, touch 2. Touch > Email. > Settings. 3. Touch General or an email account. 4.
APPLICATION AND OPERATION: File Manager ENGLISH File Manager Use File Manager to browse and manage files/folders stored in the internal memory (the device) or the memory card installed in the device. Browsing Files 1. On the Home screen, touch > File Manager. 2. Select the directory by touching SD card or Device. 3. Browse the folder list and touch the folder to explore. Managing Files and Folders Perform one of the following: • To create a new folder, touch name and touch OK.
Gallery Use Gallery to view captured photos, recorded videos, or downloaded photos stored in the internal memory (the device) or the memory card installed in the device. Viewing Photos 1. On the Home screen, touch > Gallery. 2. Touch the desired album/folder. The recorded files are displayed in thumbnails. 3. Touch the desired image to view it in full screen. 4. Perform the following: • To view other files, swipe the finger to the left or right.
APPLICATION AND OPERATION: Gallery ENGLISH Playing Videos 1. On the Home screen, touch > Gallery. 2. Touch the desired album/folder. The recorded files are displayed in thumbnails. 3. Touch the desired video to playback. 4. Perform one of the following: • To play the video, touch . • To view other files, swipe the finger to the left or right. • To share this video, touch desired sharing application. • To delete this video or show more options, touch . and select the Playing Slideshow 1.
APPLICATION AND OPERATION: Messaging ENGLISH Messaging Use Messaging to send and receive text and MMS messages. Creating and Sending a Text Message 1. On the Home screen, touch 2. Touch > Messaging. . 3. Enter the recipient’s phone number in the To field. 4. Compose the message. 5. Touch to send the message. NOTE: By exiting Messaging before sending the message, the unsent message will be automatically saved as a draft. Adding an Attachment to a Message 1. On the Home screen, touch 2.
APPLICATION AND OPERATION: Messaging ENGLISH Configuring Messaging Settings 1. On the Home screen, touch 2. Touch > Messaging. > Settings. 3. Touch an option and change the necessary settings: 42 • Delete old messages: Select this option to delete old messages as limits are reached. • Text message limit: Select to specify the maximum limit of text message per conversation. • Multimedia message limit: Select to specify the maximum limit of multimedia message per conversation.
APPLICATION AND OPERATION: Music ENGLISH Music Use Music to listen to the favorite songs using the device. Playing a Song 1. On the Home screen, touch > Music. 2. Touch the Song tab. All songs are displayed on the screen. 3. Touch a song to play. Touch to enter Now Playing screen. Touch to enable/disable the shuffle mode. Touch to toggle the repeat mode. Touch to pause the playback. Touch again to play. Touch to skip to the previous song. Touch to skip to the next song.
APPLICATION AND OPERATION: Music ENGLISH Creating a Playlist 1. On the Home screen, touch > Music. 2. Touch and hold the desired song to add. 3. Touch Add to playlist. 4. Select a playlist. To create a new playlist, touch New. Enter the new playlist name and touch Save. Assigning a Song as Ringtone 1. On the Home screen, touch > Music. 2. Touch and hold the desired song to be the device ringtone. 3. Touch Use as phone ringtone.
APPLICATION AND OPERATION: Music 1. On the Home screen, touch ENGLISH Deleting a Song > Music. 2. Touch and hold the desired song to delete. 3. Touch Delete. 4. Touch OK to delete the selected song. Configuring the Sound Effect 1. On the Home screen, touch > Music. 2. Touch a song to play. 3. Touch > Sound effects. 4. Touch Equaliser and set it to ON. 5. Touch an option and change the necessary settings.
APPLICATION AND OPERATION: People ENGLISH People Use People to view and manage the contact list. Adding a New Contact 1. On the Home screen, touch 2. Touch > People. . 3. Touch one of the following: • New Contact in Device: To save the new contact to the phone memory. • New Contact in Card: To save the new contact to the memory card. 4. Enter the contact information such as name, phone number, email address, home address, and other related data. 5. Touch DONE to save the contact.
APPLICATION AND OPERATION: People ENGLISH Importing Contacts To import contacts from the SIM card, perform the following: 1. On the Home screen, touch 2. Touch > People. > Import/export > Import from SIM card. 3. Touch the desired contact to import. To import contacts from the memory card, perform the following: 1. On the Home screen, touch 2. Touch > People. > Import/export > Import from storage. 3. Select the vCard file(s) to import. 4. Touch OK to import contacts.
APPLICATION AND OPERATION: People ENGLISH Backing Up Contacts To copy contacts to the SIM card, perform the following: 1. On the Home screen, touch 2. Touch card. > People. > Import/export > Export to SIM/RUIM 3. Touch the desired contact to export. To copy contacts to the memory card, perform the following: 1. On the Home screen, touch 2. Touch > People. > Import/export > Export to storage. 3. Touch OK to copy contacts to the memory card.
APPLICATION AND OPERATION: People ENGLISH Managing Contacts To edit a contact information, perform the following: 1. On the Home screen, touch > People. 2. Touch the desired contact to modify. 3. Touch > Edit. 4. Modify the necessary information. 5. Touch DONE to save the changes. To share a contact information, perform the following: 1. On the Home screen, touch > People. 2. Touch the desired contact to share. 3. Touch > Share. 4.
APPLICATION AND OPERATION: People ENGLISH To send all calls from specific contact to voicemail, perform the following: 1. On the Home screen, touch > People. 2. Touch the desired contact to revert all calls directly to voicemail. 3. Touch > All calls to voicemail. To add a contact to Favorite list, perform the following: 1. On the Home screen, touch > People. 2. Touch the desired contact to add to the Favorite list. 3.
APPLICATION AND OPERATION: Phone ENGLISH Phone Use Phone to make or receive a phone call using the device. Making a Call 1. On the Home screen, touch > Phone. 2. Enter the phone number using the on-screen keypad. • To delete a wrong number, touch . • To delete the entire number, touch and hold . 3. Touch to make a call after the user finishes entering the phone number. 4. To end the call after dialing, touch . NOTE: As an alternative, calls can be made directly from the contact lists.
APPLICATION AND OPERATION: Phone ENGLISH Answering a Call • To answer a call, touch and drag it to the icon. • To reject the call, touch and drag it to the icon. • To reject and send a message directly to the caller, touch and drag it to the NOTE: When the changes to icon. icon is touched, it automatically . Viewing Call Log The Call Log screen displays the recent outgoing, received, or missed calls. To view the Call Log screen, touch the Call Log ( ) tab.
Barcode Scanner Module This device is equipped with a barcode scanner module which supports many of the popular barcode formats currently used worldwide. NOTE: During the system initialization (after powering on the device for the first time or resetting the device to factory default), the scanner will take approximately 30 seconds to be activated. It is highly recommended not to press the barcode scan trigger key within 30 seconds.
APPLICATION AND OPERATION: Barcode Scanner Module ENGLISH • Show the notification icon: Check the box to enable notification icon to be displayed on the status bar. • Firmware Version: View the module firmware version. 3. Touch to return to the Home screen. Reading a Barcode To read a 1D barcode, perform the following: 1. Press and release the barcode scan trigger key. 2. Aim the scanning beam at the barcode. 3. The scanned data appears on the screen. To read a 2D barcode, perform the following: 1.
APPLICATION AND OPERATION: MSR Module ENGLISH MSR Module The Magnetic Stripe Reader module supports tracks 1, 2, and 3 covering possible reading methods currently in use. Configuring MSR Settings Use the MSR settings menu to configure the MSR module related settings. 1. On the Home screen, touch MSR Settings. > Settings > 2. Touch one of the following options: • Track setting: Configure tracks order, start sentinels, and end sentinels settings.
APPLICATION AND OPERATION: MSR Module ENGLISH Testing the MSR Module 1. On the Home screen, touch > Settings > MSR Settings. 2. Touch MSR Demo to open the swipe test screen. 3. Swipe a magnetic stripe card through the MSR module. Make sure the magnetic stripe is facing upward. 4. Data appears on the screen if the test is successful.
APPENDIX: Specifications ENGLISH Appendix Specifications OT-310 Specifications Processor Qualcomm MSM8960 Dual Core Krait– 1.5GHz OS Android 4.2 Memory Standard: 1GB Storage Standard: 8GB Display • 4.3" TFT, 800*480 • Brightness 350nits Capacitive Touch • 2 finger touch • Gorilla glass+ AR solution WWAN 1. (RF WCDMA+GSM)GWTR-1605 support • GSM850/900/1800/1900 • EDGE850/900/1800/1900 • GPRS850/900/1800/1900 • WCDMA850/1700(AWS)/1900/2100 2. Voice 3. HSPA+ Modem Bluetooth V4.
APPENDIX: Specifications ENGLISH OT-310 Specifications Speaker Internal, 1 (0.
APPENDIX: Troubleshooting ENGLISH Troubleshooting 1. The device powers off automatically. • The battery power is depleted. Charge the battery. 2. No sound comes out from the device. • Check whether the volume is set to mute. Press the volume keys to adjust volume. • Check whether the music file is damaged, try other files to test. 3. Cannot copy a file to the micro SD card. • Check whether the micro SD card capacity is full. • Try to delete or move some files to free space. 4.
ENGLISH Preface Copyright Copyright © 2014. All rights reserved. No part of this user manual may be reproduced, transmitted, stored in a retrieval system, or translated into any language, in any form or by any means, without permission from the manufacturer. Google, the Google logo, Android, the Android logo and Tags are trademarks of Google Inc. Wi-Fi is a registered trademark of the Wireless Fidelity Alliance. microSD is a trademark of SD Card Association.
ENGLISH Regulatory Statement RF Exposure Information (SAR) This phone is designed and manufactured not to exceed the emission limits for exposure to radio frequency (RF) energy set by the Federal Communications Commission of the United States. During SAR testing, this device was set to transmit at its highest certified power level in all tested frequency bands, and placed in positions that simulate RF exposure in usage against the head with no separation, and near the body with the separation of 10 mm.
ENGLISH WEEE Notice The WEEE logo on the product or on its box indicates that this product must not be disposed of or dumped with your other household waste. You are liable to dispose of all your electronic or electrical waste equipment by relocating over to the specified collection point for recycling of such hazardous waste. Isolated collection and proper recovery of your electronic and electrical waste equipment at the time of disposal will allow us to help conserve natural resources.
ENGLISH About this Manual The content in this manual is as accurate as possible. However, due to continuous product improvements, some contents and specifications may have been changed since this manual was written. In this case, take the actual device as basis. No part of this user manual may be reproduced, transmitted, stored in a retrieval system, or translated into any language, in any form or by any means, without a written permission from the manufacturer.