EM Enterprise n Tablet User's Manual a
ENGLISH Table of Contents Preface ............................................................................................... 1 Copyright ...................................................................................................... 1 Safety Information ......................................................................................... 1 Regulatory Statement ................................................................................... 2 SAR Information ..............................
ENGLISH Using ES File Explorer .................................................................................. 18 Managing Files and Folders ................................................................. 19 Changing the Tablet Settings ........................................................... 20 Settings Menu ............................................................................................... 20 Managing Wireless and Network Settings ....................................................
ENGLISH Preface Copyright Copyright © 2012. All rights reserved. No part of this user manual may be reproduced, transmitted, stored in a retrieval system, or translated into any language, in any form or by any means, without permission from the manufacturer. Google, the Google logo, Android, the Android logo and Tags are trademarks of Google Inc. ES File Explorer is a trademark of EStrongs Inc. Wi-Fi is a registered trademark of the Wireless Fidelity Alliance. microSD is a trademark of SD Card Association.
ENGLISH Regulatory Statement SAR Information THIS MOBILE DEVICE MEETS GUIDELINES FOR EXPOSURE TO RADIO WAVES. Your mobile device is a radio transmitter and receiver. It is designed not to exceed the limits for exposure to radio waves recommended by international guidelines. These guidelines were developed by the independent scientific organization ICNIRP and include safety margins designed to assure the protection of all persons, regardless of age and health.
ENGLISH RF Exposure Information (SAR) This device is compliance with SAR for general population / uncontrolled exposure limits in ANSI/IEEE C95.1-1999 and had been tested in accordance with the measurement methods and procedures specified in OET Bulletin 65 Supplement C. This equipment complies with FCC RF radiation exposure limits set forth for uncontrolled environment. This device was tested for operations with the device contacted directly to the human body to the back side of the EUT.
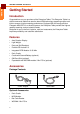
GETTING STARTED: Introduction ENGLISH Getting Started Introduction Congratulations on your purchase of the Enterprise Tablet. This Enterprise Tablet is a stylish commercial tablet that uses the latest ARM technology supporting mobile work input to ensure a high processing performance. Equipped with the energy-efficient Freescale ARM CPU in an Android system, the Enterprise Table provides the highest usability matching various industrial needs.
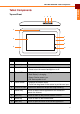
GETTING STARTED: Tablet Components ENGLISH Tablet Components Top and Front 1 2 3 4 7 5 8 9 6 No. 10 Item Description 1 Volume Down Press to decrease volume. 2 Volume Up Press to increase volume. 3 Power Button • Press and hold for 2 seconds to turn the device on or off. • Press to turn the screen backlight on or off. 4 Status LED Indicates the power and charging status: • Red: Battery is charging. • Green: Device power is on. • Off: Device power is off.
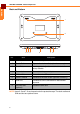
GETTING STARTED: Tablet Components ENGLISH Back and Bottom 1 2 3 4 No. 5 6 Item 7 8 Description 1 Speakers Emits audio output. 2 Cradle Guide Aligns to the dock cradle (optional accessory). 3 Reset Button Insert a pointed object to reset the device to its factory defaults. 4 Power Jack Connects to the power adaptor. 5 SD Card Slot Houses the microSD card. 6 Cradle Contacts Connects to the dock cradle (optional accessory).
GETTING STARTED: Installing the SD Card ENGLISH Installing the SD Card Install a compatible microSD™ card to add more storage space to save your files. To install the microSD™ card: 1. Open the left side protective cap. 2. Insert the microSD™ card with the gold contacts facing the front of the device. 3. Push the microSD™ card until it clicks into place. 4. Close the protective cap.
GETTING STARTED: Charging the Battery ENGLISH Charging the Battery 1. Open the protective cap. 2. Connect one end of the power adaptor to the power jack of your device. 3. Plug the other end of the power adaptor to the wall outlet to start charging. NOTE: Use only the supplied power adaptor to charge the battery. Using other power adaptor not authorized by the manufacturer may damage the device and void the warranty.
GETTING STARTED: Powering On the Tablet ENGLISH Powering On the Tablet To turn on your device: Press and hold the Power button until the status LED lights green. To turn off your device: 1. Press and hold the Power button for at least 3 seconds. The screen below appears. 2. Touch OK to turn the device off. Sleep Mode To save power, put the device to sleep mode when not in use. In sleep mode, the device is in turned on mode but the screen backlight is turned off.
GETTING STARTED: Unlocking the Screen ENGLISH Unlocking the Screen By default, the screen is locked after turning the device on or after a period of inactivity. The screen lock time can be set in Setting menu (see “Display” on page 23). To unlock the screen: Drag the lock icon upwards. Initial Settings For first time use, a setup wizard may prompt you for the system date and time, guide you on how to setup email and other options. Follow the wizard to complete the initial settings of your Tablet PC.
Using Data Network Connection For locations without Wi-Fi connection, install a SIM card to connect to a data network (see “Installing the SIM Card (Optional)” on page 7). NOTE: Only Tablet PC models with a SIM card slot can use this connection.
USING THE TABLET: Understanding the Interface ENGLISH Using the Tablet Understanding the Interface The Home Screen 1 3 2 4 5 6 No. 12 Item Description 1 Status Bar Displays status icons and notifications. See “Status and Notifications” on page 13 for more information. 2 Home screen Main screen display. Touch items on the screen to select an application. 3 Browser icon Touch to open the Browser application and search the Internet.
USING THE TABLET: Understanding the Interface ENGLISH Status and Notifications The Status Bar always appears on top of the screen and indicates different types of information. 1 2 3 4 6 No. Item 5 7 8 Description 1 Home icon Touch to return to the Home screen from any application. 2 USB icon Indicates that the Tablet PC is connected to a computer using the USB cable. 3 Bluetooth icon Indicates Bluetooth is enabled. “Connecting to Bluetooth Devices” on page 21.
USING THE TABLET: Understanding the Interface ENGLISH Managing the Home Screen You can add shortcut icons, widgets, and folders on the Home screen and change the wallpaper. To change the wallpaper: 1. Touch and hold a blank space on the Home screen. 2. A pop up window appears. Touch one of the following: • Gallery: To use pictures saved on your Tablet PC. • Live wallpapers: To use pre-installed interactive wallpapers that came with your device.
USING THE TABLET: Using the Applications ENGLISH Using the Applications This section covers some basic applications that you can do on your Tablet PC. Typing on the Keyboard Your Tablet PC comes with the Android On-Screen Keyboard. Use of the on-screen keyboard is similar to that of an ordinary computer keyboard. 1 2 3 7 6 4 No. Item 5 Description 1 Alphanumeric Keys Touch the keys to enter letters, numbers, and symbols.
USING THE TABLET: Using the Applications ENGLISH Searching for Items Your Tablet PC comes with a Search Bar. You can search for applications on your device or search the Internet using the Search Bar, 1 No. 2 Item Description 1 Source to Search Touch to select the source where you want to search: Web, Application, or All. 2 Search Bar Type the characters/word to search for. Opening Applications Your Tablet PC comes with pre-installed applications.
Using Tags Near Field Communication (NFC) technology, otherwise called as Tags contain URLs, pictures, maps location, and any other kinds of information. Your Tablet PC comes with the Tags application. Use Tags to scan tags, open applications, share, and organize them on your device. Before using Tags, activate the NFC function on your device first. Activating NFC 1. On the Home screen, touch > Settings > Wireless & networks. 2. Touch NFC to check the box and enable the function. Scanning Tags 1.
USING THE TABLET: Using ES File Explorer ENGLISH Using ES File Explorer The ES File Explorer allows you to browse files on the microSD card, device internal memory, or browse through files through LAN and FTP servers. 3 4 5 6 7 8 9 1 2 No. 18 Item Description 1 Directory Shows the current directory location. 2 File Organizer Displays files/folder contents of the current directory. Touch a folder to browse its contents. 3 Root / Home • Touch to toggle between root and home directory.
No. 9 Item Show / Hide Menu ENGLISH USING THE TABLET: Using ES File Explorer Description Touch to show or hide the ES File Explorer menu. Managing Files and Folders You can use common computer operations such as copy and paste with the ES File Explorer. To do this, perform the following: 1. Touch and hold a file or folder. 2. A pop up window appears. Touch an operation such as Paste, Cut, Copy, Rename, etc. To access more options: Touch options: to bring up the ES File Explorer menu.
CHANGING THE TABLET SETTINGS: Settings Menu ENGLISH Changing the Tablet Settings This chapter covers information on how to change your Tablet PC settings and customize other options. To access the Tablet Settings, on the Home screen, touch > Settings . Settings Menu Wireless & networks Manage Wi-Fi, Bluetooth, VPN, and NFC settings. Sound Set volume, screen lock sounds, and mute device. Display Set brightness setting, enable auto-rotate screen, animation, and screen timeout options.
Language & keyboard Select the system language, manage the user dictionary and keyboard settings. Accessibility Set accessibility options, if available. Date & time Set the system date and time. About device View device information such as version, legal information, model name, etc. ENGLISH CHANGING THE TABLET SETTINGS: Managing Wireless and Network Settings Managing Wireless and Network Settings Connecting to Wireless Networks 1. 2. 3. 4. 5.
CHANGING THE TABLET SETTINGS: Changing Basic Settings ENGLISH Setting Up VPN The Tablet PC can be setup to connect to Virtual Private Networks (VPN). NOTE: Obtain the necessary settings from your network administrator. 1. 2. 3. 4. On the Home Screen, touch > Settings > Wireless & networks. Touch VPN settings. Touch Add VPN.
CHANGING THE TABLET SETTINGS: Changing Basic Settings ENGLISH Display To modify the display settings of your Tablet PC, perform the following: 1. On the Home Screen, touch > Settings 2. Touch one of the following options: > Display. • Brightness: Touch to bring up the Brightness window. Drag the slider to adjust the screen brightness, then touch OK. • Auto-rotate screen: Check this box to enable automatic rotation of the screen when changing the screen orientation.
CHANGING THE TABLET SETTINGS: Changing Language and Keyboard Settings ENGLISH Changing Language and Keyboard Settings Changing the Device Language To change the device language, perform the following: 1. On the Home Screen, touch 2. Touch Select language. 3. Touch the desired language. 4. Touch > Settings > Language & keyboard. to return to the Home screen. Managing Keyboard Settings By default, your Tablet PC uses the Android keyboard. To manage the keyboard settings, perform the following: 1.
CHANGING THE TABLET SETTINGS: Changing Language and Keyboard Settings ENGLISH Using the User Dictionary Your Tablet PC has a built-in user dictionary where you can add words to it. To add words to the dictionary, perform the following: 1. On the Home Screen, touch 2. Touch User dictionary. 3. 4. 5. 6. > Settings > Language & keyboard. To add words to the dictionary, touch > Add. Type the word you want to add to the dictionary. Touch OK. Repeat steps 3 to 5 to add more words. 7.
CHANGING THE TABLET SETTINGS: Managing Storage Space ENGLISH Managing Storage Space The Storage settings menu allows you to view the total and available space on your storage devices. Your Tablet PC has three storage sources: • SD card: The internal storage • EXTSD card: The micro SD card • U disk To view the total and available storage space, touch touch Settings from the Home screen, then > Storage.
CHANGING THE TABLET SETTINGS: Managing Accounts ENGLISH Managing Accounts You can synchronize the data, email, calendar and other information of an account with your Tablet PC. Adding Exchange Accounts 1. 2. 3. 4. On the Home Screen, touch > Settings Touch Add account. Touch Corporate. Enter your Email address and Password. > Accounts & sync. NOTE: If you have more than one accounts, check the Send email from this account by default box to set the current account as the default account. 5.
CHANGING THE TABLET SETTINGS: Managing Accounts ENGLISH 5. Touch to return to the Home screen. Removing Accounts 1. 2. 3. 4. On the Home Screen, touch > Settings > Accounts & sync. Touch the account to you want to remove. Touch Remove account. A confirmation message appears. Touch Remove account to confirm. 5. Touch 28 to return to the Home screen.
CHANGING THE TABLET SETTINGS: Advanced Settings ENGLISH Advanced Settings Location and Security 1. On the Home Screen, touch > Settings 2. Touch one of the following options: > Location & security. • Set up screen lock: Set up a pattern, PIN, or password to lock or unlock the screen. • Visible passwords: Check the box to show the password as you type. • Select device administrators: Add or remove device administrators.
CHANGING THE TABLET SETTINGS: Advanced Settings ENGLISH Privacy 1. On the Home Screen, touch > Settings 2. Touch one of the following options: > Privacy. • Back up my data: Check to back up application data, Wi-Fi passwords, and other settings to Google servers. • Automatic restore: Check to automatically reinstall applications, and restore backed up settings or other data. Available only when Back up my data is enabled.
USING OPTIONAL ACCESSORIES: Dock Cradle ENGLISH Using Optional Accessories Expand the functionality of your Tablet PC using the optional accessories. Dock Cradle Parts and Functions 1 2 3 No. Item Description 1 Dock Guide Guides that lock with the Tablet PC. 2 Status LED Indicates the dock cradle status. Lights red when battery charging is ongoing. 3 Dock Contacts Connects to the Tablet PC. Docking the Tablet Align the dock guides and the gold contacts on the Tablet PC and the dock cradle.
USING OPTIONAL ACCESSORIES: Dock Cradle ENGLISH When docked... • A second battery icon appears on the status bar of the Tablet PC • The Tablet PC battery is charged when the power adapter is connected to a power outlet. • Use the connected USB device, such as a keyboard or mouse, through the Tablet PC. Making Connections To connect the power: Connect the dock cradle to a power source to charge the batteries on both the Tablet PC and dock cradle. The Tablet PC battery is charged first.
USING OPTIONAL ACCESSORIES: MSR Module ENGLISH MSR Module Your Tablet PC is especially designed to expand functionality with an MSR module. Before installing the MSR module, prepare the following tools: • Screw kit (supplied with MSR module) • Phillip screwdriver To install the MSR module: 1. Align the guides on the MSR module through the guides on the right side of the Tablet PC. 2. Attach a screw to secure the MSR module to the Tablet PC.
APPENDIX: Troubleshooting ENGLISH Appendix Troubleshooting 1. The device powers off automatically. • The battery power is depleted. Charge the battery. 2. No sound comes out from the Tablet PC. • Check whether the volume is set to mute. Press the volume keys to adjust volume. • Check whether the music file is damaged, try another files to test. 3. Cannot copy a file to the microSD card. • Check whether the microSD card capacity is full. • Try to delete or move some files to free space. 4.
APPENDIX: Specifications ENGLISH Specifications EM-70B Specifications CPU Freescale ARM IMX 51 800MHz Memory DDR 512MB, NAND Flash 4GB max. 16 GB Display Type: High Brightness TFT Colour LCD Capacitive Multitouch Size: 7-inch Resolution: 1024 x 600 Brightness: 350 nit Communication Wi-Fi 802.11 b/g/n Expansion 1 x WCDMA Module / Mini PCI-e (optional) I/O Interface 1 x Mini USB 2.0 PTG 1 x Micro-SD card 1 x DC Jack 1 x Cradle Connector Storage Micro SD (SDHC) with eject function, max.