
Installation Guide

©2018 The Agency ACBH. PO Box 178, West Grove, PA 19390
www.partsmasterpro.com
1-877-542-2211
customerservice@theonlyagencyrep.com
52004
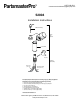
1. Remove the cap (E) from existing air gap assembly.
2. Remove the base (B) and head assembly (A) from the air gap soap dispenser.
3. Pour soap into the container (C).
4. Screw the base (B) to the container (C).
5. Insert head assembly (A) into the base (B).
6. Unthread collar (D) from existing air gap assembly.
7. Screw the container (C) onto the air gap assembly.
Tools needed for installation:
None
Air Gap Soap Dispenser takes the place of an existing air gap cap, adding soap dispenser
functionality to an air gap assembly. Does not include air gap assembly.
52003
A Head Assembly
B Base
C Container
Dishwasher Outlet
Hose (5/8” O.D.)
Drain Hose
(7/8” O.D.)
D Air
Gap Cap
Air Gap
Soap
Dispenser
Existing Air
Gap Assembly
Security Device Enclosed
WARNING: Cancer and Reproductive Harm - www.P65warnings.ca.gov
Installation Instructions