
User's Manual


®
Dynamics Cart Magnetic Damping Experiment 1: Damped Oscillation
4
4. Release the cart.
5. Allow the cart to oscillate. Count (and write down) the number of down-up cycles
that the cart completes before stopping.
6. Repeat steps 3 through 5 with the gap set to 8 mm, 6 mm, 4 mm, and 2 mm, and
with the magnets as close as possible to the track without touching.
Skip to the Questions section on page 4.
Method II (using a motion sensor)
Sensor, Interface, and Software Set-up
For detailed information about setting up your motion sensor, interface, and software, refer to the
instructions supplied with those products.
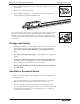
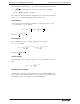
1. Place a motion sensor at the lower end of the track.
2. Adjust the angle of the track so that the cart’s equilibrium position is about 40 cm
from the sensor.
3. Connect the sensor to your interface.
4. Prepare a graph to display Position versus time.
5. Take some test data and adjust the sensor so that it can measure the cart’s position
up to a distance of about 70 cm. Delete the test data.
Leave the sample rate at the motion sensor’s default of 10 Hz.
Data Collection
1. Place the Magnetic Damping Accessory on the end of the cart with a gap of
10 mm between the magnets and the track.
2. Tap the cart a few times so that it moves to its equilibrium position.
3. Pull the cart up the track and hold it 20.0 cm from equilibrium.
4. Release the cart and start data recording at the same time.
5. Allow the cart to oscillate until it comes to a stop.
6. Stop data recording.
7. Repeat steps 3 through 6 to record data runs with the gap set to 8 mm, 6 mm,
4 mm, and 2 mm. Record a final data run with the magnets as close as possible to
the track without touching.
Question
What is the effect of moving the magnets closer to the track?
Motion sensor at end of
track