
Use and Care Manual


14
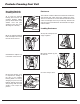
Paslode Cordless Framing Nailer Operation
No-Mar Work-Contacting Element
For applications where the work-piece must be mark free,
like in siding and recreational decks, order the No-Mar
Work-Contacting Element, Part No. 901252
ANZ Product Code: B20544G
DANGER
Never attempt to operate the Cordless Framing Nailer
unless both adjustment screws are installed. Intentional
removal of an adjustment screw could result in improper
tool operation, loss of nail control and injury to tool user
or bystanders.
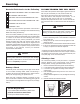
PRESS WORK CONTACT
ELEMENT AGAINST THE
WORK SURFACE
Fan motor starts,
fuel is injected into
combustion chamber
and mixed with air by
the fan.
SQUEEZE
TRIGGER
Spark plug sparks and
fuel/air mixture ignites.
Combustion powers
piston assembly driving
fastener.
LIFT TOOL -
RELEASE
TRIGGER
Combustion chamber
opens.
Fan exhausts
hot gases and cools
internal
components.
Standard
Work-Contacting
Element
DANGER
The work contacting element and nose will become hot
after prolonged or rapid use. If it becomes necessary to
adjust the work contacting element, avoid touching with
bare hands.
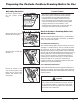
Adjustable Utility Hook
To set depth of drive
The adjustable utility hook can be used as a belt or
rafter hook. To adjust the utility hook, push the black
button in the direction of the arrow and rotate it to the
desired position.
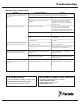
Probe Stop
Note: The fan will run for approximately 10 seconds after the last nail
is driven. After rapid firing (at least 32 times in 80 seconds), the fan will
run for 60 seconds to cool the tool.
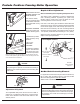
Move up to Increase
Drive Depth
Move Down to Reduce
Drive Depth
Push
Depth of Drive Adjustment
Remove the battery before adjusting the depth of drive.
If the tool is over-driving (the nail head is driven below the
surface of the wood), the work contacting element should be
moved down slightly. If the nails stand up (the head is not
flush with the work surface), the work contacting element
should be moved up slightly. The indicator marks are set at
1/10" (2.5mm) increments with a total range of 1/2" (13mm).
Adjust the work contacting element to get the nail head
depth to meet job requirements.
The depth of drive adjustment is made by adjusting the
work contacting element. Squeezing the probe stop
release buttons toward each other will allow the work
contacting element to be moved up or down.