
Product Manual


9
Battery and Charging System
Inserting Battery
1. Load the battery, contacts first, into the Cordless
Framing Nailer.
2. Push battery fully forward into its locked position.
3. To remove battery, push down on locking tab and slide
battery out.
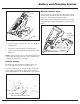
Battery Indicator Light
The illustration is a close-up of the side of the Paslode
Cordless framer handle. On the side of the handle is a small
plastic lens. This is the battery indicator light.
When you insert a fully-charged battery into the tool, you will
see a blinking green light. If the light blinks red, recharge the
battery.
Battery
Indicator
Light
LISEZ SOIG
NE
USEMEN
T LE MODE D' E
MPLO
I. LEUR NON RESP
ECT PEUT EN
TRAINER
DES ACCIDENTS
! EXPLOSION
H
AZARD - NEVER
USE IN
EX
PLOSIVE ATM
OSPHERE
- TOOL E
XHAUST COULD IGNIT
E FUMES
.
! TOOL OPERATORS AND BYSTANDERS MUST W
EAR EYE AND HEARING PROTE
CTION T
HAT CONFOR
MS TO A
NSI STANDARDS.
! READ MANUAL FROM
COVER TO COVER. DISREGARD COULD RES
ULT IN ACCIDENTS.
! ASSUME TOOL IS ALWAYS
LOADED AND WILL ALWAYS FIRE A F
ASTENER.
LEA TODAS LAS
PAGIN
AS DEL MANU
AL.
DE
LO CON
TRA
RIO PUEDE RESULTAR
EN
ACCIDENTES
.
! CARBON MONOXIDE
HAZARD - USE ONLY IN V
ENTILATED AREA TO AVOI
D NAUSEA AND UNCONSCIOUSN
ESS.
A
n
ITW
Co
mpan
y
R
R
L
Smo
ot
h
Ri
ng
=
.11
3i
n. -
.
1
31in.
2
.
8
m
m -
3
.
4
mm
L = 2
i
nch
- 3 1/
4
inc
h
50
mm
- 8
2
mm
88
8
FOR
E
S
T
EDGE
DR
IVE
,
VERNON HILL
S
,
I
L,
U.S
.A.
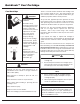
Battery Standby
The battery can be placed in the standby position if the
tool is not going to be used for a period of time.
To place the battery into the standby position, push down
on the locking tab and slide the battery back so that the
locking tab engages into the standby position in the handle.
NOTE:If battery is left in tool for an extended period of time
in the normal operating position, the battery will discharge
completely and will require recharging.
Locking Tab
Standby Position
Normal Operating Position