
Installation Instructions

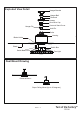

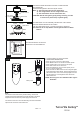

Connect the female terminals from motor to male terminals
from fan light kit.
secure the fan light kit to the motor by fan screws.
Note: 1). The blue fixture wire to blue motor wire;
2). The orange fixture wire to orange motor wire;
3). The white fixture wire to white motor wire;
170116
Turn of the Century
TM
PAGE: 7 / 9
Fig.12
Fig.13
Fig.15
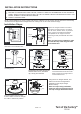
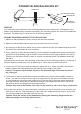
1. Install the battery (9V) to the transmitter.
2. OPERATING TRANSMITTER:
* Press "HI" to turn on the fan at high speed.
* Press "MED" button to turn the fan in medium speed.
* Press "LOW" button to turn the fan in low speed.
* Press "OFF" button to turn off the fan.
* Press and release the "Accent" button quickly to turn
on or turn off the accent light.
* Press and hold the "Main" button to dim or brighten lights
to the desired level and release, and the brightness level
will be memorized. Turn on the main light again, then fan
light will restore on of the brightness level which was
dimmed last time.
Battery Cover
Battery
Note:
This remote control has memory function setting. The fan will
operate at the same speed and the fan light will stay at the same
brightness as the last time the power supply was turned off.
This remote control can not be worked along with other solid-state
speed control or dimmer at the same time
Fig.14
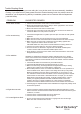
Turn ON the electric circuit at the
main fuse or circuit breaker box.
CAUTION :Handle the light kit gently during installing. In order
to avoid noise please keep crystalls tightly.
NOTE: Accent light is non-dimmable. Main light is
dimmable.
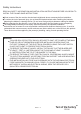
The slide switch on motor assembly sets direction of fan rotation.
Select the desired direction of fan rotation.
Push the slide switch left for " Forward" and right for "Reverse".
Note: Wait for fan to stop before reversing the direction of blade
rotation.
Motor
Fan Light Kit
Fan Screw
Male terminal
Female terminal
Slide Switch
Reverse
Forward
Motor