
Installation Instructions
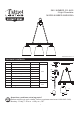

ASSEMBLY INSTRUCTIONS
3
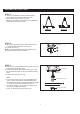
STEP 1:
a. Once the installation method is determined,
attach the end of the side chain to hooks.
b. Insure chain has no twists or kinks.
: For versatility, this fixture can be installed
with glass pointed up or down.
Note
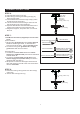
STEP 2:
a. Secure the crossbar (AA) to the outlet box (not
included) with outlet box screws (CC).
b. Tighten until snug.
: The preassembled mounting nipple on the
crossbar should protrude outward.
Note
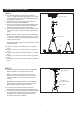
Outlet Box
CC
AA
Canopy Lock Ring
I
Hex Nut
Outlet Box
Canopy Chain Loop
A
Option 1 Option 2
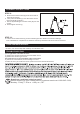
STEP 3:
a. Remove the pre-assembled canopy lock ring from
the crossbar assembly (AA).
b. Temporarily attach the ceiling canopy (A) to the
pre-assembled nipple on the crossbar assembly
(AA).
c. Secure with canopy lock ring.
:
If the ceiling canopy (A) is not snug against the
ceiling, remove it from the crossbar assembly
and adjust the length of the pre-assembled nipple
by unscrewing the pre-assembled hex nut.
Screw the nipple in or out of the crossbar until
the correct length is achieved.
Then, re-attach the ceiling canopy (A).
Note
?
?
?