
Installation Instructions


INSTALLATION INSTRUCTIONS
3
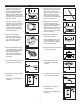
Fig. 1 Fig. 7
Fig. 2 Fig. 8
Fig. 3 Fig. 9
Fig. 4 Fig. 10
Fig. 5 Fig. 11
Fig. 12
Fig. 13
Fig. 6
1. Separate the surface ring
from the LED puck light
housing. Holding the surface
ring of the puck (A) rmly
with your ngers with the lens
facing away from you, press
the back of the puck housing
with your thumbs.
7. Mark the location of the puck
light on the mounting surface
with a pencil. Before you
drill, be sure to consider the
distance to make sure the
puck connect to the power
cord and the power cord will
reach the receptacle.
2. Using the surface ring as a
template, mark the locations
of the mounting holes on the
mounting surface. Be sure
to orient a side opening for
routing lead wire toward the
nearest receptacle.
8. Separate the surface ring
from the LED puck light
housing. Holding the surface
ring of the puck (A) rmly
with your ngers with the lens
facing away from you, press
the back of the puck housing
with your thumbs.
3. Secure surface ring to
mounting surface using
mounting screws provided
(C). Use an awl or nail to
start screws if needed.
9. Discard the surface ring.
It will not be needed.
At the marked location, use
a power drill and a 2-3/8 in.
hole saw, to drill a mounting
hole for the puck light.
4. Route the lead wire through
the opening leading toward
the nearest receptacle. Push
the puck light body into
the surface rin, with lead
wire routed toward nearest
receptacle.
10. Route lead wire of puck light
(A) through the hole.
5. Connect the lead wire of puck
(A) to the power cord (B).
11. Press puck light (A) into
mounting hole until fully
seated.
12. Connect lead wire of puck
(A) to the power cord (B).
13. Plug power cord (B) into
wall receptacle.
Recess mount installation is
complete.
6. Plug power cord (B) into wall
receptacle.
Surface mount installation is
complete.
A
C
B
A
B
For surface mount applications, start at Step 1. For recess mount applications, start at Step 7.
A
2-3/8 in.
A
B
A
B