
Installation Instructions


Before beginning assembly, installation, or operation of product, make sure all parts are present.
Compare parts with package and hardware contents list on page 1. If any part is missing or
damaged, do not attempt to assemble, install or operate the product. Contact customer service for
replacement parts.
Tools Required for Assembly (not included): Ladder, safety glasses and Phillips screwdriver (when
existing recessed can’s inside diameter measures between 5-1/8 in. and 5-1/2 in.).
Estimated assembly time: 10 minutes per xture
SAFETY INFORMATION
PREPARATION
WARNING: These products may represent a possible shock or re hazard if improperly installed
or attached in any way. Products should be installed in accordance with these instructions, current
electrical codes, and/or the current National Electric Code (NEC). Disconnect power to the unit prior
to installation.
WARNING: To reduce risk of re, electric shock, or injury to persons,
• Read all installation instructions before beginning. If you have any doubts about how to install
this lighting xture, or if the xture fails to operate completely, consult a qualied electrician to
ensure correct branch circuit conductor.
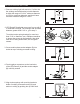
• To reduce the risk of re, electric shock or injury to persons, install these kits only in 5 in. or 6 in.
recessed housings. The recessed housing must have a measured diameter (opening) of 5-1/8
in. minimum to 6-5/8 in. maximum and a minimum clearance height of 3-3/4 in. Conrm this
before installation.
• Always be sure that power supply is turned o at fuse box or circuit breaker before installing,
cleaning, or servicing the xture.
• This product must be installed in accordance with the applicable installation code by a person
familiar with the construction and operation of the product and the hazards involved.
• To reduce the risk of re, electric shock or injury to persons, do not make or alter any open holes
in a wiring enclosure nor in any electrical components during kit installation.
• To prevent wiring damage or abrasion, do not expose wiring to edges of sheet metal or other
sharp objects.
• There are no serviceable parts inside the xture.
• Suitable for indoor dry and damp locations only.
• The installer must determine that supply power is 120V AC at the luminaire before installation.
• The National Electric Code (NEC) does not permit cords to be concealed where damage to
the cord’s insulation may go unnoticed. To prevent re damage, do not run cord behind walls,
ceilings, sots, or cabinets where it may be inaccessible for examination. Cords should be
visually examined periodically and immediately replace when any damage is noted.
• Do not alter socket adapter in any manner.
SAVE THESE INSTRUCTIONS. For safest operation, read and become familiar with complete
installation instructions prior to use. Pay close attention to this manual and stay within its guidelines
when using this product.
CAUTION:
• All parts must be used as indicated in this manual. Do not substitute any parts, leave parts out,
or use parts that are worn out or broken. Failure to obey this instruction could invalidate the ETL
certication.
• Do not mount over a sink, tub or shower - these are considered wet locations. The xture is not
rated for use in wet locations.
• LEDs emit bright light. Avoid looking directly at the light source.
WARNING: PROPOSITION 65
This product can expose you to chemicals including Lead, which is known to the State of California to cause
cancer. For more information go to www.P65Warnings.ca.gov.
2