
Installation Instructions
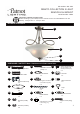


ASSEMBLY INSTRUCTIONS (Semi-Flush mount)
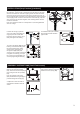
INSTALLATION (Drop Pendant) (continued)
3. Adjust three arms to make an
equal distance between arms as
shown.
7. Connect the glossy / live wire from the fixture to the black wire from
the outlet box, and the rough / neutral wire from the fixture to the white
wire from the outlet box. The bare copper ground wire from the fixture
must loop one turn under the head of the green ground screw (CC) on
the mounting bracket (AA) before it is connected to the ground conductor
of the supply circuit. Cover the wires with wire connectors (II). Tape the
wire connectors (II) and wires together, and carefully position all wires
inside the outlet box.
Note: The Glossy/Live wire has a text printed on it; the Rough/Neutral
wire has a ridge.
8. Place the canopy (JJ) all the
way to the ceiling and tighten the
ring (HH) onto the screw collar
loop (GG) until the canopy (JJ) is
firmly held against the ceiling.
1.
Fasten the support screw (long)
(RR) into the mounting bracket
(AA), and secure the screws (RR) in
place using the hex nuts (G 5/32")
(SS).
Note: the support screw (long)
(RR) should extend long enough to
protrude through the canopy (A).
10. Fasten the nipple (MM) into the
bushing of socket assembly, place
the metal washer (NN), rubber
washer (OO), glass shade (C)
through the nipple (MM) and
secure by hex nut (PP) as show (Do
not tighten excessively) , then put
the cap (D) over nipple (MM) and
secure by tightening the finial (E).
9. Install the bulbs (not included).
Use 60-watt medium standard
type B bulbs.
2. Fasten the mounting bracket
(AA) onto the outlet box using two
outlet box screws (short) (BB).
3
3
7
8
1
10
9
2
JJ
RR
HH
AA
AA
BB
GG
SS
MM
NN
OO
PP
B
C
D
E
CC
AA
II