
Installation Instructions

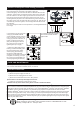

CARE AND MAINTENANCE
INSTALLATION (Semi-Flush mount) (continued)
TROUBLESHOOTING
• Use a dry soft cloth to dust or wipe carefully.
• Do not clean with abrasive materials, bleach, or solvents.
1) The light does not come on at all:
a) Ensure the power supply is turned on.
b) Ensure the cord is plugged into an outlet.
c) Ensure the circuit breaker is set in the “ON” position.
2) Fuse blows or circuit trips when light is turned on.
a) Check for crossed wires, ensure wiring is correct.
If unable to fi x any of the above issues, please consult a certifi ed electrician.
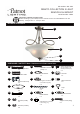
5. Unscrew the cap nuts (QQ) from
canopy (A) meanwhile take off
screws originally used for covering
hole of canopy (A), and place the
canopy (A) over the outlet box, let
heads of support screws (long)
(RR) come through the holes of
the canopy (A), then secure by
tightening the cap nut (QQ).
7. Fasten the nipple (MM) into the
bushing of socket assembly, place
the metal washer (NN), rubber
washer (OO), glass shade (C)
through the nipple (MM) and
secure by hex nut (PP) as show (Do
not tighten excessively) , then put
the cap (D) over nipple (MM) and
secure by tightening the finial (E).
6. Install the bulbs (not included).
Use 60-watt medium standard
type B bulbs.
4
FIVE-YEAR LIMITED WARRANTY:
If, during normal use, this PATRIOT LIGHTING lighting fixture breaks or fails
due to a defect in material and workmanship within five (5) years from the date of original purchase, simply bring this
lighting fixture with the original sales receipt back to your nearest MENARDS retail store. At its discretion, PATRIOT
LIGHTING agrees to have the product or any defective part(s) repaired or replaced with the same or similar
PATRIOT LIGHTING product or part free of charge, within the stated warranty period, when returned by the original
purchaser with original sales receipt. This warranty; (1) excludes expendable parts including but not limited to light
bulbs; (2) does not cover damage that has resulted from abuse or misuse; and (3) does not cover any losses, labor,
injuries to persons/property or costs. This warranty does give you specific legal rights and you may have other rights,
which vary from state to state.
®
®
®
®
Questions, problems, missing parts?
Before returning to your retailer, call our customer service at 1-800-388-6141 ext: 216
Monday - Friday 9:30 a.m. - 3:00 p.m. EST
5
7
6
RR
A
QQ
MM
NN
OO
PP
B
C
D
E
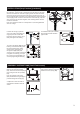
4. Cut the bare copper ground wire and fixture wire, and make sure you
have enough wire for connecting to the power supply wire.
Connect the glossy / live wire from the fixture to the black wire from the
outlet box, and the rough / neutral wire from the fixture to the white wire
from the outlet box. The bare copper ground wire from the fixture must
loop one turn under the head of the green ground screw (CC) on the
mounting bracket (AA) before it is connected to the ground conductor of
the supply circuit. Cover the wires with wire connectors (II). Tape the wire
connectors (II) and wires together, and carefully position all wires inside
the outlet box.
Note: The Glossy/Live wire has a text printed on it; the Rough/Neutral wire
has a ridge.
4
II
AA
CC