
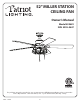
Installation Instructions

8
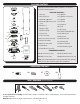
ASSEMBLY INSTRUCTIONS
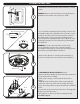
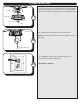
15. Remove the nial, nial cap, and hex nut from the
threaded rod at the bottom of the light kit.
16. Install the E26-base LED bulbs into the sockets of the
light kit.
Important: Make sure you allow the bulbs and light kit to
cool before you replace the bulbs.
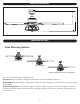
15
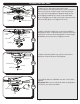
Fitter Plate
Light Pan
Light Pan
Screw
Light Pan
Light Kit
Light Kit
Hex Nut
Finial
Finial Cap
Threaded Rod
9-pin
Connector
9-pin
Connector
Fitter Plate Screw
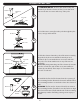
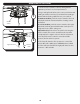
13. Remove one of the three tter plate screws
preassembled to the tter plate and loosen the other two
but do not remove. Feed the 9-pin connector through
the center hole in the light pan. Align the keyhole slots
in the light pan with the loosened screws in the tter
plate. Turn light pan clockwise and replace the previously
removed tter plate screw. Tighten all screws.
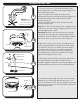
14. Remove the three light pan screws preassembled to
the light pan. Then, connect the 9-pin connector from fan
to the 9-pin connector from the light kit. Secure the light
kit with the previously removed light pan screws.
14
13
Light Kit
Bulb
16