
Use And Care Manual
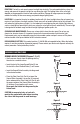
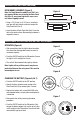


Figure 5
Figure 6
Figure 7
OPERATION (Figure 5)
• After assembling, take the light to direct sunshine
that allows the rechargeable battery to reach its
maximum capacity.
• Push the ON/OFF switch to the ON position. Ensure
the light is in full sunlight for 8 hours.
• The unit will then automatically light up at dusk.
Note: Lights with crystalline panels may have a
protective film over the solar panel. This must be
removed prior to use.
ASSEMBLY INSTRUCTIONS (continued)
CHANGING THE BATTERY (Figures 5,6 & 7)
• Push the ON/OFF switch to the OFF position.
• Open the battery chamber cover on top of the
Solar Panel Unit (A) by removing the 4 screws.
• Replace the battery with a new AAA Ni-Mh solar
rechargeable battery, ensuring the correct polarity
is observed.
• Reassemble the unit by reversing the above
procedure.
• Push the ON/OFF switch to the ON position. Fully
charge the battery before first use for up to 2 days
in full sunlight in the ON position. The unit will then
automatically light up at dusk.
A
3-5/8” MIN.
ON/OFF
DECK MOUNT ASSEMBLY (Figure 4)
Note: For Deck Mount Assembly Parts B & C are
not required. Make sure to locate the Solar Panel
Unit (Part A) away from high traffic areas so as
not to be a tripping hazard.
• Using a 3-5/8”(min.) to 3-3/4”(max.) sized hole
saw, pre-drill hole in deck surface to accept the
Solar Panel Unit (Part A).
• Insert the base of Solar Panel Unit (Part A) into the
hole in the deck surface. No mounting hardware is
required to secure.
OPERATIONAL INSTRUCTIONS AND BATTERY REPLACEMENT
Figure 4
3-3/4” MAX.
4-1/2” DIA.