
Installation Instructions

Turn on the power at fuse or circuit box.
Page 3 of 3
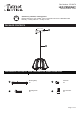
Spare Parts List:
The following parts are available for re-order if damaged or missing. Call our toll free at 1-800-887-6326
Assembly Kit
6111MM (1 SET)
FIVE-YEAR LIMITED WARRANTY: If, during normal use, this PATRIOT LIGHTING lighting fixture breaks or fails due
to a defect in material workmanship within five (5) years from the date of original purchase, simply bring this lighting
fixture with the original sales receipt back to your nearest MENARDS retail store. At its discretion, PATRIOT
LIGHTING agrees to have the product or any defective part(s) repaired or replaced with the same or similar PATRIOT
LIGHTING product or part free of charge, within the stated warranty period, when returned by the original purchaser
with original sales receipt. This warranty; (1) excludes expendable parts including but not limited to light bulbs; (2) does
not cover damage that has resulted from abuse or misuse; and (3) does not cover any losses, labor, injuries to
persons/property or costs. This warranty does give you specific legal rights and you may have other rights, which vary
from state to state.
Questions, problems, missing parts?
Before returning to your retailer, call our customer service at 1-800-887-6326
Monday – Friday 9:00 a.m. – 5:00 p.m. CST
TROUBLESHOOTING
R
R
R
CARE AND MAINTENANCE
R
● To clean, turn off and wipe with a damp, non-abrasive cloth.
1) The light does not come on at all:
a) Make sure the wall switch and circuit breaker are on.
b) Make sure the wiring is correct.
2) Fuse blows or circuit trips when light is turned on.
a) Check for crossed wires, ensure wiring is correct.
If unable to fix any of the above issues, please consult a certified electrician.
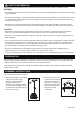
3. Connect fixture black wire to house
black wire and fixture white wire to
house white wire using wire
connectors (DD) provided. Connect
the copper wire or green/yellow wire
on the light fixture to the mounting
strap (AA) by securing it with the
preinstalled grounding screw, and
then connect it to the house
grounding wire with wire connectors (DD).
Tuck all the wires into outlet box.
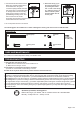
4. Attach the canopy (A) to
the mounting strap (AA)
by inserting set screws
into "L" slots in the canopy
(A), rotate the canopy (A)
until it is locked in place,
and then tighten two set
screws (CC).
4
“L” Slot
A
3
DD
AA
DD
AA
AA
Mounting Strap
X1
Set Screw
X2
Mounting Screw
X2
Wire Connector
X3
CC
DDBB