
Installation Instructions


INSTALLATION (continued)
3
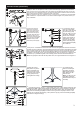
6. Open the quick link
(KK) at the end of the
chain (JJ), hook it to the
loop of the fixture body
(B) and close the quick
link (KK). Hook the other
end of the chain (JJ) to
the screw collar loop (HH)
using the quick link (KK)
retained in step 3 and
close the quick link (KK).
8.
Strip 3/4 in. of insulation from the wire ends. Connect the glossy/live wire from the fixture
to black wire from outlet box, and rough/neutral wire from the fixture to white wire from outlet
box. The bare copper ground wire from the fixture must loop one turn under the head of the
green ground screw (CC) on the mounting strip(AA) before it is connected to the ground
conductor of the supply circuit. Cover the wires with the wire connectors (LL). Tape the wire
connectors (LL) and wires together, and carefully position all wires inside the outlet box.
Note: The glossy/live wire has the text printed on it; the rough/neutral wire has a ridge on it.
7.
Loosen the ring (II)
from the screw collar
loop (HH), lower the ring
(II) and canopy (GG)
over the chain (JJ) onto
the fixture. Weave the
fixture wires and bare
copper ground wire up
through the chain (JJ),
ring (II), canopy (GG),
screw collar loop (HH)
and threaded tube (DD)
into outlet box.
6
8
7
HH
JJ
JJ
II
GG
HH
DD
KK
LL
KK
A
B
AA
CC
A
5. Open one quick link (KK) on the end chain (JJ), and remove the quick link and keep the quick
link(KK) for later use. To adjust the chain (JJ) to the desired length, spread the end link of the
chain (JJ) and remove unnecessary links. Two people are suggested for this step. One to hold
the chain, and one to separate the links. Use a pair of pliers and a screwdriver as shown above.
Wrap a soft cloth around pliers to protect the finish of the chain.
Note: To reduce the risk of fire, electrical shock, or personal injury, pendant can not be adjusted
after installation is completed. Make sure to measure desired height of the pendant before you
begin installation.
5
KK
JJ
9.
Place the canopy
(GG) all the way to the
ceiling and tighten the
ring (II) onto the screw
collar loop (HH) until the
canopy (GG) is firmly
held against the ceiling.
10.
Install the light
bulbs to sockets (not
included). Use three
Max 60-watt medium
base (E26) type "A"
bulbs or less.
Note: you also can use
three Max 9-watt self-
ballasted LED bulb (not
included)
9 10
GG
II
HH
11.
Unscrew the finial (F), cap (E), 1 metal washer (PP) and 1 rubber washer (QQ) from the
threaded pipe (MM). Fasten the threaded pipe (MM) into the bushing located on the fixture
body (B) as shown. Slide the glass shade (D), the rubber washer (PP), the metal washer
(QQ) over the threaded pipe (MM) and secure it using the hex nut (RR) as shown in the
diagram (Do not tighten excessively). Then place the cap (E) over the threaded pipe (MM)
and secure it using the finial (F).
11
B
D
E
RR
PP
QQ
F
QQ
PP
MM