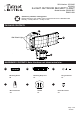
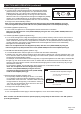
SKU Number: 356-9430 356-9431 2-LIGHT OUTDOOR SECURITY LIGHT Model Number: E9200-2BZ E9200-1WH Questions, problems, missing parts? Before returning to your retailer, call our customer service at 1-800-887-6326 Monday – Friday 9:00 a.m. – 5:00 p.m. CST PACKAGE CONTENTS A B Wall Wash Light C HARDWARE CONTENTS Note: Hardware not shown actual size.
SAFETY INFORMATION Please read and understand this entire manual before attempting to assemble, operate or install the product. WARNING ● Turn off electricity at main fuse box (or circuit breaker box) before beginning installation by removing fuse (or switching off circuit breaker). ● Be careful not to damage or cut the wire insulation (covering) during fixture installation. Do not permit wires to contact any surface having a sharp edge.
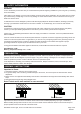
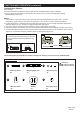
ASSEMBLY INSTRUCTIONS (continued) For eave mounted only: Rotate the sensor head clockwise 180˚ so the controls face down. Swing the sensor head towards the mounting bracket. Backplate Controls Controls Controls Installation Steps Turn off the power at fuse or circuit box. 1. Install the mounting strap unit (BB) 1 to the outlet box with the screw bolt toward out, using two mounting screws (AA) that best fit the outlet box. Outlet Box BB 3.
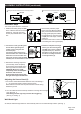
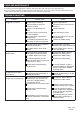
ASSEMBLY INSTRUCTIONS (continued) Fig. 2 Fig. 3 Sensor Adjustment Higher For Long Coverage Sensor Adjustment Lower For Short Coverage Adjusting the Light Head (B): 1. Adjust the light head up or down, left or right for desired area. Keep the light heads at least 1˝ (25mm) away from the sensor.(See Fig. 4) 2. Keep the light heads (B) face down around 30 degrees angle to avoid water damage and electrical shock. Fig.
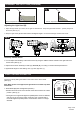
ASSEMBLY INSTRUCTIONS FUNCTION AND OPERATION(continued) (continued) 2. AUTO MODE (nighttime operation only) Fig.6 ● In "AUTO" mode, rotate Time Delay knob to the desired time setting (30s/1min/3min). At dusk, the light turns on to pre-selected low-level brightness and CCT color. When motion is detected, the light turns 0% 50% Low Level to full brightness (5000K) and stays on as long as motion continues.
ASSEMBLY INSTRUCTIONS FUNCTION AND OPERATION(continued) (continued) Customization Options: Shut-off Delay ● The shut-off delay is the length of time the light will stay at brightness after motion is detected. ● You can set the shut-off delay by rotating the Time knob arrow so it points to the desired time setting (30s/1min/3min) (See Fig.5). Notes: 1. The sensitivity of the motion sensor will increase as the environmental temperature gets cooler.
CARE AND MAINTENANCE ● To prolong the original appearance, clean the light fixture with clear water and a soft, damp cloth only. ● Do not use paints, solvents, or other chemicals on this light fixture. They could cause a premature deterioration of the finish. This is not a defect in the finish and will not be covered by the warranty. TROUBLE SHOOTING Problem The light will not come on. The light comes on during the day. The light comes on for no apparent reason.
TROUBLE SHOOTING (CONTINUED) Problem The lights flash on and off. The lights flash once then stay off in manual mode. Possible Cause Solution Heat or light from the lamp heads may be turning the motion sensor on and off. Reposition the lamp heads away from the motion sensor. Heat is being reflected from other objects and may be turning the motion sensor on and off. Decrease the “SENS” setting or reposition the motion sensor. The motion sensor is in “TEST” mode and warming up.