
Installation Instructions

Page 4 of 8
201029
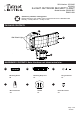
ASSEMBLY INSTRUCTIONS (continued)
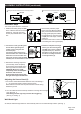
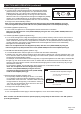
Sensor Adjustment Lower For Short Coverage
Sensor Adjustment Higher For Long Coverage
Fig. 4
Fig. 2
Fig. 3
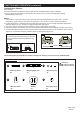
Adjusting the Light Head (B):
1. Adjust the light head up or down, left or right for desired area. Keep the light heads at least 1˝ (25mm) away from
the sensor.(See Fig. 4)
2. Keep the light heads (B) face down around 30 degrees angle to avoid water damage and electrical shock.
B
B
B
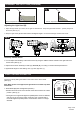
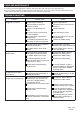
FUNCTION AND OPERATION
Fig.5
Custom Setting
Test 3min
30s 1min
3H
PC
Auto
MODE
SENSTIME
M
L
H
Choose a mode by sliding the switch on the bottom of the sensor head.
(See Fig.5)
Note: When power is first applied, the light will be on and warm up lasts
30 seconds.
1. TEST MODE (daytime and nighttime operation.)
● Rotate Time knob arrow on the left side of the sensor head to the “TEST”
position. (See Fig. 5)
● The light turns to high-level brightness (5000K) when motion is detected,
and stays on as long as the motion continues. Then it reverts back to
low-level brightness (2700K) about 5 seconds after motion is no longer
detected.
Sensitivity of Motion Sensor
● You can adjust the sensitivity of the motion sensor by using the “SENS” selector located on the right side of the
sensor head. (See Fig. 5)
● Adjust motion sensor sensitivity to HIGH (H), MEDIUM (M), or LOW (L) to achieve desired performance.
● Approximate range for each setting: 70 ft. (H), 40 ft. (M), 20 ft. (L).