
Installation Instructions
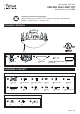

Please read and understand this entire manual before attempting to assemble, operate or install the product.
WARNING
Before beginning assembly, installation or operation of product, make sure all parts are present. Compare parts with
package contents list and diagram on previous page. If any part is missing or damaged, do not attempt to assemble,
install or operate the product. Contact customer service for replacement parts.
Tools Required for Assembly (not included): Screwdriver, Phillips Screwdriver, Pliers, Electrical Tape, Wire Cutters,
Safety Glasses, Ladder, Wire Stripper.
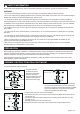
Turn off the power at fuse or circuit box
1. Unscrew the three
screws from the fan,
remove the switch box
and wire connectors.
Push the center plug from
inside the switch box to
remove the center plug.
2. Feed the two wires from the fan light kit (A) through
the center hole in the switch box cover, and thread
the wires through the washer (NN) and hex nut (MM),
then secure switch box cover onto the fan light kit
with a hex nut (MM) and washer (NN).
Motor
Switch Box
Switch Box Cover
Center Plug
Fig.1.
Screw
Switch Box Cover
Fig.2.
MM
NN
A
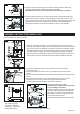
Switch Box Cover
Switch Box
Fig.3.
EE
A
Screw
SAFETY INFORMATION
PREPARATION
ASSEMBLY INSTRUCTIONS-FAN LIGHT MOUNT
3. Connect wires using the wire connectors (EE):
---Connect the blue wire ( hot wire) from the housing to the black fixture wire from the
fan light kit (A).
---Connect the white wire (neutral wire) from the housing to the white wire from the
fan light kit (A).
---Carefully put wires back into the switch box.
Restore the switch box cover back to the switch box by using the three screws.
Page 2 of 4
• This fixture is intended for use with an indoor ceiling fan. Not suitable for damp or outdoor locations.
• Do not use bulbs having a wattage greater than the maximum value stated on the fixture. The use of bulbs with higher
wattage than specified will increase temperatures and risk of fire.
• To avoid risk of electric shock, be sure to shut off power at the main fuse or circuit breaker box before installing or
servicing this fixture. Turning off the electrical power by using the light switch is not sufficient to prevent electrical shock.
• Installation must comply with the national electrical code, ANSI / NFPA 70-1999 and local codes. If you are unfamiliar
with the methods of installing electrical wiring, seek the services of a qualified licensed electrician.
• To avoid personal injury, the use of gloves or protective clothing may be necessary when handling fixture parts with
sharp edges.
• To reduce the risk of fire, electrical shock or personal injury, do not connect this fixture to a ceiling fan is not properly
grounded.
• To reduce the risk of fire, electrical shock or personal injury,each wire connector used with this light kit should accept
only one 18-gauge wire from the light kit and one 18-gauge wire from the ceiling fan.
• When mounting fixture to a ceiling fan, ensure the fan is mounted to an outlet box labelled "Acceptable for fan
support" and is secured to the building structure.
• Wire colors from ceiling fan may not be the same color used in this manual. When in doubt, consult a qualified
licensed electrician to determine the proper wiring.