
Installation Instructions
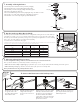

1. Assembly of the Light Fixture
2. Run the Landscape Wire (Not Included)
The landscape wire should run from the transformer to each light without being cut. Do not run the landscape
wire within 10 feet (3m) of a pool, spa or fountain. If the landscape wire is too long, cut it with a cable cutter.
The landscape wire should be protected by routing it close to proximity of the light fixture or next to a building,
deck or fence. Use cable suitable for low voltage landscape lighting.
See chart below for recommended cable gauges.
*Suitable cable should be sized in accordance to the table, should be Type SPT-2W. If you cannot find this cable at your local hardware or home improvement store then please
call customer service at 1-888-867-6095 or e-mail at customerservice@niinorthern.com to order the cable needed.
Fixtures
Cable
Transformer
* llustration of xture is for example only.
1.1 Carefully remove the fixture from its protective packaging.
1.2 Attach spike to the post by pushing them both together.
1.3 Attach the post to the body by pushing them both together.
1.4 Put the glass globe into the body.
1.5 Press the LED housing into the base by aligning the clips. You will hear a “click”.
1.6 Turn the cover on the body until it stops. This will line up the holes.
1.7 Attach the cover to the body using the provided thumbscrews.
3. Choosing Lighting Fixture Location
For uniform brightness and longer bulb life, attach first fixture at least 10 feet from transformer.
Once you have decided where you will install your fixtures, verify the type of soil.
• If the soil is of a loose, sandy or organic type, grasp the fixture post, close to the spike, with both hands and firmly push into the ground.
• If the soil is heavy or stony, dig a small hole, insert the fixture spike, replace the soil and tap down.
Never push the fixture into the ground by the fixture head.
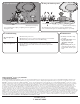
4.2 Align and fit the main low
voltage cable vertically to
the slot of wire connector as
shown.
4.3 Press the wire connector together
until fully seated and locked around
the cable. Pre-set prongs will pierce
the cable insulation and establish
contact. Turn on the power unit. If the
light fixture does not turn on, repeat
operations 4.2 and 4.3.
4.4 Once the clip-on connector is in
place, wrap it with electrical tape for
additional protection.
4.1 Place the wire connector
on opposite sides of the
low voltage cable where the
fixture will be located.
CAUTION
BE CAREFUL!
THE WIRE STABS
ARE VERY
SHARP!
4. Connect the fixture wire to the landscape wire
Combined wattage of all fixtures on line (in
Watts)
Wire Gage (0-75')Wire Gage (75'-150')Wire Gage (150'-250')
0-60 18 16 14
60-120 16 14 12
120-180 14 12 12
180-240 12 12 Not recommended
240-300 12
Not recommended Not recommended
Cover
LED housing
Glass globe
Spike
Body
Thumbscrews
Post
Wire
Connector