
Installation Instructions
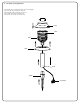


2. Assembly of the Floodlight
2.1 Carefully remove the fixture from its protective packaging.
2.2 The spot light is fully assembled.
NOTE: There are no serviceable parts inside the body and it is not
recommended to remove the lens cover assembly
The lens should point up, never towards the ground.
.
Spike
Body
Quick Clip Connector
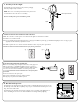
3.
Find a location for the transformer and control box
Note: The control box contains a photo sensor that turns the lights on at dusk and off at dawn.
3.1 Outdoor use, weather resistant.
3.2 Prior to installing and powering the transformer, a safety approved GFCI receptacle (fig. 1) and GFCI watertight protective cover (fig. 2) (not
supplied) must be installed by a qualified electrician.
3.3 GFCI receptacle and cover must be mounted a minimum of 30.5 cm (12 in.) above ground level.
Transformer must me mounted at least 30.5 cm (1 ft.) above ground level.
(fig. 1)
(fig. 2)
4.
Connect the transformer and the wire
Note: Prior to installing and powering the transformer, a safety approved
GFCI receptacle (fig. 1) and GFCI watertight protective cover (fig. 2)–
not supplied must be installed by a qualified electrician. GFCI receptacle
and cover must be mounted a minimum of 12 inches (0.3 m) above
ground level.
Transformer must me mounted at least 1 foot (0.3m) above
ground level.
4.1 Connect the wire to the power pack.
4.2 Screw the watertight connector by turning clockwise.
4.3 Plug the power pack into the GFCI receptacle.
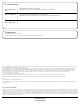
5. Run the landscape wire
* llustration of fixtures is for example only.
The landscape wire should run from the power pack to each light without being cut. Do not run
the landscape wire within 10 feet (3.05m) of a pool, spa or fountain. If the landscape wire is too
long, cut it with a cable cutter.
The landscape wire should be protected by routing it close to proximity of the light fixture or
next to a building, deck or fence. Use cable suitable for low voltage landscape lighting.
Fixtures
Cable
Transformer