
Installation Instructions


8.
Connect the control box and the transformer
8.1 Connect the control box to the transformer.
8.2 Plug the transformer into the electrical receptacle.
6. Choosing Lighting Fixture Location
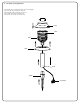
For uniform brightness and longer fixture life, attach first fixture at least 10 feet from power pack.
Once you have decided where you will install your fixtures, verify the type of soil.
• If the soil is of a loose, sandy or organic type, grasp the fixture post, close to the spike, with both hands and firmly push into the ground.
• If the soil is heavy or stony, dig a small hole, insert the fixture spike, replace the soil and tap down.
Never push the fixture into the ground by the fixture head.
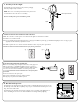
7. 2 Align and fit the main low voltage
cable vertically to
the slot of wire connector as shown.
7. 3 Press the wire connector together until fully
seated and locked around the cable. Pre-set
prongs will pierce the cable insulation and
establish contact. Turn on the power unit. If the
light fixture does not turn on, repeat operations
7.2 and 7.3.
7.4 Once the clip-on connector is in place, wrap
it with electrical tape for additional protection.
7. Connect the fixture wire to the landscape wire
7. 1 Place the wire connector on
opposite sides of the low voltage
cable where the fixture will be
located.
CAUTION
BE CAREFUL!
THE WIRE STABS
ARE VERY
SHARP!
* llustration of fixture is for example only.
It is recommended to adjust your lighting effect at night before
burying the cable.
The landscape wire and connector can also be hidden under stone or
buried under grass at a maximum depth of 6” (15,24cm).
6 ’’ (15,24cm) max.
* llustration of fixture is for example only.
9. Light adjustment
10. Bury the landscape wire