
Installation Instructions
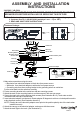


1. Make wire connections using wire nuts:
--- Black wire from electrical adaptor to black wire from power source.
--- White wire from electrical adaptor to white wire from power source.
--- Grounding wire from the mounting bracket to the grounding wire from outlet box.
Put the wires back into the outlet box carefully.
2. Fasten mounting bracket to the outlet box with two mounting screws.
3. Attach the track to the mounting bracket, and then secure it with two set screws.
4. Secure the track to the ceiling with two track screws.(See illustration B & C).Track ends must be
terminated with end cap or a connecter.
5. Insert electrical adaptor into the track. Rotate adaptor 90 degrees to achieve a locked position and to
make electrical contact. (See illustration A and A1)
NOTE: Polarity tab on the electricity adaptor must point to the positive polarity slot of the track when
installed correctly.
6. Attach the canopy to the electrical adaptor, and secure with the screws.
7. Attach the track light to the track. (See illustration D)
Holder
Canopy
Screw
Track Light
Outlet Box
Black Wire
White Wire
Track
Positive Polarity Slot
Wire Nut
Mounting Bracket
Mounting Screw
Track Screw
End cap
Ground Wire
Polarity Tab
Electrical Adaptor
Neutral
Ground tab
Hot contact conductor
Lower position for
one circuit track system
or P1 circuit of two circuits
system
P1
N G
ASSEMBLY AND INSTALLATION
INSTRUCTIONS
WARNING: BE SURE TO SHUT OFF POWER AT THE MAIN FUSE OR CIRCUIT
BREAKER BOX BEFORE INSTALLING OR SERVICING THIS FIXTURE.
NOTE: 1. Before installing, consult local electrical codes for wiring and grounding requirements.
2.
Customer Service: 1-800-887-6326 (weekdays 9 a.m. – 5 p.m. CST)
3. READ AND SAVE THESE INSTRUCTIONS.
349-5903 / 349-5904
Hardware Package:
(1 SET)
(1 SET)
130912