Patriot GearBox Network Storage Adaptor NAS (Network Attached Storage) Adaptor Applied Model No.
Patriot GearBox Network Storage Adaptor Description Features: ◎Support 10/100 M/bps ◎Support Windows/Linux ◎Support Protocol:TCP/IP, HTTP ◎Chipset:RDC ◎Support Data Format:FAT32, EXT2, EXT3 ◎Support Function: FTP/DHCP /SAMBA / UPnP Media server/ PRINTER SERVER ◎Support BT download management ◎Included Disk Utility: Format Disk, Scan Disk, and Disk hibernation mode. ◎Support Administration Password control. ◎Support USB external HDD and Printers ◎Power Adapter: Input:AC:100~240V 50/60Hz, 0.
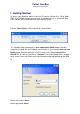
Patriot GearBox Network Storage Adaptor 1. Getting Started To access your GearBox, please insert the CD and run “Search Disk” Utility. Note: JRE( Java Runtime Environment) must be installed on the PC. If you do not have JRE installed, please download from http://www.java.com Execute "Search Disk" Utility and click on “Search Next”. “IP” should be filled automatically if your network has DHCP server: Gearbox should be assigned with an IP address by the router.
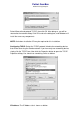
Patriot GearBox Network Storage Adaptor 2. WEB UI (User Interface) Status Screen 2.1 System Information Status Page: Host Name & Group Name To change “Host Name” & “Group Name”, click on the “Status” on the left menu and then click the "Change" button besides “Host Name” and “Group Name”. Host Name by default is “STORAGE-XXXX” reflecting unit’s MAC address for the last 4 digital xxxx.
Patriot GearBox Network Storage Adaptor Date/Time To change Date/ Time, click on “Change” button beside Date/Time. Date: set manual Date (yyyy/mm/dd) Time: set manual Time (hh:mm:ss) SNTP: enable/disable SNTP client Time server: locate time server Time Zone: Select your time zone in the list, and then click OK. Daylight Saving time : If your time zone has daylight saving time Firmware version: Display firmware and loader current version 2.1.
Patriot GearBox Network Storage Adaptor 2.3 Maintenance 2.3.1 Firmware Upload To upload a new firmware version, please download the latest version from www.patriotmem.com. During upload process, please DO NOT turn off the power or close the web browser until process is finished.. 2.3.2 System Reboot Click the “Reboot” button to perform a restart. Your unit should be ready to use in about a minute after system boot. 2.3.
Patriot GearBox Network Storage Adaptor * create SMB share account (folder) and password , Default Account: guest Default Password: null Click on “New” Button to create user name and password. You can also grant user access and enable/ disable accounts.
Patriot GearBox Network Storage Adaptor Password: password of SMB account Access control: read only / read and write access control of SMB account folder Folder List: is all of exist folder on storage Sharing List: is share folder of SMB account. If you want to share some folder, select this folder from Folder List and add to Sharing List. Folder manage: create / rename /delete folder Enable/ Disable: this button can enable/disable SMB account Delete: delete SMB account 2.4.
Patriot GearBox Network Storage Adaptor Select Microsoft and protocol TCP/IP, then click OK. After doing so, you will be returned to the network dialog. Click OK to close the dialog box, and Windows will install the necessary components. NOTE: A windows installation CD may be required for this installation. Configuring TCP/IP: Select the TCP/IP protocol linked to the networking device that will be accessing the Samba network. If you have only one networking device, simply click the TCP/IP item.
Patriot GearBox Network Storage Adaptor If you use DHCP on your network to provide IP addresses automatically to Windows systems, select the "Obtain an IP address automatically" radio button. Otherwise, click the "Specify an IP address" and manually enter your IP address and subnet mask. Setting the Computer Name and Workgroup Click on Identification tab as shown below: Enter your Computer name, Workgroup name and Computer Description then click on “Ok” to confirm.
Patriot GearBox Network Storage Adaptor Accessing the Samba Server from Windows 95/98 Double-click the Network Neighborhood icon on the desktop. You should see your Samba server listed as a member of the workgroup, as shown bellow: Double-clicking the server name will show the resources that the server is offering to the network, as shown bellow Accessing the Samba Server from Windows Me Double-click the My Network Places icon on the desktop.
Patriot GearBox Network Storage Adaptor Double-click the Entire Network icon, and you should see an icon for your workgroup, as shown in bellow 2.4.3 Setting Up Windows XP Computers Networking Components Go to the Control Panel and double-click the Network and Dial-up Connections icon (in classic view). You should see a Local Area Connection icon. If there is more than one, identify the one that corresponds to the network adapter that is connected to your Samba network.
Patriot GearBox Network Storage Adaptor You should see at least the following two components: Client for Microsoft Networks & Internet Protocol (TCP/IP) Configuring TCP/IP Click Internet Protocol (TCP/IP) and then Properties to open the Internet Protocol (TCP/IP) Properties dialog box, shown as bellow
Patriot GearBox Network Storage Adaptor If you are using DHCP on your network to assign IP addresses automatically, make sure "Obtain IP address automatically" is selected. Otherwise, select the "Use the following address:" to specify static IP settings. Computer and Workgroup Names From the Control Panel, double-click the System icon to open the System Properties dialog box.
Patriot GearBox Network Storage Adaptor The workgroup name should be the same as the Gearbox’s workgroup name. Connecting to the Samba Server Click My Network Places, and you should see a folder icon for the test directory shown as follow. Click View workgroup computers in the Network Tasks box at the left of the window. You should see your Samba server listed as a member of the workgroup. Double-click its icon, and you will see attached drives and printer if specified.
Patriot GearBox Network Storage Adaptor 2.5 FTP server File Transfer Protocol (FTP) is a network protocol used to transfer data from one computer to another over the Internet. You can access your data on the road with any internet connection or share your data with distant friends and families. 2.5.
Patriot GearBox Network Storage Adaptor FTP port: configure port number, port range is 1025 to 65500 and default port is 21. If your computer is behind a firewall, remember to forward your port to your GearBox. FTP code page: configure FTP server code page Central Europe (CP1250) Croat, Czech, Hungarian, Polish, Romanian, Slovak, Slovene and Sorbian. Cyrillic (CP1251) Bulgarian, Belorussian, Macedonian, Moldavian, Russian, Serbian and Ukrainian.
Patriot GearBox Network Storage Adaptor Password: password of FTP account Access control: read only / read and write rights Folder List is all of exist folder on storage Sharing List is shared folder of FTP account . To share folders, select folder from list and add to Sharing List . Folder manage: create / rename /delete folder Enable/ Disable: this button can enable/disable FTP account Delete: delete FTP account 2.5.
Patriot GearBox Network Storage Adaptor remote FTP server to local file system easily 2.6 BitTorrent 2.6.1 What is BitTorrent BitTorrent is a peer-to-peer file sharing (P2P) communications protocol. BitTorrent is a method of distributing large amounts of data widely without the original distributor incurring the entire costs of hardware, hosting, and bandwidth resources. Instead, 2.6.2 Using Bit Torrent client 1. Download torrent file to PC 2. Browse and select torrent file to upload Download Queue 3.
Patriot GearBox Network Storage Adaptor 5. Bit Torrent Configurations, System ID shows torrent ID and Number of the Downloads shows number of active torrents. 6. Server Port: BT server upload port 7. Upload Limit: BT server upload throughput control 8. Mail notification: when user stop or remove torrent, storage will send the mail alarm to administrator email box.
Patriot GearBox Network Storage Adaptor Enable: enable or disable email notification. SMTP Server: SMTP server address or IP (ex: ms48.url.com.tw) Sender: email of sender (ex: sender@ ms48.url.com.tw) Recipient: email of recipient (ex: recipient@ ms44.url.com.tw) Mail Authentication: enable or disable Mail Authentication User Name: enter your email user name Password: enter your email password 9.
Patriot GearBox Network Storage Adaptor 2.8 Print server First plug in your USB printer into the Gearbox with provided USB cable. If you log in to the web UI, the printer status should still say “offline”. Gearbox will recognize the printer and activate the printer server service once an IP is assigned to the unit. The network printer will require a static IP address to be seen on your network by the computer 1. Click Start and select Printers and Faxes. 2. Under Printer Tasks, click Add a Printer.
Patriot GearBox Network Storage Adaptor 3. Select the Local Printer attached to this computer 4. UNCHECK “Automatically detect and install my Plug and Play printer” check box. 5. Click Next. 6. Select the Create New Port button. 7. From the Type of port: drop down list choose Standard TCP/IP Port. Click Next. 8. In the Printer Name or IP Address, enter the IP Address of the device. Note: Port Name should be filled automatically. 10.
Patriot GearBox Network Storage Adaptor 11. Select LPR under Protocol and enter a queue name. Note: If you receive an error message "LPD server did not respond as expected ...", click Cancel. Attempt to reenter the IP Address or Print Queue name. Click OK again. If this process fails, the device may not support LPR printing.
Patriot GearBox Network Storage Adaptor now and contact the manufacturer for further assistance. 12. You are now ready to install the driver. Click Have Disk. Click Browse. Locate and select the .INF file for the device. You may need to browse to the CD or to the folder on your computer where you have the device driver downloaded. click Next to proceed. Note: If you are prompted to replace or keep existing driver, click on Keep Existing Driver. Click Next. 13. When asked to print a test page, click No.
Patriot GearBox Network Storage Adaptor UPnP Media server with XBOX 360 To access media files—including audio, video and pictures—from storage, you need to connect your XBOX 360 to your home network. 1. Connect your console to your home network. 2. Click Media Server page of storage, and set up sharing list (photo, music, and video). 3. When finish, GearBox’s Media Server of should automatically start. 4. XBOX 360 will search for devices on your network. 5.
Patriot GearBox Network Storage Adaptor UPnP (Media server with PS3 On your Storage: Click Media Server page, and set up sharing list (photo, music, and video) On your PS3: 1. Go into the PS3's Settings menu and navigate to Network Settings - Media Server Connection, and select Enabled. This allows the PS3 to detect networked device running Universal Plug and Play (UPnP) server software.
Patriot GearBox Network Storage Adaptor 2. When you turn on the PS3™ system, Media Servers on the same network are automatically detected and icons for the detected servers are displayed under (Photo), (Music), and (Video). 3. Select the icon of the DLNA Media Server that you want to connect. All available folders and files that can be played by the PS3™ system will be displayed. 4. Select the file that you want to play.
Patriot GearBox Network Storage Adaptor Hints for PS3 How to use iTuner Server 1 2 3 Make sure your GearBox UPnP Media Server is on. Select and set your music directory for iTune to see. Access your music file in iTune under iTune server as follow..
Patriot GearBox Network Storage Adaptor