
Installation Guide

Congratulations! Your KP2 is now ready to go!
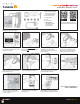
15. Select your KP2 camera
conguration.
Choose the driver’s side
of the vehicle.
Tap Next to select your
power connection type.
14. Read the instructions
to understand more about
your vehicle’s “Horizon” and
“Hood” lines.
Tap Show Me How for a brief
video walk-through of the
device attachment process.
13. Ensure the IMEI code
in the app matches your
device’s IMEI.
If there isn’t a match,
tap No and contact
Sensata INSIGHTS Support.
If there’s a match, tap Yes
to continue.
16. Select the power adapter
cable you used during
installation to connect your
device to the vehicle.
Tap Next to set your
vehicle’s “Horizon” and
“Hood” lines.
20. After you’ve made changes
and activated the appropriate
features, tap Confirm to save
your conguration.
19. If you’re unaware of a
setting’s function, tap the
info icon to learn more.
Pay close attention
to Camera Height. Enter an
even interval value (e.g.,
190 cm), not an odd
interval value
(e.g., 205 cm, 213 cm).
18. Choose preferences for
in-cabin alerts, an alert’s volume
level or activation of different
ADAS and DSM events.
21. On the home screen,
you’ll see a success message
validating your saved
conguration.
17. If you adjust either camera,
tap Refresh Images to
update road- and driver-facing
camera images.
Use the arrows to adjust
your vehicle’s “Horizon”
and “Hood” lines.
Ensure your “Hood” line
is in the bottom one-fourth
of your image.
Scroll down and tap Next
to save the “Horizon” and
“Hood” lines.
Quick Start Installation Guide
For KP2 Video Telematics Camera
sensatainsights.com INSIGHTS © 2023 Sensata INSIGHTS. All Rights Reserved.