
Instruction Manual


3-14 System Administrator’s Guide
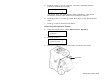
3. Close the supply door.
For more information on how to load supply for peel mode, refer
to the Operator's Handbook.
4. Pull down on the liner to remove any slack.
5. Press A under ↵ to continue.
SUCCESSFUL
↵ X
Note: If you see a "FAILED" message, call Service.
6. Press A under ↵ or press A under X to return to the Demand Sensor
menu.
7. Press F to return to the Printer menu.
Setting the Stock Sensor
Use this option to set the sensor for die cut, black mark, non-indexed
(continuous), or aperture supplies. Select the correct sensor for the
supply type you are using.
Select the:
♦ Die-cut sensor for die cut supplies (labels on a liner with gaps
between the labels).
♦ Black mark sensor for black mark supplies (supplies with rectangular
marks on the back side of the liner or on the supply).
♦ Non-indexed sensor for non-indexed (continuous) supplies without a
black mark or perforations.
♦ Aperture sensor for supplies with holes (apertures) in them.
Note: If you have die cut supplies with black marks, select the black
mark sensor.