Operator's Handbook Monarch® Printers 9844™ 9854™ TC9854OH Rev. AB 4/08 ©2007 by Avery Dennison Corp. All rights reserved.
Copyright © 1997-2008 by Avery Dennison. All rights reserved. Monarch®, 9844, and 9854 are trademarks of Paxar Americas, Inc. Avery Dennison® is a trademark of Avery Dennison Corp. Reprinting and reproduction of these documents, including extracts, is only allowed with the express permission of the manufacturer. More detailed information is available from your supplier. Copyright The documentation is subject to copyright.
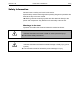
05/08 Rev. AB OPERATOR’S HANDBOOK Safety Safety Information General notes on safety are found in this section. Special safety notes and warnings about possibly dangerous operations are listed at the top in the user manual. ¯ Warning notes and warning symbols are also attached directly to the printer and components. Pay attention to these safety notes as well.
05/08 Rev. AB OPERATOR’S HANDBOOK Safety General safety notes CAUTION! - The printer operates safely when you observe all necessary information. « Proper operation of the product requires the user to read and follow these operating instructions. The warranty does not cover service required as a result of operator error and/or failure to read and follow the documentation. WARNING! - Any changes or modifications not expressly approved by us could void the user's authority to operate the equipment.
05/08 Rev. AB OPERATOR’S HANDBOOK Safety Equipment safety Thermotransfer label printers are designed for printing label material, using the thermal direct or thermal transfer printing process. It is possible to use a wide range of label materials and thermal transfer ribbons. See “Specifications” for more information. Avery Dennison assumes no liability for damage due to improper use of the printer and/or material.
05/08 Rev. AB OPERATOR’S HANDBOOK Safety Disposal Procedures Waste Electrical and Electronic Equipment (WEEE) for European Union (EU) customers Avery Dennison is fully committed to achieving the EU mandated WEEE directives. W E E E S ym b o l This product, its components, and accessories must be sent to a designated collection facility for proper disassembly and disposal in accordance with the WEEE directives.
05/08 Rev. AB OPERATOR’S HANDBOOK Safety FCC Regulations - Class B WARNING This equipment has been tested and found to comply with the limits for a Class B digital device, pursuant to Part 15 of the FCC Rules. These limits are designed to provide reasonable protection against harmful interference when the equipment is operated in a commercial environment.
05/08 Rev. AB OPERATOR’S HANDBOOK Table of Contents Table of Contents GETTING STARTED ......................................................................................................1-1 Installing the Printer............................................................................................................1-2 Unpacking the printer .........................................................................................................1-2 Carrying the Printer................................
05/08 Rev.
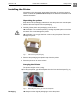
05/08 Rev. AB OPERATOR’S HANDBOOK Getting Started 9844/9854 Installing the Printer Information in this document supercedes information in previous versions. Check our Web site (www.monarch.com) for the latest documentation and release information. Unpacking the printer Keep the box and packaging materials in case the printer ever needs repair. 1. Remove all loose objects from the packaging. 2. Carefully lift the printer and packaging out of the box.
05/08 Rev. AB OPERATOR’S HANDBOOK Getting Started 9844/9854 Printer Contents After you unpack your printer, make sure you have all the necessary components and that the printer was not damaged during shipping. • • Printer Power supply cable The plug for the power supply is different depending on the country of delivery. 9854 with Internal Liner Takeup Reel • Data cable Centronics IEEE 1284 CA Cable 2 m.
05/08 Rev. AB OPERATOR’S HANDBOOK Getting Started 9844/9854 Terms to Know Review these terms before you continue. Dispenser Peel mode. The printer separates the backing paper from the label as it prints. The printer stops after each label to allow you to remove it. Material Supply (labels, tags, etc.) Self-adhesive material Labels Light barrier Material (supply) sensor Transmission sensor Die cut sensor Reflex sensor Black mark/aperture sensor Punched material Die cut supply.
05/08 Rev. AB OPERATOR’S HANDBOOK Getting Started 9844/9854 About the Printer Cover Open to insert material and foil (ribbon). Control panel LCD graphics display, 4 buttons; displays printer operating status, enables parameter menu settings. Window Allows material/foil check without opening the cover. Connection for additional devices Connection for optional cutter. Fig. 4: Exterior view of the printer. Material rewinder Labelling material roller inserted here.
05/08 Rev. AB OPERATOR’S HANDBOOK Getting Started 9844/9854 9854 with Dispenser (Peel) and Liner Takeup Dispensing edge Removes the labels from the backing paper. Connector Connection of the dispensing edge sensor. Dispensing roller Holds the material tight over the dispensing edge. Dispensing roller release button Press the button to release the dispensing roller. Fig. 6: Takeup Reel Wraps up the backing paper. Additional operating parts of the printer with dispenser.
05/08 Rev. AB OPERATOR’S HANDBOOK Getting Started 9844/9854 About the 9854 Dispenser (Peel) and Internal Liner Takeup The 9854 printer has an internal liner takeup reel, which allows labels to be dispensed (using the dispensing edge) or rewound inside the printer (using the deflector) after printing. After the printer is turned on, the takeup reel is initialized and the label material is stretched. If an error occurs, the takeup reel turns off automatically.
05/08 Rev. AB OPERATOR’S HANDBOOK Getting Started 9844/9854 Identifying Printer Connections ¯ CAUTION! - Only use approved add-on devices or damage to the printer may occur. « Only connect devices that fulfill SELV (Safety Extra-Low Voltage) circuit requirements to EN 60950. « Connect only original accessories. P Refer to the “Advanced Applications” section on your CD-ROM for more information about the 9854 network connection.
05/08 Rev. AB OPERATOR’S HANDBOOK Getting Started 9844/9854 Safety Information ! WARNING Keep hands clear of rollers. A5346 Fig. 9: Warning signs of the printer. The warning sign shown in Fig. 9 explains the risk of getting hands, fingers, loose clothing, jewelry, etc. caught between rotating parts of the printer. The warning sign shown in Fig. 9 warns of the risk of getting hands or fingers burned at hot surfaces close to the printhead. Plug the power supply into a grounded electrical outlet.
05/08 Rev. AB OPERATOR’S HANDBOOK Getting Started 9844/9854 Using the Control Panel (Display) Display Cut button Online button Feed button Prog button Fig. 10: Control panel Display With 32 digits and two lines, the display shows the operating conditions (modes) for parameters, values, status and errors. You can select the display language. Backlighting ensures good legibility. Button Functions The buttons offer a multitude of operating functions. A logical menu structure is used for operation.
05/08 Rev. AB OPERATOR’S HANDBOOK Getting Started 9844/9854 Operating Modes Offline Mode Display OFFLINE Meaning 0 JOBS No jobs are waiting to be processed. Tab. 1:Display in offline mode. Settings can be made when the printer is offline. The offline mode is normally active when the printer is turned on. Print jobs are received with the selected interface, but not processed.
05/08 Rev. AB OPERATOR’S HANDBOOK Getting Started 9844/9854 Standalone Mode (9854 only) In standalone mode, the print jobs are not transferred with a data cable, but are stored on a Compact Flash card. They are selected from the printer’s display or a keyboard connected to the printer. P Refer to the “Advanced Applications” section on your CD-ROM for more information on using standalone mode for the 9854 printer.
05/08 Rev. AB OPERATOR’S HANDBOOK Getting Started 9844/9854 Using the Printer Connecting the Printer WARNING! Touching live electrical parts causes exposure to hazardous electrical currents that may lead to burns! « Make sure the printer is turned off before connecting the power cable. « Only connect the printer to an electrical outlet that provides the correct voltage, which can be found on the rating plate. « Only connect the printer to a grounded electrical outlet fitted to authorized standards.
05/08 Rev. AB OPERATOR’S HANDBOOK Getting Started 9844/9854 Setting the Interface By factory default, the printer is set for data transfer using the Centronics interface. Print data can be transferred using the RS232, USB or Ethernet interface (9854 only). « Select the interface with the following parameter: Set INTERF. PARAM. > EASYPLUGINTERPR to Interface P Refer to the “Info-Printouts and Parameters” section on your CD-ROM for more information about setting parameters.
05/08 Rev. AB OPERATOR’S HANDBOOK Getting Started 9844/9854 Possible causes: – Material is not loaded, or the material’s end was not fixed to the takeup reel. Attach the end to the takeup reel and press Online. – The material is not stretched tightly. Press Online. The printer is now ready for the next print job.
05/08 Rev. AB OPERATOR’S HANDBOOK Getting Started 9844/9854 Configuring the Dispenser Position • Application A: The label is dispensed (peeled) so that a small portion still sticks to the backing paper above the dispensing edge. After the dispensed label is removed, the next label is immediately printed and dispensed. « Set DISPENSER PARA > Dispenseposition to –6.0 mm (set to –8.0 mm if the material is very adhesive). « Set DISPENSER PARA > Start Source to Light barrier.
05/08 Rev. AB OPERATOR’S HANDBOOK Getting Started 9844/9854 • Access the parameter menu: OFFLINE • Prog PRINT INFO Feed material until the next punch (die cut) is reached or when the button is held down: OFFLINE • x JOBS x JOBS OFFLINE feeding… Feed x JOBS Setting the label length automatically: OFFLINE x JOBS Feed Prog OFFLINE x JOBS Manual Calibrate After pressing the two buttons, the printer feeds the label material, until two punches have passed the label sensor.
05/08 Rev. AB OPERATOR’S HANDBOOK Getting Started 9844/9854 • • Continuing the print job: ONLINE X JOBS Stopped XXX ONLINE X JOBS Restcount XXX Feed Standalone operation (9854 only): Selecting a print job stored on a Compact Flash card (for example, Testdat.FOR): ONLINE x JOBS Online Prog Choose a file Testdat.FOR Creating a Print job There are two ways to create a print job: Use the Microsoft® Windows printer driver, or create a text file using print commands.
05/08 Rev. AB OPERATOR’S HANDBOOK Getting Started 9844/9854 Compact Flash Card You need the following to load a print job from a Compact Flash card: • • • • a 9854 printer a Compact Flash card (copy the print job to the \FORMATS directory) a computer with a PCMCIA drive and an adapter for the Compact Flash card. Rename the print job file on the Compact Flash card to autostrt.for so the printer recognizes it.
05/08 Rev. AB OPERATOR’S HANDBOOK Getting Started 9844/9854 Setting the Realtime Clock (9854 only) The 9854 printer’s realtime clock can be used to calculate and print the expiration date of perishable goods. To set the realtime clock: 1. Navigate to the parameter SYSTEM PARAMETERS > Realtime clock Realtime clock dd.mm.yyyy hh:mm dd=day, mm=month, yyyy=year, hh=hour, mm=minute 2. To enter the date and time, press Cut to shift the cursor, Feed to change the setting, and Online to save it.
05/08 Rev.
05/08 Rev. AB OPERATOR’S HANDBOOK Setup 9844/9854 Loading Diagrams The loading diagrams show the material and ribbon path through the printer. Material is wound with the labels facing outwards Ribbon is wound with the colored side facing inwards. 1 2 3 11 10 4 9 601 5 2 4 3 5 8 Bild_3/Z0194.cdr • • 7 Fig. 1: 6 Material and ribbon path in printer. No.
05/08 Rev. AB OPERATOR’S HANDBOOK Setup 9844/9854 9854 Printer with Internal Liner Takeup Reel (Rewinder) 1 2 3 15 14 4 13 5 601 5 2 4 3 Bild_3/Z0194.cdr 12 11 Fig. 2: 10 9 8 7 6 Material and ribbon path through printer with internal liner takeup. No.
05/08 Rev. AB OPERATOR’S HANDBOOK Setup 9844/9854 9854 Printer with Dispenser (Peel) 1 2 3 15 14 4 13 5 601 5 2 4 3 12 Bild_3/Z0194.cdr 11 10 Fig. 3: 9 8 7 6 Material and ribbon path through printer with dispenser (peel). No.
05/08 Rev. AB OPERATOR’S HANDBOOK Setup 9844/9854 Selecting Ribbon/Material About Material Use Monarch-approved material. See “Specifications” for more information. About Ribbons Use Monarch-approved ribbon. See “Specifications” for more information.
05/08 Rev. AB OPERATOR’S HANDBOOK Setup 9844/9854 Loading Material WARNING! Rotating axles! – Keep long hair, loose clothing, jewelry, etc. away from the printer! « Do not operate the printer with the cover open! « Be careful when touching the printhead. It may be hot. The printer can use both roll and fan-fold material. Follow these steps to load material. P See “Specifications” for more information about the media. 1. Open the cover. 1 2. Release the printhead pressure lever (1). 3.
05/08 Rev. AB OPERATOR’S HANDBOOK Setup 9844/9854 6. Push the material guide (5) up to the edge of the material, without pinching the material (Fig. 3). 3 7. Slide the light barrier fitting using the grip (6) until the pointer (7) is located above the material perforations (Fig. 4). 4 ¯ The optional reflex sensor is located 5mm to the right of the pointer below the material! 8. Thermodirect printing: Close the pressure lever. Thermotransfer printing: See “Loading Ribbon” to continue.
05/08 Rev. AB OPERATOR’S HANDBOOK Setup 9844/9854 Loading Fan-fold Material Follow these steps to load fan-fold material: 1. Open the cover. 2. Release the printhead pressure lever (1). 3. Position the fan-folded material behind the printer (Fig. 1). 1 4. Guide the material over the material unwinder. Push the material guide up to the edge of the material without pinching the material. 5.
05/08 Rev. AB OPERATOR’S HANDBOOK Setup 9844/9854 Loading the 9854 with the Internal Liner Takeup Reel 1. Follow the steps for loading material from the previous section. Then, follow these steps. 2. Thread the end of the material to the internal liner takeup reel (1) as shown and secure it with the clip (2) (Fig. 1). 3. Choose the rotation direction of the takeup reel (face inside or outside): Select parameter REWINDER PARA > Rewind direction.
05/08 Rev. AB OPERATOR’S HANDBOOK Setup 9844/9854 Dispensing (Peel) 9854 only 1. Follow the steps for loading material from the previous section. Then, follow these steps. 1 2. Remove the labels from the first 10 inches (25 mm) of backing paper (Fig. 1). 3. Press the red button (1) at the dispensing edge to release the peel roller (Fig. 1). 4. Remove the peel roller, feed the label web through as illustrated (Fig. 1) and press the roller back between its bearings. 5.
05/08 Rev. AB OPERATOR’S HANDBOOK 9844/9854 Loading a Ribbon WARNING! Rotating axles! – Keep long hair, loose clothing, jewelry, etc. away from the printer! « Do not operate the printer with the cover open! « Be careful when touching the printhead. It may be hot. ¯ Ribbon is only needed for the thermotransfer printing. 1. Open the cover. 2. Release the printhead pressure lever (1). 3. Push the ribbon roll onto the ribbon unwind reel (2) as far as it will go.
05/08 Rev. AB OPERATOR’S HANDBOOK 9844/9854 Quick ribbon exchange 1. Open the pressure lever (Fig. 1). 1 2. Remove both ribbon rolls from the ribbon reels. Remove the ribbon from underneath the printhead (Fig. 2). 2 Load the new ribbon as follows: 1. Push the ribbon, which is between the rolls, under the printhead (Fig. 2). 2. Push both ribbon rolls onto the ribbon reels as shown (Fig. 1).
05/08 Rev. AB OPERATOR’S HANDBOOK Setup 9844/9854 Material/Ribbon End Material Stock End If the material end has passed the material sensor, you see Status Material end 5002 « Release the pressure lever and pull the end of the remaining material from the front side of the printer. Ribbon End If the ribbon roll is emptied (the ribbon unwind reel is not turning), you see Status Ribbon end 5008 « See “Loading a Ribbon” to continue. ¯ Ribbon end detection can be turned off for theromodirect printing.
05/08 Rev. AB OPERATOR’S HANDBOOK Setup 9844/9854 Setting Printhead Support When printing narrow labels, the printhead may come into contact with the print roller where there is no material. This can lead to premature wear of the printhead and to different print intensity between the two edges of the label. ¯ When using narrow labels, enable the printhead support. Small = material width < printhead width. Change the printhead support by using the adjusting wheel (1).
05/08 Rev. AB OPERATOR’S HANDBOOK Setup 9844/9854 Setting the Material Parameters Use the following three parameters to set the material properties: Parameter Function PRINT PARAMETERS/ Material type Sets the material type (perforated or endless) PRINT PARAMETERS/ Material length Sets the material length PRINT PARAMETERS/ Material width Sets the material width SYSTEM PARAMETERS/ Sets the sensor type (reflex or transmission) Light sens based on the material (marks or . type perforations) Tab.
05/08 Rev.
05/08 Rev.
05/08 Rev. AB OPERATOR’S HANDBOOK Care & Maintenance 9844/9854 Care & Maintenance Regular maintenance is required to make sure the printer is always operating safely. Safety WARNING! Maintenance and cleaning may result in hazardous situations.
05/08 Rev. AB OPERATOR’S HANDBOOK Care & Maintenance 9844/9854 Cleaning the Printhead CAUTION! - The printhead is sensitive to static electricity, which can damage the printhead or reduce its life. Ground yourself by touching a metal surface, such as the printer’s metal base, before cleaning the printhead. « Do not use sharp objects to clean the printhead! You may need to clean the printhead when you see voids or streaks in the printing or notice uneven printing. 1. Turn off the printer. 2.
05/08 Rev. AB OPERATOR’S HANDBOOK 9844/9854 Replacing the Printhead 1 Fig. 1: Printhead (1) with bracket (2). CAUTION! - Printhead (1) and bracket (2) were adjusted exactly using special tools. 2 « Do not loosen the screws (3) attaching the printhead to the bracket. Removing the printhead: 1. Turn off the printer and disconnect the power supply. 2. Remove the material and ribbon. 3. Close the pressure lever (1). 4. Remove the two thumb screws (Fig. 1). 5. Open the pressure lever.
05/08 Rev. AB OPERATOR’S HANDBOOK 9844/9854 Cleaning the Print Roller 1 Clean the print roller when you see adhesive buildup or dirt on the roller. 1. Turn off the printer and disconnect the power supply. 2. Remove the material and ribbon. ¯ You can easily access the print roller if you remove the tear-off edge (1) first. 3. Remove the tear-off edge and unfasten the screw (2) in the middle of the tear-off edge with a size 10 Torx screwdriver (Fig. 2). 2 4.
05/08 Rev. AB OPERATOR’S HANDBOOK Care & Maintenance 9844/9854 Cleaning the Punch (Die Cut) Sensor 1 During printing, the punch sensor can become contaminated with lint and unable to sense material. 1. Remove the cover (1) gently and swivel downwards (Fig. 1). 2. Remove the sensor arm (2) (Fig. 2). 3. Clean the opening (3) with compressed air. ¯ The transmission sensor is located in the upper and the lower part of the sensor arm on a level with the indicator (4).
05/08 Rev.
05/08 Rev. AB OPERATOR’S HANDBOOK Specifications 9844/9854 Specifications Printers Height: 10.7 inches (272 mm) Width: 10.3 inches (260 mm) Depth: 18.2 inches (462 mm) Weight: 31 lb. (14 kg) 35 lb. (16 kg) with dispenser (peel) Operating Limits: 40° to 100°F (4° to 38°C) Storage: 24° to 140°F (-4° to 60°C) Humidity: 30% to 85% non-condensing Printhead: 203 dpi (8 dots per mm) or 300 dpi (12 dots per mm) Printing Method: Thermotransfer (ribbon) or Thermodirect Print Width: 4.
05/08 Rev. AB OPERATOR’S HANDBOOK Specifications 9844/9854 Supplies (Material) Width: 0.6 to 4.8 inches (15 to 120 mm) 1.2 to 4.3 inches (30 to 110 mm) - 9854 with dispenser Min. Length: 0.2 inches (5 mm) 1.2 inches (30 mm) - 9854 with dispenser Roll Diameter: 8.35 inches (210 mm) maximum outer diameter 4.9 inches (125 mm) - 9854 with liner takeup When selecting a material, note the following items: – The abrasiveness of the printing surface. – The chemical reaction when the ink is transferred.
05/08 Rev.
Visit www.monarch.com for sales, service, supplies, information, and telephone numbers for our locations throughout the world. TOLL FREE: 1-800-543-6650 (In the U.S.A.