Monarch® 939i™ Intelligent Keyboard TC0939iOI Rev. AF 12/07 ©2004 Paxar Americas, Inc. a subsidiary of Avery Dennison Corp. All rights reserved.
Each product and program carries a respective written warranty, the only warranty on which the customer can rely. Paxar reserves the right to make changes in the product, the programs, and their availability at any time and without notice. Although Paxar has made every effort to provide complete and accurate information in this manual, Paxar shall not be liable for any omissions or inaccuracies. Any update will be incorporated in a later edition of this manual. ©2004 Paxar Americas, Inc.
TA B L E O F C O N T E N T S GETTING STARTED. . . . . . . . . . . . . . . . . . . . . . . . . . . . . . . . . . . . . . . . . . . . . . . . . . . . . 1-1 Overview. . . . . . . . . . . . . . . . . . . . . . . . . . . . . . . . . . . . . . . . . . . . . . . . . . . . . . . Power-Up Modes . . . . . . . . . . . . . . . . . . . . . . . . . . . . . . . . . . . . . . . . . . . . . . . . About This Manual . . . . . . . . . . . . . . . . . . . . . . . . . . . . . . . . . . . . . . . . . . . . . . . About Scripts . .
SPECIFICATIONS & ACCESSORIES . . . . . . . . . . . . . . . . . . . . . . . . . . . . . . . . . . . . . . A-1 Accessories & Options. . . . . . . . . . . . . . . . . . . . . . . . . . . . . . . . . . . . . . . . . . . . A-1 Flat Surface Mount . . . . . . . . . . . . . . . . . . . . . . . . . . . . . . . . . . . . . . . A-2 Wall Mount. . . . . . . . . . . . . . . . . . . . . . . . . . . . . . . . . . . . . . . . . . . . . . A-3 CHARACTER SETS . . . . . . . . . . . . . . . . . . . . . . . . . . . . . . . . . .
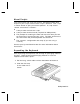
1 G E T T I N G S TA R T E D The Monarch® 939i keyboard allows you to easily configure the printer and enter batch data. The keyboard works with the Monarch® 9416®, 9825, 9855 and 9860 printers. This keyboard also works with non-Monarch printers. However, an auxiliary power supply is required for the keyboard. See Appendix A, "Specifications and Accessories" for the part number. This chapter includes information about N unpacking the keyboard. N connecting the cables. N power-up modes.
Throughout this manual, you will see references to the term "script." The script is the program that runs on the keyboard to perform a specific task, such as scanning or collecting data. Monarch® offers custom script writing. Contact your Monarch Representative for information and pricing on custom scripts. Power-Up Modes Your 939i keyboard has the ability to operate in "terminal" mode or in "intelligent" mode (using a custom ADK2 script). Terminal mode is only available with the 9855 and 9860 printers.
About Scripts This manual does not cover any specific information about what may be in your script, because each script is different. Your script is written based on jobs you need to perform. A script should contain several basics features: N A way to enter and exit the script. N A way to enter terminal mode (required for 9860 printer). N The prompts for entering the date and time each time you turn on the printer if required by your script.
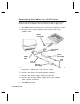
Connecting the Cables to a 9416 Printer When using the keyboard with the Monarch® 9416® printer, the keyboard receives power from the auxiliary power supply (5V). 1. Turn OFF the printer before you connect the keyboard’s cable. 2. Plug the 9-pin coiled keyboard cable into the end of the adaptor cable. Optional Scanner Cable Keyboard cable goes here Printer’s Power Supply Adaptor Cable Power Connector Keyboard’s Power Supply Power Cords 3.
Connecting the Cables to a 9825 Printer When using the keyboard with a Monarch® 9825 printer, the keyboard receives power from the auxiliary power supply. 1. Turn OFF the printer before you connect the keyboard’s cable. 2. Plug the 9-pin coiled keyboard cable into the adaptor cable. 3. Plug the 25-pin serial cable into the back of the printer. 4. Tighten the screws on the cables. 5. Plug the auxiliary power supply into the adaptor cable as shown. Auxiliary Power Supply 6.
Connecting the Cables to a 9855/9860 Printer When using the keyboard with a Monarch® 9855 or 9860 printer, the keyboard receives power from the printer. 1. Turn OFF the printer before you connect the keyboard’s cable. 2. Plug the 9-pin coiled keyboard cable into the back of the printer. Keyboard Cable Goes Here ON/OFF Switch 3. Tighten the screws on the cable to secure the cable to the printer. 4. Turn ON the printer. On the back of the printer, press (I) to turn on and (O) to turn off the printer.
Connecting the Scanner’s Cables A scanner is optional for the keyboard. You need to connect the cable to the scanner and keyboard before you can use it. The scanner receives power through the keyboard. For more information about the scanner or other peripheral devices, refer to their User Manuals. 1. Turn OFF the printer before you connect the scanner’s cable. 2. Reach into the bottom of the keyboard’s base and locate the keyboard’s auxiliary serial port, which is on a short, straight cable as shown. 3.
7. Tuck the connectors into the keyboard’s base if necessary. 8. Turn ON the printer. Press (I) to turn on and (O) to turn off the printer. Using the Keyboard The keyboard has full alphabetic keys with 10 numeric keys, 5 function keys, 4 arrow keys, and several special keys.
Control Keys P, F, and C operate as described in terminal mode. Depending on your script, those buttons may function differently. E Escape. Returns the display to the previous menu or clears an error. C Clear. Clears the entire field. P Pause. Interrupts printing. Press Pause again to resume printing. F Feed. Feeds a blank label if there is no print job. Prints a label in on-demand mode. C Cut. Cuts the supply. L R Displays menu items and allows you to move the cursor.
1-10 Getting Started
2 S E T T I N G B AT C H O P T I O N S This chapter only applies when using the keyboard in terminal mode. When using the keyboard in intelligent mode, your script controls the prompts you see and each script is different. You can select Batch Options to change which prompts appear during Batch Entry mode and set default values for those prompts. Customizing which prompts appear during batch entry can reduce the time it takes to enter data for a format.
Setting Prompts and Defaults Use the following steps to customize which prompts appear during batch entry and to specify defaults for these prompts. 1. Press N at the Main menu, when you see Batch Options. If you have password protection enabled, you will see Enter Password: _______ 2. Press F three times and then press N. Clear Fields? Prompt? Yes 3. Decide if you want to see this prompt in Batch Entry mode and press either l or r to display your selection. Press N. Clear Fields? No r 4.
Cut Option Prompt? Yes 7. Decide if you want to see this prompt in Batch Entry mode and press either l or r to display your selection. Press N. Cut Option No r 8. Decide if you want to change the default (No) and press either l or r to display your selection. Press N. Cut Multiple Prompt? Yes 9. Decide if you want to see this prompt in Batch Entry mode and press either l or r to display your selection. Press N. Cut Multiple 1________ 10.
12. Decide if you want to change the default (No) and press either l or r to display your selection. If you select "Yes," the last tag in the batch is cut. The printer must feed one or two tags past the printhead to cut the last tag in the batch. Press N. Cut After Batch? Prompt? Yes 13. Decide if you want to see this prompt in Batch Entry mode and press either l or r to display your selection. If you select "Yes," the last tag in the batch is cut.
Quantity? Prompt? Yes 17. Decide if you want to see this prompt in Batch Entry mode and press either l or r to display your selection. Press N. Quantity 1________ 18. Decide if you want to change the default (1) for the quantity of tags to print in a batch. Enter a quantity (1-32000). Press N. After setting the batch options, you are ready to use Batch Entry mode to enter data for your formats. See Chapter 3, "Entering Batch Data," for more information.
3. Decide if you want to see this prompt in Batch Entry mode and press either l or r to display your selection. Press N. Quantity 1________ 4. Decide if you want to change the default (1) for the quantity of tags to print in a batch. Enter a quantity (1-32000). Press N. After setting the batch options, you are ready to use Batch Entry mode to enter data for your formats. See Chapter 3, "Entering Batch Data," for more information.
Print Multiple Number of copies of each tag to print as a set within a batch. A print multiple of one prints one set of one tag. A print multiple of three prints three copies of each tag as a set. If the print multiple is three and the print quantity is 15, then 15 sets of tags with three tags per set are printed (45 tags). If the print multiple is two and the print quantity is four, then four sets of tags with two tags per set are printed (8 tags).
2-8 Setting Batch Options
3 E N T E R I N G B AT C H D ATA This chapter only applies when using the keyboard in terminal mode. When using the keyboard in intelligent mode, your script controls the prompts you see and each script is different. This chapter explains how to enter batch data from the keyboard. You can enter numbers, letters, and a variety of symbols (including punctuation and international characters) from the keyboard. See Appendix B, "Character Sets" for information about international characters.
When a field has fixed characters, they appear as part of the data entry prompt. The fixed data stays the same, and prints on every tag that uses the format. Only the data you enter can be changed. In the example below, the first six digits are fixed characters. UPCA Barcode: 004156 _ _ _ _ _ The printed field contains both the fixed characters and the data you enter. Entering a Batch Batch Entry lets you enter the data to print a batch (or batches) of supplies.
5. Depending on your settings in Batch Options, you may see Clear Fields? No r N Press N (No) to keep the old data. Each field appears with the previous data. You can press N to accept the data, or change it and press N. N Press R then press N (Yes) to erase the old data. Each field appears with blanks (underscores). You have to enter new data for each field. 6. You will see the first prompt for the format. For example Color: ________ 7. Type Red and press N. Price: ________ 8. Type $99.
You may see Number of parts? [1/5]: _ 11. Type the number of times the data prints across the tag width. Press N. Cut Option No r N If your printer has a knife and you want to cut tags, press R to display "Yes" and press N. N If your printer does not have a knife, the Cut Option prompt does not appear. See "Printing Tags Without Cutting" for more information. If you answered "Yes" to the cut option, you have several cut modes to select from.
If you do not specify a cut mode (cut last ticket, cut after batch, or no cut before), the knife cuts after each tag. This is the same as cut mode 1. The knife uses the last selected cut mode. For example, if you select "Cut Last Ticket" and then select "Yes" to "Cut After Batch," the knife only cuts after each batch instead of after the last tag in the batch. Cut multiple [1/32000]: 1 _ _ _ _ 12. Type the number of tags to print before cutting and press N, or accept the default value of 1 by pressing N.
15. If you do not want to cut before the first tag in a batch, press R to display "Yes" and press N. The knife does not cut before the first tag in a batch, but does cut between each tag and after the last tag in a batch. This is the same as cut mode 4. Quantity [1/32000]: 1 _ _ _ _ 16. Type the number of tags or sets of tags you want to print in this batch and press N. A cut multiple of two with a batch quantity of 30 prints 30 tags (15 sets of two tags). Print Now? No r 17.
P r i n t i n g Ta g s W i t h o u t C u t t i n g Depending on your settings in Batch Options, some of these prompts may or may not appear. See Chapter 2, "Setting Batch Options" for more information. If you answered "No" to the cut option, you may see Print Multiple [1/32000]: _ _ _ _ _ 1. Type the number of copies of each tag to print as a set within a batch. If you want three copies of each tag, use a print multiple of 3. Press N. Quantity [1/32000]: _ _ _ _ _ 2.
Using Print Multiple with Inc/Dec Fields If your tag has an incrementing or decrementing field, the print multiple is the number of tags printed as a set before incrementing or decrementing. If the incrementing field is set to 10, the print multiple is 2, and the print quantity is 2, then four tags are printed. Two tags print "10" in the incrementing field, the other two tags print "11" in the incrementing field.
Three-part tag (number of parts = 3) Cut here for a cut multiple of 1 (Cut after one tag) OR Print multiple = 1 (Prints one tag as a set) Cut here for a cut multiple of 2 (Cut after two tags) OR Print multiple = 2 (Prints two tags as a set) Entering Batch Data 3-9
3-10 Entering Batch Data
4 TROUBLESHOOTING This chapter provides solutions to keyboard problems and explains common status code messages you may receive when using the keyboard. Problem The keyboard display is blank. The data you entered is not accepted. Your data was not accepted and blanks are still showing. You entered an incorrect check digit. You tried to skip a required field. Letters are not in the expected case. Monetary symbols do not print as expected. Script is not running. Scanner does not work.
4-2 Troubleshooting
A S P E C I F I C AT I O N S & ACCESSORIES Height: 4.0 inches (102 mm) Width: 8.25 inches (210 mm) Depth: 8.75 inches (222 mm) Weight: 2.33 lbs. (1.06 kg) Shipping Weight: 3.4 lbs. (1.5 kg) Power Source: Supplied by printer or auxiliary power supply (5V) Memory: Flash; 128K maximum for scripts; 256K maximum for data collection and lookup files. There is no battery-backed RAM. Operating Limits: 40° to 104° F (4° to 40° C) See your printer’s documentation for the printer’s operating range.
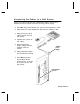
Flat Surface Mount Make sure all surfaces you apply the dual lock fasteners to are free from dirt and oil. If necessary, clean with isopropyl alcohol. 1. Pull the cord through the large hole in the stand. 2. Set the keyboard into the stand. 3. Attach either the rubber pads or dual lock fasteners to the base of the keyboard stand. If using the dual lock fasteners, attach the other side of the fastener to the tabletop. To remove the keyboard from the stand, lift the keyboard from the bottom.
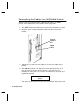
Wa l l M o u n t 1. Hold the bottom of the stand against the wall (hinge side up). Mark the mounting holes with a pencil. 2. Screw the stand onto the wall (screws not included). 3. Pull the cord through the large hole in the stand. 4. Set the keyboard into the stand. To remove the keyboard from the stand, lift the keyboard from the bottom.
A-4 Specifications & Accessories
B CHARACTER SETS This appendix contains a listing of the symbol sets and code pages the printer supports. Supported Symbol Sets and Code Pages The CG Triumvirate typefaces support only the ANSI and DOS Code Page 437 and 850 Symbol Sets. These fonts print a slashed zero when using the ANSI symbol set. However, the scalable font does not print a slashed zero or support Code Page 1256 (Arabic).
Internal (Standard and Reduced Font) B-2 Character Sets
Bold Character Sets B-3
ANSI B-4 Character Sets
Code Page 437 Character Sets B-5
Code Page 850 B-6 Character Sets
CONFIGURING THE SYSTEM C This chapter contains information useful for your System Administrator: N Accessing the Keyboard’s Main Menu. N Operating in Script Mode. N Configuring the Scanner. Accessing the Keyboard’s Main Menu The Keyboard’s Main Menu allows you to load scripts, setup communication parameters, and select a display language for the Keyboard’s Main Menu. Changing a display language does not change the language of any script messages.
About the Scanner A scanner is optional for the keyboard. For more information about the scanner or other peripheral devices, refer to their User Manuals. Use this section to N operate the scanner. N troubleshoot the scanner. N clean the scanner’s window. N configure the scanner. Your ADK script should already be written to enable and configure the scanner for you. The scanner must be connected before you can use it. See "Connecting the Scanner’s Cables" in Chapter 1 for more information.
Tr o u b l e s h o o t i n g t h e S c a n n e r If the bar code does not scan: N Change the scanner’s angle slightly and try again. N Move the scanner four to eight inches away from the bar code. Adjust this distance as needed to find the correct distance. N Try scanning another bar code that you have scanned successfully. If that scan is successful, the scanning problem may be with the bar code. N Move to a more dimly lit area. N Ensure there are no voids (streaks) in the bar code symbol.
Configuring the Scanner The scanner may already be configured to work with your ADK script. If not, use these bar codes to configure the scanner: N Reset to default values. N Set the communication port to match the keyboard’s settings. N Set the minimum bar code width (if necessary). For additional bar codes to program your scanner, refer to your scanner’s Installation and User’s Guide for more information.
Set the Communications Port Defaults To set the communications port to the same defaults as the keyboard, scan the following series of bar codes, one at a time, from top to bottom.
You can also set the communication values by using the Keyboard’s Main Menu. The keyboard defaults are 9600 Baud, 8-bit Word Length, 2 Stop Bits, No Parity, and No Flow Control. 1. Press X on the keyboard within the first two seconds when the printer/keyboard are turned on to see the Keyboard’s Main Menu. 2. Select Setup. Press L or R until you see SETUP l COM2 (Scanner) r 3. Press Enter. You see a list of communication options to change (Baud Rate, Word Length, Stop Bits, Parity, and Flow Control).
Set the Minimum Bar Code Width To scan single-digit bar codes, scan the following series of bar codes, one at a time, from top to bottom.
C-8 Configuring the System