8/04/2013 Paxton Ins-30116 Easyprox nano starter kit Technical Support 01273 811011 support@paxton.co.uk Technical help is available: Monday - Friday from 07:00 - 19:00 (GMT) Saturday from 09:00 - 13:00 (GMT) Documentation on all Paxton products can be found on our website - http://www.paxton.co.
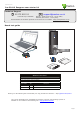
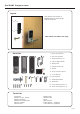
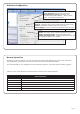
Identify the parts. 3 6 4 1 Paxton Access This battery pack is to be replaced with Paxton Access part number 746-003 only. 2 6V 5 1 2 3 4 5 6 - Front lock assembly Handle Net2Air dongle User tokens Battery pack Desktop reader (underneath main packaging) Setting up the PC 1. 2. 3. 4. Pax to n Ac cess 5. 6. 7. Net2 Access Control 8. Net2 Logon Log onto Page User name: Net2 Password: Net2 OK Cancel 9. s 09:00 Plug the dongle into a spare USB port.
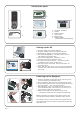
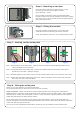
Enrolling the Easyprox 1. 2. 3. 4. With the Net2 software running, click on the Doors icon to display the Doors screen. Present the user card previously enrolled with the desktop reader to Easyprox. The unit will beep and the LED will flash Blue to show Net2Air communications are taking place. Watch the doors screen. The Easyprox will appear as a new door. Any updates for the lock will now be transmitted. - Wait for this to complete. 5. If this fails to happen, move the Easyprox closer to the dongle.
The following pages contain the full instruction issued with the Easyprox nano. It includes the following procedures: - Mounting Easyprox on a door. Commissioning. Software configuration. LED and alarm indications. Detailed server operation. Battery replacement. Flat battery recovery. The installation requires Net2Air bridge units to achieve the wireless range necessary for reliable communication. The specification table relates to these bridge devices.
Ins-30107 Easyprox nano Layout This wireless unit requires a Net2Air bridge to communicate with the server PC. This unit is for indoor use only.
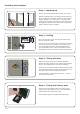
Installing the hardware Step 1 - Marking out Decide on the lock height and mark this on the door. Fold the template along one dotted line and tape it to the door with the 'Centreline of Latch' at the required height. Mark the 4 x 10 mm and 1 x 25 mm holes. Remove the template, fold along the other dotted line and apply it to the other side of the door at the same height. Mark the holes as before. 80 Step 2 - Drilling 25 57 Drill a 25 mm hole in the door edge at least 80 mm deep to accept the latch.
Step 5 - Mounting on the door Select the short (doors thinner than 45 mm) or long mounting screws and cut to length if required. (door thickness + 5 mm) Fit the rubber escutcheons to the front and back plates. Present the front and rear lock assembly to the door, locating the square drive in its recess and join the two parts together with 4 mounting screws. Step 6 - Fitting the handles Fit the two handles, positioning the screw holes to the underside and secure with the grub screws provided.
Commissioning checks With the product fixed securely to the door: 1) Extend the door open time by changing this door's settings on the Net2 PC. Set ' Door open time' to 20 seconds and then present a user card at the door. Before each check, present a user card to unlock the door.
Software Configuration Door name: Name the Door. Door open time: Set the door open time. Unlock the Door during: Holds the door unlocked during this timezone. - Set to 'At No Time' for normal user operation. Reader: Local settings for the reader. Output: Configures the lock for timed release or toggle mode. Events: Shows the events for this control unit only. Access Rights: Lists users who have access through this door. Name: The reader can be named individually if required.
Net2Air wireless communication The access control unit connects to the Net2 system using Paxton Net2Air proprietary wireless technology through a Net2Air bridge. Radio signals do not always behave as you might expect. For example, a mobile phone that displays a full signal on one part of the site will lose signal completely only a few metres away. See also: XAN1095 - Net2 wireless access control - How does it work? < http://paxton.
Low battery warning When the battery voltage falls below 4V, the user will see a delay between the card being read and access being granted. This delay provides a warning that the battery pack should be replaced. The warning delay starts at 2 seconds, increasing up to 10 seconds as the battery discharges with use. Battery replacement 1. 2. 3. 4. Remove the unit from the door by removing the 4 securing screws on the rear lock assembly. Remove the top two standoff screws - Fig 1.
Specifications Features Min Number of Cards Access levels 250 Time zones Maximum door open time Max 10,000 64 1 sec 99,999 sec 10 ACU's per Net2Air bridge - Recommended 100 Net2Air bridge per system Net2Air wireless range 20 m Events stored in ACU with no server connection 4,096 Read Range Environment Operating temperature - Battery limits Token Keyfob 50 mm 30 mm Min Max 0 °C + 55 °C Waterproof No Vandal resistance Low Paxton Battery Pack Battery type - High capacity (746-003) Ty