
Integration Guide
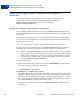

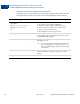
Table Of Contents
- Digital Goods Integration Guide - EC Edition
- Contents
- Preface
- Introducing Digital Goods for Express Checkout
- Integrating Digital Goods for Express Checkout
- Issuing Refunds
- Handling Recurring Payments
- How Recurring Payments Work
- Recurring Payments Terms
- Options for Creating a Recurring Payments Profile
- Recurring Payments With the Express Checkout API
- Recurring Payments Profile Status
- Getting Recurring Payments Profile Information
- Modifying a Recurring Payments Profile
- Billing the Outstanding Amount of a Profile
- Recurring Payments Notifications
- Options For Closing the Lightbox or Mini-browser
- Methods For Integrating Digital Goods Into Flash
- Express Checkout API Fields Supported By Digital Goods
- Revision History

Digital Goods Integration Guide - EC Edition January 2012 21
Integrating Digital Goods for Express Checkout
Overview of Digital Goods Integration
2
The numbers in the figure correspond to the following steps:
1. Add the dg.js JavaScript (provided by PayPal) to the webpage on which you implement
the Pay With PayPal button. This script manages the PayPal digital goods payments flow.
This flow appears in a lightbox overlaying your webpage.
2. Place the Pay With PayPal button on the same webpage on which you add the dg.js
script.
3. When the buyer clicks Pay With PayPal, call the SetExpressCheckout API operation.
NOTE: Make sure that your API version is 65.1 or greater for each PayPal API call that
you make.
Pass details of the items purchased and other parameter fields required in digital goods
transactions. See “Setting Up A Digital Goods Payment Transaction” on page 22for
details.
4. A successful response returns a token to identify the digital goods transaction. You pass the
token in subsequent Express Checkout API operations related to this transaction.
5. Redirect the buyer to the digital goods flow. Append the token returned in the
SetExpressCheckout response to the redirect URL.
If this is the first time the buyer is purchasing digital goods on your page, a mini-browser
displays that lets the buyer log in to PayPal and initiate approval for the payment.
6. After the buyer clicks Pay to approve or cancel, PayPal redirects the buyer to the respective
return or cancel URL page on your site. PayPal passes the token and the buyer’s Payer ID
with the redirect.
7. If the buyer approves payment, you can optionally call GetExpressCheckoutDetails
to obtain buyer details to display to your webpage.
8. If the buyer approves payment, call DoExpressCheckoutPayment to complete the
payment, including the details of the items purchased.
9. Add JavaScript code to your return and cancel URL pages to close the digital goods
lightbox.
10.Fulfill the buyer’s order from your webpage.
Download the digital goods and provide a purchase confirmation.
NOTE: Make sure that you test your integration before taking your pages live.