
User's Guide
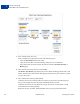

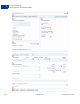
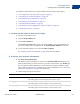
Table Of Contents
- Invoicing User’s Guide
- Contents
- Preface
- About Invoicing
- Creating Invoices
- Managing Your Invoices
- Managing Invoice Payments
- Customizing Your Invoice Information
- Working with Invoice Templates
- Working with the Address Book
- Working with Saved Items
- Managing Your Tax Information
- Invoice Administration

Invoicing User’s Guide September 2010 13
About Invoicing
Accessing PayPal Invoicing
1
4. Your customer reviews and approves the payment.
The Review your payment page displays a summary of the payment information. Your
customers click Pay Now to finalize payments.
5. Your customer receives verification of the completed payment.
A final page displays the transaction ID for the payment and an order summary email is
sent to your customer.
PayPal account holders can see invoice and payment details through their Account
Overview or History pages.
Accessing PayPal Invoicing
You access PayPal Invoicing by clicking the Request Money tab in your PayPal account.
Request Money displays the Request Money subtab and three invoicing subtabs.
NOTE: The Request Money feature is not an invoicing component and is not included in this
guide.
Use the following subtabs to access invoicing components:
Manage Invoices: Opens the Manage Invoices page.
Use this page to review your invoices, search for invoices, and perform invoice actions.
See “Managing Your Invoices” on page 35 for information about this page and how to use
it.
Create Invoice: Opens the Create a new invoice page.
Use this page to create an invoice or save an invoice as a template. Also, you can save
information to your Invoice Settings, such as customer contact information, to use again
later.
See “Creating Invoices” on page 15 to learn how to create invoices.
Invoice Settings: Opens the Enter your contact information page with an Invoice
Settings navigation box on the left.
Invoice Settings lets you save your invoice contact information and logo, your payment
logo, tax information, items to invoice, invoice templates, and customer contact
information. Use the Invoice Settings navigation box to open one of these pages. For
example, click Address book to open the Address book page.
See the following sections to learn about Invoice Settings.
– “Customizing Your Invoice Information” on page 69
– “Working with Invoice Templates” on page 83
– “Working with the Address Book” on page 103
– “Working with Saved Items” on page 119
– “Managing Your Tax Information” on page 127